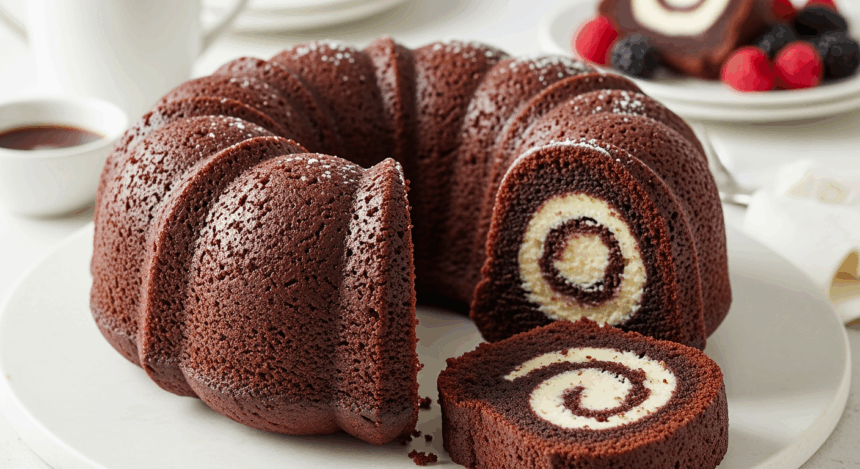
Listen, if there’s one thing I know about life, it’s that sometimes you just need to faceplant into a slice of cake that’s essentially two desserts in one. Enter this Chocolate Bundt Cake with Cheesecake Filling – the dessert equivalent of finding money in your pocket you forgot about. It’s chocolatey, it’s creamy, it’s basically therapy in food form.
Why This Recipe is Awesome
Let me count the ways this cake will change your life (or at least your weekend). First, it’s a total show-stopper that looks like you spent hours slaving away, when really you were just watching Netflix while things baked. Second, that surprise cheesecake filling? Pure genius. It’s like the dessert version of a Russian nesting doll – delightful surprises all the way through.
But honestly, the best part? When someone asks, “Did you MAKE this?” you get to casually shrug like it’s no big deal while internally high-fiving yourself. This recipe perfectly balances impressive results with actually doable steps – which is basically the holy grail of home baking.
Ingredients You’ll Need
For the Chocolate Bundt Cake:
- 2½ cups all-purpose flour (the regular stuff, nothing fancy)
- 1 cup unsweetened cocoa powder (the darker the better, like your Netflix shows)
- 2 cups granulated sugar (because adulting is hard enough)
- 1 cup butter, softened (real butter, please – this isn’t the time to count calories)
- 4 large eggs (room temperature, like nature intended)
- 1 cup sour cream (the secret to moisture, don’t @ me)
- ½ cup milk (whatever’s in your fridge is fine)
- 2 tsp vanilla extract (the real stuff, not that imitation nonsense)
- 2 tsp baking powder (check the expiration date, you know it’s been sitting there forever)
- ½ tsp baking soda (the box in your fridge doesn’t count)
- ½ tsp salt (just a pinch, like your budget)
For the Cheesecake Filling:
- 16 oz cream cheese, softened (full-fat because YOLO)
- ½ cup granulated sugar (sweetness is non-negotiable here)
- 1 large egg (the binding agent that holds this filling – and frankly, all of us – together)
- 1 tsp vanilla extract (again, the real stuff)
- 2 tbsp all-purpose flour (just a smidge)
For the Chocolate Ganache Topping (optional, but who are we kidding):
- 1 cup semi-sweet chocolate chips (the good ones, treat yourself)
- ½ cup heavy cream (calories don’t count when you’re creating art)
- 1 tbsp butter (for that extra shine, like your forehead after baking)
Step-by-Step Instructions
- Prep mode: Preheat your oven to 350°F (175°C). Generously grease a 10-inch Bundt pan like your life depends on it. Seriously, don’t skimp on the greasing unless you enjoy cake permanently fused to your pan.
- Make the cheesecake filling: Beat cream cheese and sugar until smooth and fluffy. Add egg, vanilla, and flour, mixing until just combined. Set aside and try not to eat it with a spoon.
- Start the cake batter: In a large bowl, whisk together flour, cocoa powder, baking powder, baking soda, and salt. Set aside and admire your whisking skills.
- Cream it up: In another bowl, beat butter and sugar until light and fluffy (about 3 minutes). This is your arm workout for the day, you’re welcome.
- Egg time: Add eggs one at a time, beating well after each addition. Mix in vanilla. Your batter should now look glossy and gorgeous.
- Wet meets dry: Gradually add the dry ingredients to the butter mixture, alternating with sour cream and milk. Begin and end with dry ingredients. Mix just until combined – overmixing is the enemy of tender cake.
- The layering magic: Pour two-thirds of the chocolate batter into the prepared Bundt pan. Spoon the cheesecake filling in a ring over the batter, keeping it away from the edges of the pan. Top with the remaining chocolate batter, covering the filling completely.
- Bake it baby: Bake for 50-60 minutes, or until a toothpick inserted comes out mostly clean. Cool in the pan for 15 minutes, then invert onto a wire rack to cool completely. Cross your fingers for clean release (we’ve all been there).
- Ganache time (optional but encouraged): Place chocolate chips in a heatproof bowl. Heat cream until just simmering, then pour over chocolate. Let sit for 2 minutes, then stir until smooth. Add butter and stir until glossy. Drizzle over cooled cake like you’re on a baking show.
- The hardest step: Wait until completely cool before slicing. I know, it’s torture, but patience is a virtue or whatever.
Common Mistakes to Avoid
Skimping on the pan prep: Listen, I don’t care if your Bundt pan claims to be non-stick. Grease it like you’re buttering a Thanksgiving turkey. Nothing ruins the cake experience faster than leaving half of it stuck in the pan.
Opening the oven door too early: I know you’re excited, but that cake needs consistent heat. Every time you peek, you’re letting out heat and potentially causing your cake to sink faster than my motivation on Monday mornings.
Mixing the batter to death: You’re making cake, not cement. Once the flour hits the wet ingredients, mix just until combined. Overmixing activates gluten which leads to tough cake, and nobody wants that kind of negativity in their life.
Not cooling properly before ganache-ing: Hot cake + ganache = messy puddle of chocolate. Have some self-control and let the cake cool completely. Your Instagram photos will thank you.
Alternatives & Substitutions
Dietary adjustments: Need to make this gluten-free? Swap in your favorite cup-for-cup gluten-free flour blend. The cake structure might be slightly different, but it’ll still be delicious. For dairy-free versions, vegan cream cheese and plant-based butter can work, but TBH the texture won’t be identical.
Flavor twists: Add 1 tsp of espresso powder to the chocolate batter to make the chocolate flavor pop even more. Trust me, it doesn’t make the cake taste like coffee – it’s just chocolate’s best hype man.
Filling variations: Not a plain cheesecake fan? Add lemon zest, mini chocolate chips, or a swirl of raspberry preserves to your cheesecake filling. Or go wild and make it peanut butter cheesecake by adding ¼ cup of creamy peanut butter to the filling.
No Bundt pan? You can make this in two 9-inch round pans instead. Reduce baking time to about 30-35 minutes and layer with the cheesecake filling in the middle. It won’t have that fancy Bundt shape, but it’ll still taste like heaven.
FAQ (Frequently Asked Questions)
Can I make this ahead of time?
Absolutely! This cake actually tastes better on day two when the flavors have had time to mingle. Store it covered at room temperature for up to 2 days, or refrigerate for up to 5 days. Just let it come to room temp before serving – cold cake is sad cake.
My ganache split! What did I do wrong?
Probably added too much heat, you eager beaver. If your ganache looks grainy or oily, whisk in 1-2 tablespoons of warm milk until it comes back together. Crisis averted!
Can I freeze this masterpiece?
You bet! Wrap it well in plastic wrap and then aluminum foil, and freeze for up to 3 months. Thaw overnight in the refrigerator. Maybe save the ganache for after thawing though – fresh ganache is worth the extra step.
Why did my cake crack on top?
Probably because your oven runs hot or the cake is slightly overbaked. But hey, that’s what ganache is for – concealing evidence of baking crimes.
Do I really need room temperature ingredients?
I mean, technically you can use cold ingredients if you enjoy playing kitchen roulette. Room temp ingredients incorporate better and create a smoother batter. Cold ingredients = potential lumps and uneven mixing. Your choice, friend.
My cheesecake filling leaked into the chocolate! Is it ruined?
Nope! You’ve just accidentally created a marbled cake. Call it “rustic” and pretend you meant to do it all along. It’ll still taste amazing.
Final Thoughts
Look, we both know this isn’t an everyday cake. This is a “someone special is coming over” cake. An “I need to impress my in-laws” cake. A “treat myself because I survived another week” cake. But that’s precisely why it’s worth making.
The beauty of this recipe is in the contrasts – the tender chocolate cake against the creamy cheesecake center, the simplicity of the ingredients versus the impressiveness of the final product. It’s the culinary equivalent of looking effortlessly chic while secretly wearing stretchy pants.
So go ahead, make this cake. Slice it thick. Take a picture (or don’t – sometimes the best desserts never make it to social media). And remember: calories consumed while baking are just the chef’s tax – they definitely don’t count. Happy baking, friend!
