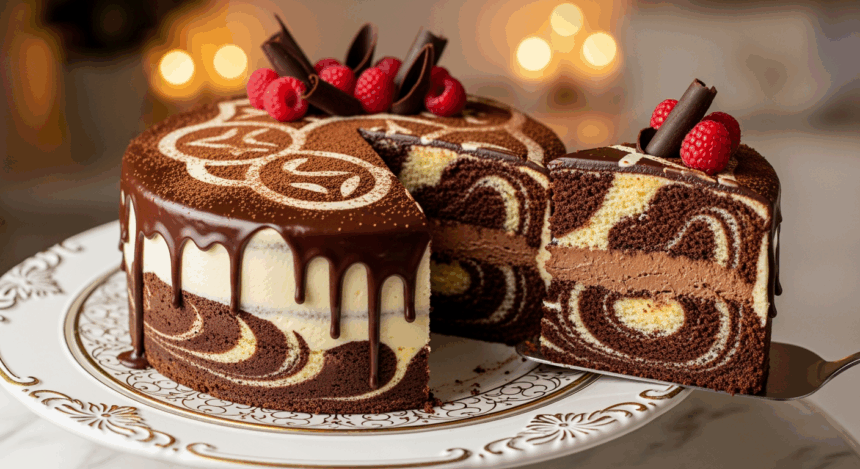
Hey there, dessert adventurer! So you’re thinking about making a marble cake with chocolate mousse filling, huh? Let me tell you, you’re about to embark on a journey that will make your taste buds do the happy dance and your friends think you’ve secretly been taking professional baking classes. This isn’t just any cake—it’s the “make everyone think you’re a genius in the kitchen while actually being pretty straightforward” kind of cake.
Why This Recipe is Awesome
First of all, this marble cake with chocolate mousse filling is basically the mullet of desserts: business on the outside, party on the inside. The classic marble cake exterior gives you those gorgeous swirls that look impressive with minimal effort (we love a low-effort showstopper), while the chocolate mousse center is like finding money in your old jeans pocket—an unexpected delight that makes everything better.
Plus, this recipe is surprisingly forgiving. Had a couple glasses of wine while baking? No problem! As long as you can still read the measuring cups, you’re golden. And the best part? People think it took you hours, when really you were just vibing to your playlist and occasionally stirring things.
Ingredients You’ll Need
For the Marble Cake:
- 2½ cups all-purpose flour (the regular stuff, nothing fancy)
- 1 tablespoon baking powder (yes, tablespoon—this isn’t a typo)
- ½ teaspoon salt (just a pinch to make the sweet stuff taste sweeter)
- 1 cup unsalted butter, softened (like, actually soft—not that cold-but-I’m-impatient situation)
- 2 cups granulated sugar (because adulting means you can use as much sugar as you want)
- 4 large eggs (from happy chickens, ideally)
- 1 tablespoon vanilla extract (the real stuff, not that imitation nonsense)
- 1 cup milk (cow, almond, oat—you do you)
- ¼ cup unsweetened cocoa powder (the good kind that doesn’t clump)
- 2 tablespoons hot water (from your tap, nothing special)
For the Chocolate Mousse Filling:
- 8 oz semisweet chocolate chips (or just chop up a chocolate bar if you’re feeling fancy)
- 2 cups heavy whipping cream, divided (because we’re not counting calories today)
- ¼ cup powdered sugar (the stuff that always creates a mini snowstorm in your kitchen)
- 1 teaspoon vanilla extract (again, the real deal)
- Pinch of salt (trust me on this one)
Step-by-Step Instructions
For the Marble Cake:
- Preheat your oven to 350°F (175°C). Don’t skip this step, even though it’s tempting. Grease and flour two 9-inch round cake pans like your success depends on it (because it kinda does).
- In a medium bowl, whisk together the flour, baking powder, and salt. Set aside and resist the urge to sample the raw flour (weird craving, but we’ve all been there).
- In a large bowl, beat the butter until it’s creamy—about 1 minute. Add the sugar and beat until fluffy and lighter in color (about 3-4 minutes). This is not the time to rush. Let that mixer do its thing!
- Add eggs one at a time, beating well after each addition. Splash in the vanilla. Your batter should look somewhat like a weird smoothie at this point.
- Gradually add the flour mixture to the butter mixture, alternating with milk. Start and end with the flour (flour, milk, flour, milk, flour). Mix until just combined—overmixing is the enemy here.
- In a small bowl, stir together cocoa powder and hot water until smooth. Take about 1/3 of your batter and mix it with the cocoa mixture.
- Now for the fun part! Dollop alternating spoonfuls of vanilla and chocolate batter into your prepared pans. Take a knife and swirl it through the batters to create that marble effect. Don’t overdo it, or you’ll just end up with brown batter!
- Bake for 25-30 minutes, or until a toothpick comes out clean. Cool in pans for 10 minutes, then transfer to a wire rack to cool completely.
For the Chocolate Mousse Filling:
- Place chocolate chips and ½ cup of heavy cream in a microwave-safe bowl. Heat in 30-second intervals, stirring each time, until the chocolate is melted and smooth. Let it cool to room temperature (patience, grasshopper).
- In a chilled bowl, whip the remaining 1½ cups of cream with the powdered sugar and vanilla until soft peaks form. You want it whipped, not butter.
- Gently fold about 1/3 of the whipped cream into the cooled chocolate mixture to lighten it. Then fold in the rest until no streaks remain. Look at you, being all technical with your folding!
- Refrigerate the mousse for about 30 minutes to firm up slightly while your cakes are cooling. This is a good time to scroll through your phone and show everyone on Instagram how productive you’re being.
Assembly:
- Once the cakes are completely cool (seriously, don’t rush this), level the tops if needed. Place one layer on your serving plate.
- Spread the chocolate mousse filling generously over the first layer. Leave about ½ inch border around the edge (the weight of the top layer will push the filling outward).
- Gently place the second layer on top. If you want to get fancy, you can frost the outside with whipped cream or chocolate ganache, but the cake is pretty fantastic even without that.
- Refrigerate for at least 1 hour before serving so the mousse can set properly. This also gives you time to clean up the hurricane that’s now your kitchen.
Common Mistakes to Avoid
Listen up, because these are the things that can turn your masterpiece into a master-mess:
- Using cold ingredients – Room temperature butter means ROOM TEMPERATURE. Not “I just took it out of the fridge 5 minutes ago and it’s technically in the room.”
- Overmixing the batter – This isn’t a workout session for your mixer. Once the flour’s in, mix just enough to combine, then stop. Your cake will thank you by not being tough.
- Rushing the cooling process – Try to frost or fill a warm cake and you’ll have a slip-and-slide situation on your hands. No one wants mousse puddles.
- Going overboard with swirling – The marble effect comes from distinct swirls of vanilla and chocolate. Swirl too much and you’ll end up with a uniformly tan cake that looks like it has an identity crisis.
- Opening the oven door too early – I know you’re excited, but your cake needs privacy during the first 20 minutes of baking. Letting cold air in can cause sad, sunken centers.
Alternatives & Substitutions
Life happens, pantries aren’t always fully stocked, and sometimes you just want to put your own spin on things. Here’s how to make this recipe work for you:
- Dairy-free? Substitute the butter with a plant-based alternative and use coconut milk instead of regular milk. For the mousse, coconut cream whips up beautifully (just make sure it’s really cold).
- No time for mousse? A simple chocolate ganache or even chocolate buttercream will work in a pinch. It won’t have the same light texture, but it’ll still be delicious.
- Flavor twists: Add a teaspoon of espresso powder to the chocolate portion for a mocha marble cake. Or replace the vanilla extract with almond extract for a subtle nutty flavor.
- Single-layer option: Half the recipe and bake in one pan for a shorter cake. Fill with mousse, then top with fresh berries to make it look intentionally fancy.
- Make it boozy: Add a tablespoon of Baileys, Kahlúa, or rum to your mousse filling. I won’t tell anyone if you add a splash to the cake batter too. Wink.
FAQ (Frequently Asked Questions)
Can I make this cake ahead of time?
Absolutely! The cake actually tastes even better the day after it’s made. Just keep it refrigerated and take it out about 30 minutes before serving so the cake part can come to room temperature while the mousse stays chilled.
My mousse isn’t setting up—what did I do wrong?
You probably either didn’t whip your cream enough or the chocolate was too warm when you folded them together. Quick fix: pop it in the freezer for 10-15 minutes, then back to the fridge. Crisis averted!
Can I use a box mix instead of making the cake from scratch?
I mean, technically yes, in the same way you can wear socks with sandals. Will it work? Yes. Is it the best choice? Debatable. If you do go this route, get a white cake mix and divide the batter to create your marble effect.
How long will this cake stay good?
In the fridge, about 3-4 days. But TBH, I’ve never seen one last more than 2 days without being completely devoured.
Can I freeze this cake?
You can freeze the cake layers before filling them, but I wouldn’t recommend freezing the assembled cake with the mousse filling. Mousse gets weird and separated when frozen and thawed. Nobody wants weird mousse.
Why did my cake crack on top?
Your oven’s probably too hot. Get an oven thermometer, FYI—most ovens are liars about their actual temperature.
Final Thoughts
Congrats! You’ve just created a marble cake with chocolate mousse filling that would make professional bakers do a double-take. This is the kind of dessert that creates food memories—you know, the ones where people randomly text you years later saying, “Remember that amazing cake you made?”
Don’t worry if it doesn’t look perfectly Instagram-worthy on your first try. Even slightly imperfect, this cake tastes incredible. And if anyone asks, just say you were going for a “rustic aesthetic.”
Now go slice yourself a piece before anyone else gets to it—baker’s privilege! You’ve earned it after all that folding and swirling. And remember: calories consumed while standing in front of the fridge at midnight don’t count… or at least that’s what I tell myself.

