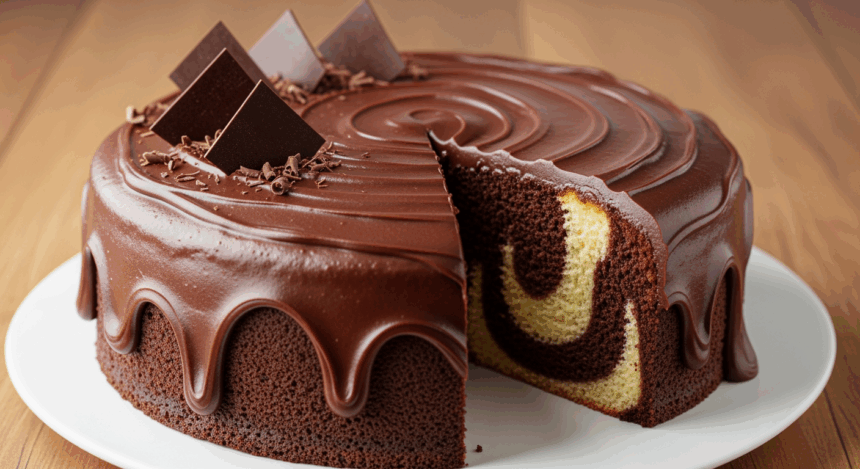
Let me guess – you’re in the mood for something fancy-looking but don’t want to spend your entire day decorating a cake that’ll be demolished in 10 minutes? Well, friend, marble cake with chocolate icing is basically the mullet of desserts: business on the outside, party on the inside. The swirly interior makes everyone think you’ve got serious baking skills, while the chocolate frosting hides any imperfections. It’s the perfect baking illusion!
Why This Recipe is Awesome
Look, we could pretend this marble cake is awesome because of some deep cultural heritage or rare technique, but let’s be real – it’s awesome because it’s two cakes in one. Can’t decide between vanilla and chocolate? Don’t! This is the cake for the chronically indecisive.
Plus, that marbled swirl effect makes it look like you graduated from some fancy culinary school, when really all you did was drag a butter knife through some batter. It’s basically the baking equivalent of wearing sunglasses indoors – effortlessly cool with minimal effort.
Ingredients You’ll Need
For the cake:
- 2 cups all-purpose flour (the regular stuff, nothing fancy)
- 1 teaspoon baking powder (not baking soda – that’s a whole different chemistry experiment)
- 1/2 teaspoon salt (just a pinch, we’re not preserving meat here)
- 1 cup butter, softened (like, actually softened, not that rock-hard block you just pulled from the fridge)
- 1 3/4 cups granulated sugar (yes, that much – we’re making cake, not salad)
- 4 large eggs (from happy chickens, if possible, but the grumpy ones work too)
- 2 teaspoons vanilla extract (the real stuff, not that imitation nonsense)
- 3/4 cup milk (cow, almond, oat – whatever floats your boat)
- 1/4 cup unsweetened cocoa powder (the baking kind, not your kid’s chocolate milk mix)
For the chocolate icing:
- 1/2 cup butter (again, actually softened)
- 3 cups powdered sugar (yes, THREE cups – embrace the sugar coma)
- 1/3 cup cocoa powder (good quality if you can swing it)
- 3-4 tablespoons milk (add gradually unless you want chocolate soup)
- 1 teaspoon vanilla extract (for that *chef’s kiss* finish)
- Pinch of salt (trust me on this one)
Step-by-Step Instructions
- Preheat your oven to 350°F (175°C). Don’t skip this step unless you enjoy waiting around while your oven heats up and your batter deflates like your enthusiasm on Monday morning.
- Grease and flour a 9×13 inch pan or two 9-inch round pans. If you’re feeling fancy, line with parchment paper – your future self will thank you during cleanup.
- In a medium bowl, whisk together the flour, baking powder, and salt. Set aside. This is called “mise en place” which is French for “making more dishes to wash.”
- In a large bowl, beat the softened butter and sugar until fluffy and light – about 3-4 minutes. If your arm gets tired, consider this your workout for the day.
- Add eggs one at a time, beating well after each addition. If some shell falls in, welcome to the egg shell fishing championship.
- Mix in the vanilla extract. Take a moment to inhale – that’s the smell of something good happening.
- Gradually add the flour mixture alternating with milk, beginning and ending with flour (flour, milk, flour, milk, flour). Mix until just combined – don’t beat it to death.
- Take about 1/3 of the batter and place it in a separate bowl. Add the cocoa powder to this portion and stir until well combined.
- Drop spoonfuls of vanilla and chocolate batter alternately into your prepared pan(s). Get creative with your pattern – no one’s judging.
- Take a butter knife and swirl through the batters to create a marbled effect. Don’t overdo it or you’ll end up with brown cake, not marble cake.
- Bake for 25-30 minutes for round pans or 35-40 minutes for a rectangular pan, until a toothpick inserted in the center comes out clean. If it comes out with batter, your cake is swimming, not baking.
- Cool in the pan for 10 minutes, then remove to a wire rack to cool completely. Patience is a virtue, my impatient friend.
- For the icing, beat the softened butter until creamy. Gradually add powdered sugar and cocoa powder, alternating with milk. Mix in vanilla and salt. If it’s too thick, add more milk. If it’s too thin, add more powdered sugar. Baking is basically just playing with textures.
- Once the cake is COMPLETELY cool (I cannot stress this enough unless you want a melted icing disaster), frost that beauty and watch as everyone assumes you’ve become a professional baker overnight.
Common Mistakes to Avoid
Let’s talk about how not to turn your marble masterpiece into a marbled mess:
- Overmixing the batter – Unless your goal is to create a cake with the texture of a rubber tire, mix just until ingredients are combined.
- Skipping the “softened butter” step – Throwing cold butter into your mixer isn’t a shortcut; it’s a detour to Lumpville, population: your cake.
- Being impatient with cooling – Frosting a warm cake is like putting makeup on while running – messy and ultimately disappointing.
- Swirling too much – The goal is marble, not “50 Shades of Brown.” A few gentle swirls with a knife is all you need.
- Opening the oven door too early – Your cake is like a shy performer – it needs privacy during its rising act or it’ll fall flat.
Alternatives & Substitutions
Not everyone has a perfectly stocked pantry, and sometimes you need to improvise. Here are some swaps that won’t ruin everything:
Flour options: All out of all-purpose? You can use cake flour for a lighter texture (add 2 extra tablespoons per cup). Self-rising flour works too – just omit the baking powder and salt.
Milk alternatives: Any milk works here – almond, soy, oat, or even buttermilk if you’re feeling tangy. Heck, even thinned-out yogurt can work in a pinch.
No cocoa powder? Melted chocolate can work for the chocolate portion – use about 2 oz and reduce the milk slightly. Or just melt some chocolate chips, you kitchen rebel.
Sugar substitutes: Brown sugar works (will make a moister cake with a slight caramel vibe), and you can even use coconut sugar if you’re trying to be all health-conscious about your cake. (FYI, it’s still cake.)
Frosting alternatives: Not feeling chocolate frosting? Cream cheese frosting is amazing on this cake. Or go wild with vanilla buttercream, coffee frosting, or just a simple dusting of powdered sugar if you’re feeling lazy.
FAQ (Frequently Asked Questions)
Can I make this cake ahead of time?
Absolutely! The cake actually tastes better on day two when the flavors have had time to mingle and get friendly with each other. Just store it covered at room temperature if it’s for 1-2 days, or refrigerate for longer shelf life.
Why did my marble effect disappear?
Did you go swirl-crazy with your knife? Less is more when it comes to marbling. Also, make sure your chocolate batter isn’t too thin or it’ll just blend completely with the vanilla.
Can I freeze this cake?
You bet your sweet spatula you can! Wrap it well (unfrosted) and freeze for up to 3 months. Thaw overnight in the fridge, bring to room temp, then frost. Or freeze frosted slices for emergency cake situations – we all have those, right?
My cake cracked on top. Did I mess up?
Nah, you’re good! Cracks happen when the outside cooks faster than the inside. The icing will cover it anyway – it’s like makeup for your cake’s imperfections.
Can I make cupcakes instead of a cake?
Absolutely! Fill cupcake liners about 2/3 full with alternating batters, swirl with a toothpick, and bake for about 18-20 minutes. IMO, marble cupcakes are even cuter than a full cake.
Why is my icing grainy?
Did you skip sifting the powdered sugar? That’s usually the culprit. Also, make sure your butter was properly softened before starting. No one wants to feel like they’re eating sweet sand.
Final Thoughts
Congrats! You’ve now mastered the art of marble cake deception – looking fancy while doing minimal work. It’s the perfect dessert for when you want people to think you spent hours in the kitchen, when really you were just binge-watching your favorite show and occasionally checking the oven.
Remember, the beauty of marble cake is that no two are exactly alike – much like snowflakes or excuses for being late to work. So embrace any quirks in your swirl pattern and know that it’s not a mistake, it’s your “signature style.”
Now go forth and amaze your friends, family, or just yourself (no judgment – sometimes the best person to bake for is you). And if someone asks for your secret? Just smile mysteriously and say it’s an old family recipe. Bakers have to maintain some mystique, after all!
