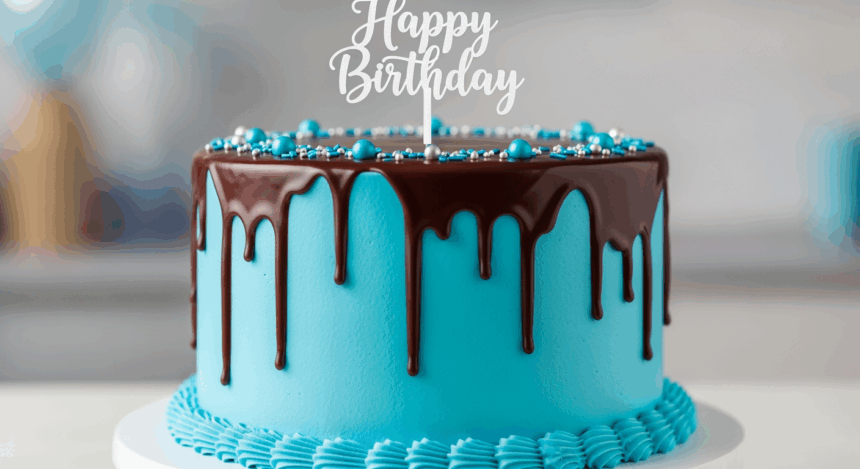
Ever looked at a cake and thought, “This needs to be BLUE and dripping with chocolate”? Well, congratulations on having excellent taste! Whether you’ve got a birthday coming up or just want to flex your baking muscles, this blue beauty with chocolate drip is about to become your new signature dessert. It’s dramatic, it’s delicious, and yes, it will absolutely blow up your Instagram. Let’s get baking, shall we?
Why This Recipe is Awesome
Look, I could tell you this cake is awesome because it tastes amazing (it does) or because it looks professional (it will), but let’s be real—the true joy comes from watching your friends’ faces when you casually mention, “Oh this? Just something I whipped up.” The brilliant blue interior combined with that glossy chocolate waterfall effect is basically kitchen sorcery, but with way less effort than it appears. It’s the ultimate fake-it-till-you-make-it recipe for when you want people to think you spent hours in the kitchen.
Ingredients You’ll Need
For the Blue Cake:
- 2 boxes white cake mix (yes, boxed—we’re not trying to win a baking championship here)
- 6 large eggs (room temperature, because cold eggs are party poopers)
- 1 cup vegetable oil (or canola if that’s your jam)
- 2 cups buttermilk (the secret weapon for moisture)
- 2 teaspoons vanilla extract (the real stuff, not that imitation nonsense)
- 1-2 tablespoons royal blue gel food coloring (NOT the liquid kind unless you want a sad teal disaster)
For the Frosting:
- 4 sticks unsalted butter, softened (yes, FOUR—this is not diet food, people)
- 8 cups powdered sugar (approximately one small mountain)
- 1/4 cup heavy cream (trust me on this)
- 2 teaspoons vanilla extract
- 1/4 teaspoon salt (to cut the sweetness, because we’re not savages)
- Optional: A few drops of blue food coloring for the outside (or leave it white for contrast)
For the Chocolate Drip:
- 1 cup semi-sweet chocolate chips (the good stuff, this is your showstopper moment)
- 1/2 cup heavy cream
- 1 tablespoon corn syrup (for that mirror-like shine)
Step-by-Step Instructions
- Prep your battle station. Preheat oven to 350°F (175°C). Grease and line three 8-inch cake pans. Yes, THREE. This is a statement cake.
- Mix that blue magic. In a large bowl, combine cake mixes, eggs, oil, buttermilk, and vanilla. Beat on medium speed for about 2 minutes until smooth. Now for the fun part—add the blue gel food coloring gradually until you reach your desired shade of blue. Remember, the batter will look darker than the finished cake, so go a bit bolder than you think.
- Bake those beauties. Divide the batter evenly between your pans and bake for 25-30 minutes or until a toothpick comes out clean. Let them cool in the pans for 10 minutes before transferring to cooling racks. If you try to frost them warm, you’ll have a blue avalanche situation.
- Whip up that cloud-like frosting. Beat the butter until fluffy (about 3-4 minutes). Gradually add in powdered sugar, cream, vanilla, and salt. Keep beating until it’s light and airy—think of it as arm day at the gym, but with delicious results. If you want blue frosting, add a tiny bit of coloring now.
- Build your tower of power. Once cakes are completely cool (I mean it—COMPLETELY), level them if needed. Place the first layer on your cake board, add a generous dollop of frosting, spread it out, then add the next layer. Repeat, then cover the entire cake with a thin layer of frosting (this is your crumb coat). Refrigerate for 20 minutes.
- Go all in on the frosting. Apply the final coat of frosting, making it as smooth as possible. Use a bench scraper or large offset spatula to get those Pinterest-worthy smooth sides. Chill the frosted cake for at least an hour before adding the drip.
- Prep the chocolate waterfall. In a microwave-safe bowl, combine chocolate chips and heavy cream. Microwave in 30-second intervals, stirring each time, until melted and smooth. Stir in corn syrup. Let it cool slightly—you want it fluid but not hot enough to melt your frosting.
- Create the drip effect. Using a spoon or squeeze bottle, slowly apply the chocolate around the edge of the cake, allowing it to drip down the sides at varying lengths. Then fill in the top with remaining chocolate. Pro tip: Test the consistency on the inside of a bowl first—if it runs too fast, let it cool more.
- Decorate like you mean it. Add sprinkles, additional piped frosting, candles, or whatever your heart desires while the chocolate is still slightly wet.
- Chill before the big reveal. Refrigerate the cake for at least 30 minutes to set the drip before serving. Let it come to room temperature for about 20 minutes before slicing to get the best flavor and texture.
Common Mistakes to Avoid
Let’s talk about what NOT to do, so your cake doesn’t end up looking like a Pinterest fail:
- Using liquid food coloring – Unless you want a sad, barely-blue cake that requires half a bottle of coloring (and tastes like chemicals), stick with gel or paste.
- Rushing the cooling process – Frosting a warm cake is like putting makeup on during a hot flash—nothing stays where it should.
- Making your chocolate drip too hot – If it’s too warm, it’ll just keep running until your cake looks like it’s melting. Not the vibe we’re going for.
- Trying to slice it cold – Rock-hard buttercream isn’t pleasant for anyone. Let it warm up a bit before serving.
- Forgetting to level your cakes – Unless the “Leaning Tower of Pisa” look is intentional, take the time to level those layers.
Alternatives & Substitutions
Not everything in your pantry? No problem:
- No buttermilk? Add a tablespoon of lemon juice or vinegar to regular milk and let it sit for 5 minutes. Boom—fake buttermilk.
- Different color vision? Swap the blue for any gel food coloring of your choice. Purple is particularly dramatic with chocolate drip, IMHO.
- Chocolate options: White chocolate works beautifully for the drip if you want a different look. Add food coloring to white chocolate for even more pizzazz.
- Frosting alternatives: Not a vanilla fan? Try almond extract instead. Want chocolate frosting? Add 1/2 cup of cocoa powder to the frosting recipe.
- Healthier version? LOL just kidding. This is a birthday cake. Live a little.
FAQ (Frequently Asked Questions)
Can I make this cake in advance?
Absolutely! The cake layers can be made up to 3 days ahead and wrapped tightly in plastic wrap. The fully assembled cake (minus the drip) can be made 1 day ahead. Add the drip the day of serving for maximum wow-factor.
Will this feed my entire extended family?
This three-layer 8-inch cake serves about 16-20 people, depending on how generous your slices are (and how many cake vultures you have at your party).
My drip hardened before I finished the cake. Help?
Just pop it back in the microwave for 10 seconds and stir. Be careful not to make it too hot though—lukewarm is the sweet spot.
Can I use a different size cake pan?
Sure thing! Two 9-inch pans work fine, but you’ll need to adjust the baking time (typically a few minutes less). Just keep an eye on them.
Do I really need corn syrup for the drip?
FYI, corn syrup gives that glossy finish, but you can skip it. Your drip just won’t be quite as shiny—more of a matte finish, which is still gorgeous.
My cake turned green instead of blue! What went wrong?
You probably used a yellow cake mix instead of white. The yellow plus blue equals green—basic color theory, my friend. Stick with white cake mix for true blue.
Final Thoughts
There you have it—a showstopping blue birthday cake with chocolate drip that’ll make everyone think you’ve been secretly taking professional baking classes. The beauty of this recipe is that it looks incredibly fancy but doesn’t require advanced techniques or specialty equipment. Just a bit of patience and a willingness to get blue food coloring on everything you own.
Remember, the most important ingredient in any birthday cake is having fun with it. If your drips aren’t perfect or your blue isn’t exactly the shade you imagined, who cares? It’s still going to be delicious, and everyone will be impressed you made it from scratch (boxed cake mix totally counts as scratch when you doctor it up this much).
Now go forth and create your blue masterpiece! And maybe wear gloves unless you want blue fingers for a week. Ask me how I know…
