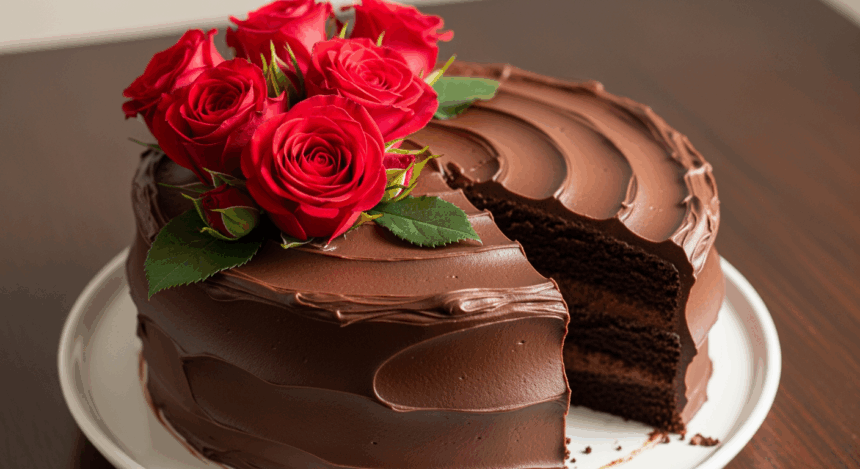
Ever stared at a Pinterest board full of gorgeous cakes and thought, “Yeah, like I could ever make THAT?” Well, friend, today’s the day we prove your inner critic wrong! This chocolate frosted cake with roses is about to be your new party trick – and between us, it’s way easier than it looks. The secret? A few sneaky shortcuts and some frosting techniques that’ll make everyone think you’ve been hiding a culinary degree. Let’s do this!
Why This Recipe is Awesome
First off, this cake is basically an edible confidence booster. It looks like something from a fancy bakery window, but the techniques are actually super forgiving. Mess up a rose? Just eat the evidence and try again! Plus, chocolate frosting is the ultimate camouflage for any cake imperfections.
The real magic is in the “wow factor” to “actual effort” ratio. You’ll spend maybe 20 minutes on the decorating part, but people will talk about your cake skills for weeks. And let’s be honest – who doesn’t want to casually whip out their phone to show pictures of a cake they made that looks professionally done? Instant kitchen cred!
Ingredients You’ll Need
For the cake:
- 2 cups all-purpose flour (the regular stuff, nothing fancy)
- 1¾ cups granulated sugar (because 2 cups would just be excessive, right?)
- ¾ cup unsweetened cocoa powder (the good kind, not the sad hot chocolate mix)
- 2 teaspoons baking soda (the unsung hero of cake fluffiness)
- 1 teaspoon baking powder
- 1 teaspoon salt (trust me, don’t skip this)
- 2 large eggs (room temperature, because cold eggs are just rude to cake batter)
- 1 cup buttermilk (or regular milk with a splash of vinegar if you’re not a buttermilk person)
- ½ cup vegetable oil (keeps it moist without having to use the M-word)
- 2 teaspoons vanilla extract (real, not imitation, respect yourself)
- 1 cup hot coffee (or hot water if caffeine makes you twitch)
For the chocolate frosting:
- 1 cup unsalted butter, softened (like, really soft, but not liquid)
- 3½ cups powdered sugar (yes, that much)
- ½ cup unsweetened cocoa powder
- 3-4 tablespoons heavy cream (full fat, we’re making roses not diet food)
- 1 teaspoon vanilla extract
- ¼ teaspoon salt
For the rose decorations:
- Additional frosting in desired colors (pink, red, whatever floats your floral boat)
- Piping bags (or ziplock bags if you’re MacGyver-ing this)
- Rose piping tips (Wilton 1M or 2D are your best friends here)
Step-by-Step Instructions
For the cake:
- Preheat your oven to 350°F (175°C). Don’t skip this step! I know it’s tempting, but a cold oven is where good cakes go to die.
- Grease and line two 8-inch round cake pans. If you’re feeling extra, dust them with cocoa powder instead of flour to avoid white marks on your chocolate cake.
- In a large bowl, whisk together all the dry ingredients: flour, sugar, cocoa, baking soda, baking powder, and salt. Break up any cocoa lumps like they’re tiny villains.
- In another bowl, mix the wet team: eggs, buttermilk, oil, and vanilla. Whisk until they’re getting along nicely.
- Slowly add the wet ingredients to the dry ingredients, mixing on low speed. It’ll look thick and maybe you’ll panic a little – that’s normal.
- Add the hot coffee (or water) and mix until just combined. The batter will be thin and you’ll wonder if you’ve made a terrible mistake. You haven’t!
- Pour the batter evenly into your prepared pans and bake for 30-35 minutes, or until a toothpick comes out mostly clean.
- Let the cakes cool in the pans for 10 minutes, then flip them onto a wire rack to cool completely. Patience is key here – warm cakes and frosting are a disaster waiting to happen.
For the frosting:
- Beat the softened butter until it’s creamy and questioning its life choices (about 2-3 minutes).
- Gradually add the powdered sugar and cocoa powder, alternating with splashes of heavy cream. Your mixer might struggle a bit – whisper words of encouragement.
- Add the vanilla extract and salt, then beat on medium-high speed until the frosting is fluffy and spreadable (about 2 minutes).
- If the frosting seems too thick, add more cream. If it’s too thin, add more powdered sugar. You’re the boss here.
For assembly and decoration:
- Level your cake layers if needed. Eat the scraps as a reward for your hard work so far.
- Place one layer on your cake stand and spread about 1 cup of frosting on top.
- Add the second layer and cover the entire cake with a thin layer of frosting (this is your “crumb coat”). Chill for 15 minutes.
- Add a final, thicker layer of frosting, smoothing the sides and top as best you can. Perfection is overrated – we’re going for “charming” here.
- For the roses: Put colored frosting in a piping bag fitted with a rose tip. Starting from the center, pipe a spiral outward to create each rose. The secret is consistent pressure!
- Practice on a piece of parchment paper first if you’re nervous. Remember, even wonky roses still look impressive to non-bakers.
- Arrange your roses around the top edge of the cake, or create a cascade down one side if you’re feeling ambitious.
Common Mistakes to Avoid
Let’s talk about some potential cake catastrophes and how to avoid them:
- The “I’m too impatient for cooling” mistake – Frosting a warm cake is like putting makeup on during a sauna session. It’s just going to slide right off. Give your cake time to chill out.
- The “I eyeballed the measurements” disaster – Baking is basically edible chemistry. Unless you want a chocolate-flavored hockey puck, use measuring cups.
- The “I forgot to do a crumb coat” mess – Trying to frost a chocolate cake without a crumb coat is like trying to apply foundation without primer. You’ll end up with chocolate speckles everywhere.
- The “I made my frosting too stiff” struggle – If your frosting is too thick, your piping bag will require the hand strength of a professional arm wrestler. Add cream until it’s pipeable!
- The “decorating under pressure” syndrome – Don’t start decorating an hour before guests arrive. That’s when the cake gods sense fear and cause disasters.
Alternatives & Substitutions
Not everyone has a fully-stocked professional kitchen, so here are some workarounds:
For the cake:
- No buttermilk? Mix 1 tablespoon of lemon juice or vinegar with enough regular milk to make 1 cup. Let it sit for 5 minutes and boom—fake buttermilk.
- Don’t do caffeine? Substitute hot water for the coffee. You’ll lose some depth of flavor, but your cake won’t keep you up at night.
- Boxed cake mix emergency substitution: Doctor up a chocolate box mix with an extra egg, substitute milk for the water, and use melted butter instead of oil. I won’t tell if you don’t.
For the frosting:
- No heavy cream? Half-and-half or whole milk will work in a pinch, though the frosting won’t be quite as rich.
- Want a non-dairy version? Solid coconut oil (not melted) can replace butter, and full-fat coconut milk can replace the cream. It’ll have a slight coconut vibe, but chocolate and coconut are besties anyway.
- No piping tips? Cut the corner off a ziplock bag for basic piping. For roses, you can actually use a clean, empty medicine syringe with the needle removed (weird but it works).
IMO, the chocolate frosting is non-negotiable, but the rose colors can be whatever speaks to your soul. Traditional red and pink are classic, but purple roses or even ombré effects can look amazing too.
FAQ (Frequently Asked Questions)
Can I make this cake in advance?
Absolutely! The cake layers can be baked up to 2 days ahead and wrapped in plastic wrap. The fully decorated cake will hold up beautifully for 24 hours in the fridge. Just let it come to room temperature before serving or your guests will think you’re serving chocolate-flavored refrigerator.
Do I really need special piping tips for the roses?
While the right tip makes life easier, it’s not the end of the world if you don’t have one. A star tip will give you a similar effect with a bit more practice. Or go rogue and create a different design altogether—it’s your cake kingdom.
My roses look like sad little lumps. What am I doing wrong?
Probably your frosting consistency. If it’s too soft, your roses will droop like they’re having an existential crisis. If it’s too stiff, they’ll look spiky and angry. The perfect consistency should hold a soft peak when you lift your spatula.
Can I use margarine instead of butter?
Technically yes, but why would you do that to a perfectly innocent cake? Butter brings flavor and the right texture. Margarine brings…sadness.
My cake sank in the middle! Is it ruined?
Not at all! That’s just a convenient reservoir for extra frosting. Fill that divot with frosting and no one will be the wiser. If anyone asks, say it’s a “frosting well” and act like you did it on purpose.
How do I get my cake layers flat?
Professional secret: Wrap wet cake strips around the pans before baking. No cake strips? Tear up an old clean kitchen towel, wet it, wring it out, and secure it around your cake pans with safety pins. Science!
Final Thoughts
Remember when you were staring at those Pinterest cakes thinking “yeah, right”? Look at you now, with your fancy chocolate cake adorned with beautiful roses! Take a picture before anyone eats it—this masterpiece deserves social media fame.
The best part about learning to make a cake like this isn’t just impressing others (though that’s a sweet bonus). It’s proving to yourself that those “too-complicated” recipes aren’t so scary after all. Today it’s rose-decorated cakes, tomorrow… who knows? Maybe croissants? Soufflés? The world is your pastry case!
So go ahead, cut a slice, and enjoy the fruits of your labor. You’ve earned every single calorie in that slice. And when people ask where you bought such a beautiful cake, just smile mysteriously and say, “Oh, I just whipped it up.” Then watch their jaws drop!
