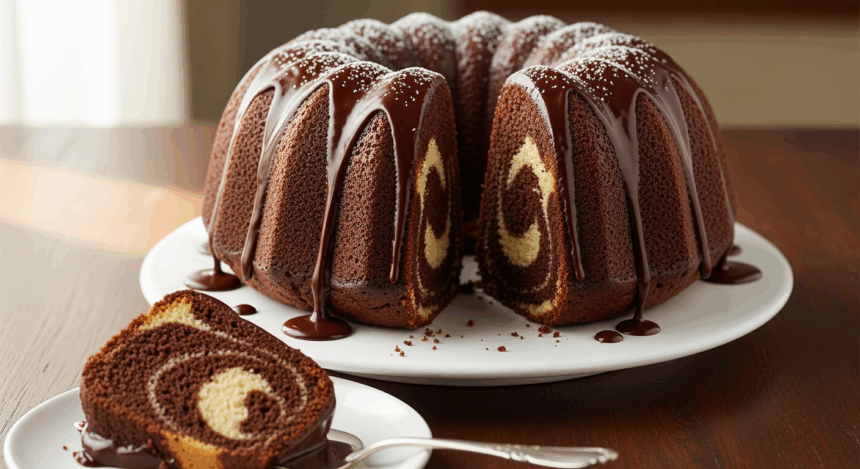
So you’ve got a chocolate craving AND a vanilla craving? Why choose when you can have both? That’s right, folks—it’s marble cake time! This swirly, twirly masterpiece lets you enjoy the best of both cake worlds without having to bake two separate cakes. And the best part? We’re using boxed mixes because life’s too short to measure flour fourteen times.
Why This Recipe is Awesome
Let me count the ways this marble cake recipe rocks. First, it’s basically foolproof. If you can stir things, you can make this cake. Second, it’s a crowd-pleaser—chocolate lovers and vanilla enthusiasts can finally eat in harmony. Third, those gorgeous swirls make you look like a baking genius when, between us, all you did was drag a knife through some batter. **That’s what we call kitchen magic, people.**
Plus, using boxed mixes means consistent results every time. No more “my cake collapsed because I sneezed while measuring baking powder” disasters. This is stress-free baking at its finest!
Ingredients You’ll Need
• 1 box vanilla cake mix (plus ingredients called for on the box, usually eggs, oil, and water)
• 1 box chocolate cake mix (same deal with the extra ingredients)
• 1/4 cup additional vegetable oil (to keep things extra moist)
• 1 teaspoon vanilla extract (the real stuff, not that imitation nonsense)
• Bundt pan or 9×13 baking dish
• Non-stick spray (your cake’s best friend)
• Optional but recommended: chocolate chips (because when has adding chocolate chips ever been a bad decision?)
Step-by-Step Instructions
1. Preheat your oven to 350°F (175°C). Yes, you actually need to preheat. Don’t be that person who throws the cake into a cold oven.
2. Prepare your pan by generously coating it with non-stick spray. Be thorough—this is not the time to be stingy.
3. Mix the vanilla cake according to package directions in one bowl. Add 1/2 teaspoon of vanilla extract to amp up that vanilla flavor.
4. Mix the chocolate cake according to package directions in another bowl. Add a handful of chocolate chips if you’re feeling fancy (and why wouldn’t you be?).
5. Add 2 tablespoons of extra oil to each batter. This little hack makes boxed cakes taste like bakery cakes. You’re welcome.
6. Create the marble effect by alternating spoonfuls of each batter into your prepared pan. Just plop them in randomly—chocolate, vanilla, chocolate, vanilla.
7. Grab a butter knife and gently swirl through the batters. Don’t overdo it—we’re going for marble, not mud. About 5-8 swirls should do the trick.
8. Bake for 35-40 minutes or until a toothpick comes out clean. Pro tip: Start checking at 30 minutes because ovens are like snowflakes—no two are exactly alike.
9. Cool in the pan for 10 minutes, then flip onto a wire rack to cool completely. If using a 9×13 pan, just let it cool right in there.
Common Mistakes to Avoid
Over-swirling the batters. Too much knife action and you’ll end up with a light brown cake instead of those gorgeous swirls. Less is more here, friends.
Opening the oven door too early. I know you’re excited to peek, but that blast of cool air can make your cake sink faster than my motivation on Monday mornings.
Forgetting to grease the pan properly. Unless you enjoy eating cake in tiny shreds picked off the pan, spray that thing like your cake’s life depends on it (it does).
Mixing the batters in one bowl from the start. That’s not marble cake—that’s just brown cake with an identity crisis.
Alternatives & Substitutions
Gluten-free? No problem! Grab gluten-free cake mixes instead. The marbling technique works exactly the same.
No chocolate cake mix? Make a vanilla cake mix and add 1/4 cup cocoa powder to half the batter. It’s not quite as rich, but it’ll do in a pinch.
Want to fancy it up? Add a teaspoon of instant coffee to the chocolate batter. Coffee and chocolate are BFFs and it makes the chocolate flavor pop.
Oil alternatives: Applesauce works as a healthier substitute, but IMO, this isn’t the time to count calories. Live a little!
Frosting options: A simple chocolate ganache or cream cheese frosting works beautifully here. Or do what I do—dust with powdered sugar because it’s easy and looks fancy.
FAQ (Frequently Asked Questions)
Can I make cupcakes instead of a cake?
Absolutely! Fill cupcake liners about 2/3 full with alternating batters and swirl with a toothpick. Reduce baking time to about 18-22 minutes.
How do I know when it’s done?
The old toothpick trick never fails—insert it into the center, and if it comes out clean or with a few crumbs (not wet batter), you’re golden. The cake should also spring back when lightly touched.
Can I make this ahead of time?
You bet! This cake actually tastes even better the next day. Store it covered at room temperature for up to 3 days, if it lasts that long (spoiler: it won’t).
My swirls don’t look as pretty as in the pictures. What gives?
Food photographers spend hours getting that perfect swirl shot. As long as it’s marble-ish and tastes good, you’ve succeeded. Remember: taste trumps appearance every time.
Do I really need both cake mixes?
Well, technically you could use just one vanilla mix and add cocoa to half… but using both gives you distinct flavors that really make the marble effect worth it. Go big or go home!
Final Thoughts
There you have it—a marble cake that’s equal parts impressive and easy. It’s the perfect dessert for when you want people to think you spent hours in the kitchen when really you were binge-watching that new series until 20 minutes before guests arrived.
The beauty of this cake is that every slice is unique, just like snowflakes or your aunt’s unsolicited opinions at family dinners. So go ahead—cut yourself a generous piece, maybe add a scoop of ice cream on the side, and enjoy the fruits of your minimal labor. You’ve just nailed the art of having your cake and eating it too—both flavors!

