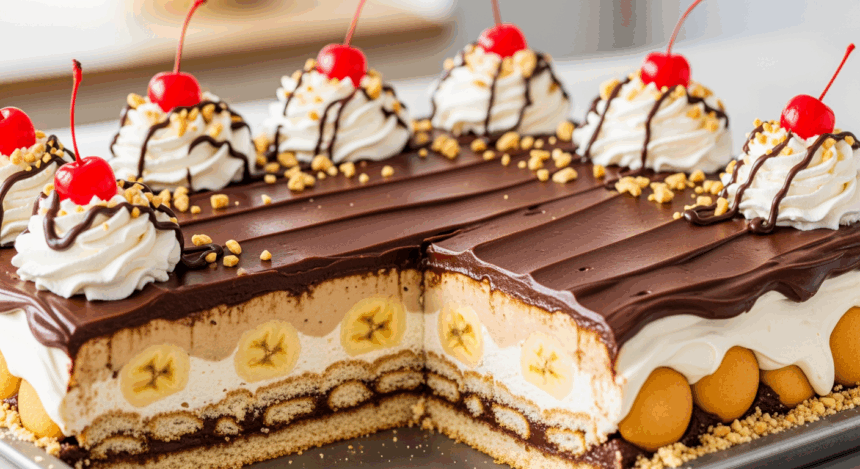
So you’ve got bananas aging faster than my motivation to do laundry, and a sweet tooth that won’t quit, huh? Perfect timing! Let me introduce you to the glorious monster I call Banana Split Cake with Chocolate Frosting – all the joy of a classic banana split but in a sliceable, shareable form that doesn’t melt while you’re looking for the perfect Instagram angle.
Why This Recipe is Awesome
Listen, I could tell you this cake is “delicious” or “scrumptious” or whatever food bloggers say these days, but let’s cut to the chase: this cake is basically three desserts having a party together. You’ve got banana bread vibes, ice cream sundae flavors, and chocolate cake energy all in one pan. Plus, it’s the perfect way to use those bananas that are practically begging to be put out of their misery.
The best part? This recipe is practically foolproof. I once made it while simultaneously watching Netflix and texting my mom about why I still don’t have kids, and it still turned out Instagram-worthy. That’s the kind of reliability we need in life, people.
Ingredients You’ll Need
For the cake:
- 3 ripe bananas (the more spotted, the better – those brown ones judging you from the counter are perfect)
- 1/2 cup unsalted butter, softened (not melted – there’s a difference, trust me)
- 1 cup granulated sugar (because adulting is hard and we deserve this)
- 2 large eggs (chicken variety, not dinosaur)
- 1 teaspoon vanilla extract (the real stuff, not that imitation nonsense)
- 2 cups all-purpose flour (the workhorse of the baking world)
- 1 teaspoon baking soda (not powder, they’re different and will absolutely judge you for mixing them up)
- 1/2 teaspoon salt (preferably not the tears of your enemies)
- 1/2 cup strawberries, diced (fresh is best, but frozen works if you’re in the apocalypse)
- 1/2 cup crushed pineapple, drained (the canned stuff is fine, no need to machete your way through a whole pineapple)
For the chocolate frosting:
- 1/2 cup unsalted butter, softened (again, not melted – are we sensing a theme?)
- 1/3 cup cocoa powder (the darker, the better, like my soul)
- 2 cups powdered sugar (sifted if you’re fancy, dumped in if you’re me)
- 1/4 cup milk (cow, almond, oat – whatever floats your boat)
- 1 teaspoon vanilla extract (still the real stuff)
For the toppings:
- 1/4 cup chopped walnuts or pecans (optional, for you nut enthusiasts)
- Maraschino cherries (because it’s not a banana split without those suspiciously red cherries)
- Sprinkles (because are you even living if you don’t add sprinkles?)
Step-by-Step Instructions
- Prep your battlefield. Preheat your oven to 350°F (175°C). Grease and flour a 9×13 inch pan, or line it with parchment paper if you hate doing dishes as much as I do.
- Banana demolition time. In a large bowl, mash those bananas into submission. The more therapeutic you find this, the better the cake tastes. It’s science.
- Cream it up. In another bowl, cream together the butter and sugar until it’s light and fluffy. This should take about 3-4 minutes with an electric mixer, or approximately forever if you’re doing it by hand (but hey, who needs a gym membership?).
- Egg-cellent addition. Beat in the eggs one at a time, then stir in the vanilla and mashed bananas until well blended.
- Get dry. In yet another bowl (sorry about the dishes), combine the flour, baking soda, and salt. Gradually blend this into the banana mixture. The goal is to mix until just combined – not to beat it like it owes you money.
- Fruit party. Gently fold in the diced strawberries and drained crushed pineapple. Be gentle here – we’re making cake, not fruit smoothie.
- Bake it ’til you make it. Pour the batter into your prepared pan. Bake for 25-30 minutes, or until a toothpick inserted in the center comes out clean. If you don’t have a toothpick, a spaghetti noodle works in desperate times.
- Cool your jets. Let the cake cool COMPLETELY. I know it’s tempting to frost it while warm, but that’s how frosting tsunamis happen, and no one wants that tragedy.
- Frosting magic. While the cake is cooling, make your chocolate frosting. Beat butter until creamy, then add cocoa powder and beat again. Gradually add powdered sugar, milk, and vanilla, beating until smooth and spreadable. If it’s too thick, add more milk one teaspoon at a time. If it’s too thin, add more powdered sugar. Baking is basically chemistry for hungry people.
- Frost like a boss. Once the cake is completely cool, spread that chocolatey goodness all over the top. Make it as smooth or as artistically messy as your personality demands.
- Top it off. Sprinkle with chopped nuts, add cherries strategically, and shower with sprinkles. This is your moment to shine – no one’s judging your decorating skills (except maybe your mother-in-law).
- Slice and devour. Cut into squares and serve. Take pictures for social media before your family demolishes the evidence.
Common Mistakes to Avoid
Even a recipe this forgiving has its danger zones. Here are the pitfalls to watch for:
- Using unripe bananas – Those firm, yellow bananas might look pretty, but they’ll make your cake taste about as exciting as cardboard. Wait for the spots, people!
- Overmixing the batter – Unless you’re aiming for a cake with the texture of a rubber bouncy ball, mix just until the ingredients are combined.
- Frosting a warm cake – I mentioned this before, but it bears repeating. Warm cake + frosting = sad, melty disaster. Exercise patience for once in your life.
- Skipping the pineapple – It might seem like a weird addition, but the pineapple adds moisture and that authentic banana split flavor. Don’t be a hero – follow the recipe.
Alternatives & Substitutions
Life happens, pantries aren’t always fully stocked, and sometimes you just want to rebel against recipes. I get it. Here are some rebellious options:
Fruit alternatives: Not a strawberry fan? Try blueberries instead. Hate pineapple? You could use peaches, though I’ll silently judge your life choices.
Make it boozy: Add 2 tablespoons of rum to the cake batter for an adult version that will definitely not be served at your kid’s birthday party.
Dairy-free options: Substitute the butter with coconut oil and use almond milk in the frosting. The cake will have subtle coconut vibes, but that just makes it more tropical.
Gluten concerns? A one-to-one gluten-free flour blend usually works well here, though the texture might be slightly different. Still delicious, just… different.
Frosting alternatives: If chocolate isn’t your jam (who are you?), try cream cheese frosting instead. Just mix 8 oz softened cream cheese with 1/4 cup butter, 2 cups powdered sugar, and 1 teaspoon vanilla.
FAQ (Frequently Asked Questions)
Can I make this cake ahead of time?
Absolutely! In fact, it often tastes better the next day when the flavors have had time to mingle and get to know each other. Just store it covered at room temperature for up to 3 days, or refrigerate if your kitchen is hotter than the surface of the sun.
Do I really need THREE bowls for this recipe?
Look, you could technically combine steps and use fewer bowls if you’re feeling rebellious or if dish-washing is your personal nightmare. The baking police won’t arrest you, but your cake might have a slightly different texture. Your call, brave baker.
Can I turn this into cupcakes?
You absolutely can! Fill cupcake liners about 2/3 full and reduce the baking time to 18-22 minutes. This recipe should make about 24 cupcakes, which means 24 opportunities to perfect your frosting swirl.
Will this cake impress my mother-in-law who thinks she’s the next Martha Stewart?
No guarantees in life, but this cake has a pretty good track record of winning over even the most critical dessert snobs. If all else fails, just mention it’s an “elevated take on a classic” – food critic language works wonders.
My frosting looks grainy. What went wrong?
Your butter probably wasn’t soft enough, you poor soul. Next time, make sure it’s truly room temperature before starting. For now, you can save it by warming the frosting slightly (microwave 5-10 seconds) and beating again, or embrace the texture and call it “rustic.”
Can I freeze this cake?
You bet! Freeze unfrosted cake layers wrapped tightly in plastic wrap and aluminum foil for up to 3 months. Thaw overnight in the refrigerator before frosting. Already frosted? Freeze individual slices on a baking sheet, then wrap them once solid. Instant future-you treat!
Final Thoughts
There you have it – a cake that delivers all the nostalgic joy of a banana split without the race-against-time ice cream melt situation. It’s the kind of dessert that makes people think you spent hours in the kitchen (when we know you were really just finding a use for those judgment-inducing overripe bananas).
The beauty of this recipe is its flexibility. Make it exactly as written, or throw caution to the wind and customize it to your heart’s content. Either way, you’ll end up with something that makes people do that closed-eye, mmm-noise thing when they take their first bite.
Now go forth and bake! Your bananas aren’t getting any younger, and neither are we. And remember, calories consumed while licking the bowl absolutely don’t count – that’s just another baking science fact.
