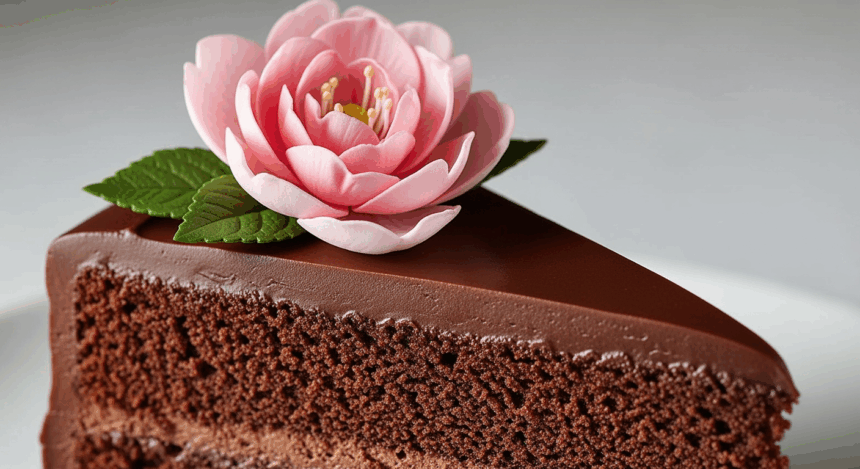
Picture this: You’re scrolling through Instagram, and there they are again – those impossibly perfect chocolate cakes with delicate pink flowers that look like they belong in a fancy bakery window. Meanwhile, your baking skills are more “nailed it” than “master chef.” Well, friend, today’s the day we change that! This chocolate cake with pink flower decoration is about to become your new party trick – and guess what? It’s actually doable. Like, real-human-with-normal-skills doable.
Why This Recipe is Awesome
Let’s be real – this cake isn’t just a cake. It’s a confidence booster disguised as dessert. First off, the chocolate base is so forgiving that even if you’re the type who burns water (no judgment here), you’ll still end up with something delicious. Second, those pretty pink flowers? They’re WAY easier than they look. It’s basically like playing with edible Play-Doh. And finally, the whole thing takes less time than binge-watching half a season of whatever show you’re currently obsessed with.
Plus, this recipe doesn’t require any fancy equipment that’ll just collect dust afterward. If you have a bowl, a pan, and an oven, you’re basically halfway there already!
Ingredients You’ll Need
For the Chocolate Cake:
- 2 cups all-purpose flour (the regular stuff, nothing fancy)
- 2 cups granulated sugar (because, duh, it’s cake)
- ¾ cup unsweetened cocoa powder (the darker, the better)
- 2 teaspoons baking soda (not baking powder – they’re different things, trust me)
- 1 teaspoon salt (to make the sweet stuff taste sweeter – science!)
- 2 large eggs (room temperature, if you remember, but no stress if you don’t)
- 1 cup buttermilk (or regular milk with a splash of lemon juice if you forgot to buy buttermilk)
- ½ cup vegetable oil (keeps it moist without making you cream butter – you’re welcome)
- 2 teaspoons vanilla extract (the real stuff if possible, because we’re worth it)
- 1 cup hot coffee (secret weapon for chocolate intensity – and no, the cake won’t taste like coffee)
For the Frosting:
- 1 cup unsalted butter, softened (patience, grasshopper – truly soft butter matters)
- 4 cups powdered sugar (yes, that much – we’re not making health food here)
- ¼ cup heavy cream (makes it silky smooth and dreamy)
- 1 teaspoon vanilla extract (again, the real deal)
- Pinch of salt (balances sweetness – trust the process)
For the Pink Flowers:
- 1 cup white fondant (pre-made from the store because life’s too short)
- Pink food coloring (gel works best, but use what you have)
- A tiny bit of tylose powder (optional, but makes your flowers hold shape better)
- Small flower cookie cutters (or wing it with a knife if you’re feeling brave)
Step-by-Step Instructions
Prep Work (Don’t Skip This!)
- Preheat your oven to 350°F (175°C). This is not optional – cold ovens are where good cakes go to die.
- Grease and line two 9-inch round cake pans. If you’re using parchment paper, give yourself a high-five for being so professional.
- Make your coffee and let it sit. You want it hot but not scalding when it goes into the batter.
For the Cake:
- In a large bowl, whisk together all the dry ingredients: flour, sugar, cocoa, baking soda, and salt. No need for sifting – we’re not that fancy today.
- In another bowl, mix the wet team: eggs, buttermilk, oil, and vanilla. Beat until they’re well combined and look like a cohesive mixture.
- Slowly pour the wet mixture into the dry ingredients, mixing on low speed. It’ll look thick and a bit sad at this point – don’t worry!
- Add the hot coffee last, mixing until just combined. The batter will be very thin – this is normal and actually what we want.
- Pour the batter evenly between your two prepared pans and pop them in the oven.
- Bake for 30-35 minutes or until a toothpick comes out with just a few moist crumbs. A completely clean toothpick means it’s overbaked, so keep an eye out!
- Let the cakes cool in the pans for 10 minutes (set a timer, impatient people!), then turn them out onto a cooling rack to cool completely.
For the Frosting:
- Beat the softened butter until it’s creamy and looks like, well, very soft butter.
- Add powdered sugar one cup at a time (unless you enjoy wearing it – then dump it all in at once and turn the mixer on high).
- Pour in the heavy cream and vanilla, then beat until fluffy. We’re talking at least 3-4 minutes here. Your patience will be rewarded with cloud-like frosting.
- Set aside about ⅓ of the frosting if you want to add color for piping details. The rest stays white for the base coat.
For the Pink Flowers:
- Knead a tiny drop of pink food coloring into your fondant. Start with less – you can always add more, but you can’t take it away.
- Roll the fondant out to about ⅛ inch thickness on a surface dusted with powdered sugar.
- Cut out flowers with your cookie cutters. If you’re fancy, pinch the centers slightly and curve the petals for dimension.
- Set the flowers aside to dry slightly while you frost the cake. They should be firm but not completely hard when you place them.
Assembly (Where the Magic Happens):
- Place one cake layer on your serving plate. If it’s domed, consider trimming the top for a flat surface. Or don’t – rustic is in!
- Spread a generous layer of frosting on top of the first layer. This is not the time to hold back.
- Place the second cake layer on top, gently pressing down.
- Apply a thin layer of frosting all over the cake – this is your crumb coat. It doesn’t need to be pretty. Chill the cake for 20 minutes to set this layer.
- Add your final coat of frosting, making it as smooth or textured as you like. No pressure – both looks have their charm.
- If you saved some frosting for details, tint it pink and pipe some borders or dots – whatever your heart desires.
- Arrange your fondant flowers in a pattern that pleases you. Try a cascade down one side for maximum “wow” factor with minimal effort.
Common Mistakes to Avoid
Overmixing the batter – You’re making cake, not bread. Once everything’s combined, step away from the mixer. Overmixing = tough cake = sad you.
Opening the oven repeatedly to check on your cake. I know it’s tempting, but every time you do this, the temperature drops, and your cake gets confused about whether it should rise or fall. Nobody wants a confused cake.
Frosting a warm cake – Unless you’re aiming for a melted snowman aesthetic, let that cake cool completely. I’m talking room temperature all the way through. Patience, grasshopper.
Making your fondant flowers too thick – They’ll look clunky and probably taste too chewy. Thin and delicate is the goal here, even if your first few attempts look more like pink blobs than flowers.
Overthinking the decoration – Sometimes the most beautiful arrangements happen when you just go with the flow. If it looks good to you, it IS good. End of story.
Alternatives & Substitutions
Not everyone has a fully-stocked professional kitchen (shocking, I know), so here are some workarounds:
No buttermilk? Add 1 tablespoon of white vinegar or lemon juice to a cup of regular milk and let it sit for 5 minutes. Boom – fake buttermilk that works just as well.
Don’t do coffee? Hot water will work, but you’ll miss out on some depth of flavor. You could also try hot chai tea for an interesting twist.
No fondant in sight? You can make flowers out of buttercream too! Just use a piping bag with a flower tip. They won’t look exactly the same, but they’ll be delicious. Or go rogue and use edible fresh flowers – just make sure they’re actually edible, mmkay?
Gluten issues? Sub in your favorite cup-for-cup gluten-free flour blend. The texture might be slightly different, but with all that chocolate, who’s really going to notice?
IMO, the beauty of this cake is its flexibility. It’s like the yoga instructor of desserts – bendy but still structured enough to stand on its own.
FAQ (Frequently Asked Questions)
Can I make this cake ahead of time?
Absolutely! The cake layers actually taste better the next day. You can bake them, wrap them well in plastic wrap, and store them at room temperature overnight or freeze them for up to a month. The fondant flowers can be made several days ahead too – just store them in a single layer in an airtight container.
Will my cake taste like coffee?
Nope! The coffee just enhances the chocolate flavor, making it deeper and more complex. Even coffee haters won’t detect it – they’ll just wonder why your chocolate cake tastes so much better than others.
Do I really need to use fondant for the flowers?
Of course not! Fondant is just one option that happens to look fancy with minimal skill required. Buttercream flowers are delicious, or you could use fresh edible flowers, or even candy flowers. You do you.
My cake cracked/sank/exploded. What happened?
First, if it exploded, I’m impressed. More likely: your oven temperature is off (get an oven thermometer), you opened the oven door too early (patience!), or you overmixed the batter (step away from the mixer). But guess what? Frosting hides a multitude of sins!
Can I turn this into cupcakes instead?
You brilliant person, yes! Fill cupcake liners about 2/3 full and bake for 18-22 minutes. You’ll get about 24 cupcakes, and each one can have its own little flower. Adorable!
The fondant is fighting me. Help?
If it’s too sticky, add more powdered sugar. Too dry? A tiny drop of water worked in with your hands will soften it right up. And if it’s absolutely refusing to cooperate, throw it in the trash and open a package of Oreos. Sometimes plan B is just fine.
Final Thoughts
Look at you, about to create a showstopper cake that’ll make your friends think you’ve been secretly taking professional baking classes! The beauty of this chocolate cake with pink flowers is that it looks impressive but doesn’t require a culinary degree or special equipment – just a bit of patience and willingness to play with your food.
Remember, the goal isn’t perfection – it’s creating something delicious that brings joy (both in the making and the eating). If your flowers look more abstract art than botanical illustration, call it your signature style and own it with pride.
Now go preheat that oven and channel your inner artist-baker hybrid! And when people ask for your secret? Just wink mysteriously and say it’s an old family recipe. What happens in your kitchen stays in your kitchen – except for this amazing cake, which should definitely be shared.

