Ever stood in front of your oven thinking, “I need something that screams ‘I’m a professional baker’ without actually requiring professional skills”? Well, grab your apron because this sunflower-themed cake is about to solve that existential baking crisis! It’s impressive enough for Instagram but secretly simple enough that you won’t have a meltdown halfway through.
Why This Recipe is Awesome
Let me count the ways this cake rules. First, it’s basically two show-stopping desserts in one – gorgeous sunflower aesthetics on the outside, decadent chocolate goodness on the inside. Second, despite looking like something that would earn you a Hollywood handshake on Great British Bake Off, it’s surprisingly manageable for us regular humans. And third, it’s customizable – mess it up a bit and you can just say it’s “rustic.” Win-win-win!
Plus, everyone will think you spent hours on it when really you were binge-watching your favorite show for most of the prep time. That’s what I call efficient baking.
Ingredients You’ll Need
For the cake:
- 2 cups all-purpose flour (the regular stuff, nothing fancy)
- 1 ¾ cups granulated sugar (yes, that much – this isn’t a health food)
- ¾ cup unsweetened cocoa powder (the good kind, not the sad hot chocolate packets)
- 1 ½ teaspoons baking powder
- 1 ½ teaspoons baking soda
- 1 teaspoon salt
- 2 eggs (room temperature, because cold eggs are apparently rude to cake batter)
- 1 cup buttermilk (or regular milk with a splash of vinegar if you forgot to buy buttermilk… again)
- ½ cup vegetable oil
- 2 teaspoons vanilla extract (real vanilla, not that imitation nonsense)
- 1 cup hot coffee (or hot water if caffeine makes you twitchy)
For the sunflower decoration:
- 1 cup unsalted butter, softened (like, actually softened, not that half-cold chunk you’re tempted to use)
- 3-4 cups powdered sugar (depending how sweet your tooth is feeling)
- Yellow food coloring (the brighter, the better)
- Orange food coloring (just a touch)
- 1 cup chocolate chips, melted (for the sunflower center)
- Green food coloring (for optional leaves)
Step-by-Step Instructions
- Prep your workspace like a responsible adult. Preheat oven to 350°F (175°C) and grease two 9-inch round cake pans. Line the bottoms with parchment paper if you’re smart and don’t want a cake-stuck-in-pan disaster.
- Mix the dry ingredients. In a large bowl, whisk together flour, sugar, cocoa powder, baking powder, baking soda, and salt. Make a little well in the center like you’re creating a cocoa volcano.
- Add the wet team. Pour in eggs, buttermilk, oil, and vanilla. Mix until just combined – don’t go crazy with the mixing or you’ll activate the gluten and make your cake tough. Nobody wants a tough cake.
- Add the secret weapon. Stir in the hot coffee. Yes, the batter will look alarmingly thin. No, you didn’t mess up. That’s the magic that makes this cake moist.
- Bake those babies. Pour batter evenly into your pans and bake for 30-35 minutes, or until a toothpick comes out mostly clean. A few moist crumbs are good; wet batter is not.
- Cool your jets. Let cakes cool in pans for 10 minutes, then flip onto wire racks to cool completely. If you frost them while warm, you’ll create a buttercream avalanche.
- Make your buttercream. Beat butter until fluffy (about 3 minutes), then gradually add powdered sugar. Add a splash of milk if it gets too thick. Set aside about 1/4 cup of white frosting for optional green leaves.
- Color that frosting. Add yellow food coloring to the main batch, with just a drop or two of orange to make it sunflower-perfect. Color the reserved frosting green if you’re doing leaves.
- Assemble the cake. Place one layer on your serving plate, spread a layer of buttercream, top with second cake. Cover the whole thing with a thin layer of frosting (this is your crumb coat). Chill for 15 minutes.
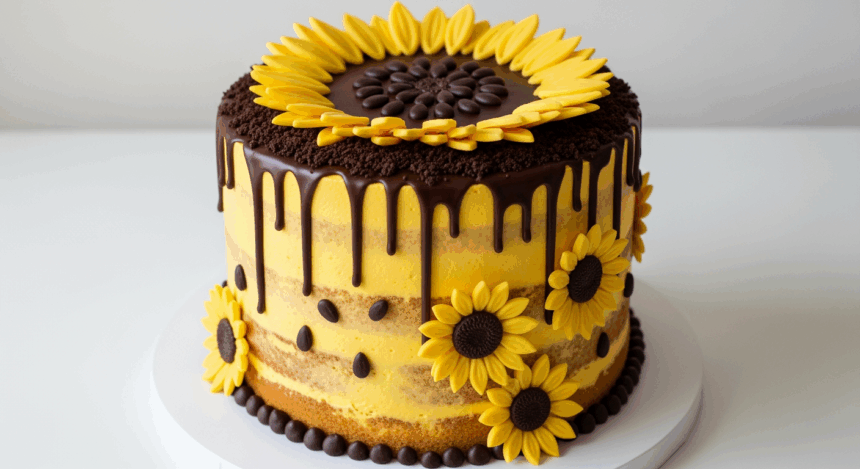
- Create your sunflower. Using a piping bag with a petal tip (or a ziplock with the corner snipped off, no judgment), pipe yellow “petals” around the top edge of the cake, working your way inward. Continue down the sides if you’re feeling ambitious.
- Add the center. Pour melted chocolate in the middle of your sunflower to create the dark center. Let it drip slightly down the sides for that “I meant to do that” look.
- Optional: Add leaves. Use green frosting to pipe a few leaves around the base of your masterpiece.
Common Mistakes to Avoid
Even the best bakers occasionally create disasters. Here’s how to avoid joining that club:
- Overmixing your batter. This isn’t a workout session – mix just until combined unless you want a cake with the texture of rubber.
- Using cold ingredients. Room temperature eggs and butter blend better. Plan ahead or microwave very carefully if you forgot (been there).
- Rushing the cooling process. Hot cakes + frosting = sliding layers and sadness. Be patient for once in your life!
- Skipping the crumb coat. Unless you enjoy little chocolate specks throughout your beautiful yellow frosting, don’t skip this step.
- Getting intimidated by the decorating. Remember, real sunflowers aren’t perfect either. Embrace the “artisanal look” if things go sideways.
Alternatives & Substitutions
Can’t follow directions exactly? No problem! Here are some tweaks:
- Make it vanilla: Use vanilla cake instead of chocolate if you’re one of those people who don’t worship at the altar of cocoa.
- Dairy-free option: Use almond milk + a tablespoon of vinegar instead of buttermilk, and plant-based butter for the frosting. The cake will still be delicious, just slightly different.
- Less sweet version: Reduce sugar to 1 ½ cups in the cake and use dark chocolate for the center. IMO, this makes for a more sophisticated flavor anyway.
- Cupcake adaptation: Turn this into 24 sunflower cupcakes! Just reduce baking time to about 18-20 minutes and decorate each with a mini sunflower.
- Lazy version: Use store-bought frosting and just add food coloring. I won’t tell anyone if you don’t.
FAQ (Frequently Asked Questions)
Can I make this cake ahead of time?
Absolutely! The cake layers can be baked a day ahead and wrapped in plastic wrap. You can even freeze them for up to a month. The decorated cake will hold up nicely in the fridge for 2-3 days, though the colors might dull slightly.
Do I really need to use coffee in the cake?
Nope, hot water works too. But the coffee doesn’t make it taste like coffee – it just enhances the chocolate flavor. Trust me on this one.
What if my petals look more like yellow blobs?
Then you’ve created an “abstract” sunflower! Seriously though, if your first few petals look rough, scrape them off and try again. Or just call it a “modern interpretation” and own it.
Can I use canned frosting instead of making buttercream?
You can, but should you? Store-bought frosting is softer and harder to pipe defined shapes. If you must go this route, refrigerate the frosting for a bit to firm it up.
How do I transport this masterpiece without ruining it?
Chill the cake thoroughly first. Then use a cake carrier if you have one, or carefully place toothpicks around the top and loosely cover with plastic wrap that doesn’t touch the decoration. And maybe consider having people come to you instead.
What if I don’t have piping tips?
No fancy equipment? No problem! Cut a small corner off a ziplock bag for simple petals, or use the back of a spoon to create texture in the frosting. The sunflower police won’t arrest you.
Final Thoughts
There you have it – a show-stopping sunflower cake that’s both gorgeous AND delicious. Sure, you might have yellow food coloring under your fingernails for days, but that’s just the mark of a dedicated baker. Plus, who doesn’t want their kitchen creations to spark joy in this crazy world?
The best part about this recipe is that it’s forgiving. Petals looking weird? Add more! Chocolate center too small? Make it bigger! It’s YOUR sunflower cake – you’re the artist here.
Now go forth and create something that would make Van Gogh jealous (though hopefully with less ear drama and more cake eating). Your Instagram feed – and your taste buds – will thank you!
