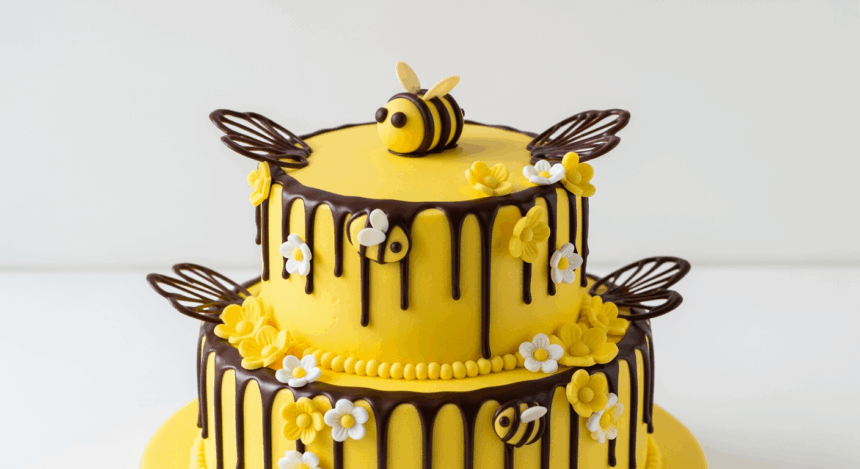
Okay, so you’ve volunteered to bring a showstopper dessert to the garden club meeting, and now you’re frantically Googling “cake ideas that don’t look like a 5-year-old made them”? Been there! This bee-themed cake is about to become your new secret weapon. It looks complicated (hello, Instagram likes!) but between us, it’s actually pretty simple. Let’s create some buzz with this honey of a recipe!
Why This Recipe is Awesome
First off, this bee cake hits that sweet spot between “wow factor” and “won’t make you cry in the kitchen.” The honeycomb pattern looks like you spent hours on it, but it’s basically just pressing things into frosting. And those chocolate bees? They’re basically squiggles with wings that somehow turn out adorable every single time. Plus, who doesn’t love a theme that lets you make terrible bee puns throughout the entire party? (“This cake is un-BEE-lievable!” Sorry, not sorry.)
Ingredients You’ll Need
For the cake:
- 2 boxes of yellow cake mix (because life’s too short to measure flour)
- 6 eggs (the chickens did all the hard work here)
- 1 cup vegetable oil
- 2 cups water
- ¼ cup honey (because, duh, bees)
For the frosting:
- 4 sticks unsalted butter, softened (yes, FOUR – this isn’t diet food, people)
- 8 cups powdered sugar (don’t breathe while measuring unless you want to look like a ghost)
- ¼ cup honey
- 2 tsp vanilla extract
- Yellow food coloring (or yellow and a tiny bit of orange to get that perfect honey color)
For the chocolate bees and decorations:
- 1 bag of dark or semi-sweet chocolate chips
- 1 bag of white chocolate chips
- Yellow food coloring (oil-based if you can find it)
- Sliced almonds (for bee wings)
- Honeycomb candy or a honeycomb-shaped cookie cutter (optional but extra fancy)
Step-by-Step Instructions
- Preheat your oven to 350°F (175°C). This step is non-negotiable, unless you enjoy raw cake batter (no judgment).
- Prepare your cake pans. Grease and flour three 8-inch round cake pans. If you’re feeling fancy, add parchment paper circles at the bottom.
- Mix the cake batter. Dump both boxes of cake mix into a large bowl. Add the eggs, oil, water, and honey. Beat with an electric mixer until smooth-ish (a few small lumps won’t kill anyone).
- Divide and conquer. Pour equal amounts of batter into your three prepared pans. Bang the pans against the counter a few times to release air bubbles (also great stress relief).
- Bake for 25-30 minutes. You know the drill—insert a toothpick in the center, and if it comes out clean, you’re good to go. If not, give it a few more minutes and check your phone while waiting.
- Cool completely. Let the cakes cool in pans for 10 minutes, then flip them onto cooling racks. No shortcuts here—warm cake + frosting = sliding disaster.
- Make the honey buttercream. Beat the butter until fluffy. Gradually add the powdered sugar (emphasis on gradually unless you enjoy wearing it). Mix in the honey and vanilla. Add yellow food coloring until it reaches your desired honey shade.
- Assemble the cake. Level your cakes if needed (eat the scraps—chef’s privilege). Place one layer on your cake stand, add frosting, repeat with remaining layers. Cover the entire cake with a thin layer of frosting as a crumb coat. Refrigerate for 20 minutes.
- Final frosting. Cover the cake with the remaining buttercream. For a honeycomb effect, press a clean honeycomb-patterned item (or bubble wrap in a pinch!) gently into the sides.
- Make chocolate bees. Melt dark chocolate in the microwave (30-second intervals, stirring in between). Pipe small ovals onto parchment paper. Add tiny stripes with melted yellow-tinted white chocolate. Stick sliced almonds into the sides for wings before the chocolate sets.
- Decorate your masterpiece. Once the chocolate bees have hardened, arrange them on your cake. Add some dripping honey effect by mixing a bit of honey with a touch of frosting and letting it drip down the sides.
Common Mistakes to Avoid
1. Rushing the cooling process. I know you want to frost that cake ASAP, but unless “avalanche” is the look you’re going for, wait until it’s completely cool.
2. Overheating your chocolate. Chocolate goes from “perfectly melted” to “burned beyond recognition” in approximately 3 seconds. Low and slow is the way to go.
3. Making your bees too big. Unless you’re recreating “The Swarm,” keep those bees petite. Nobody wants to bite into a massive chunk of solid chocolate (okay, maybe some people do, but they’re not the norm).
4. Getting food coloring everywhere. Yellow hands, yellow countertops, yellow cat… Been there. Use gloves or accept that you’ll look jaundiced at work tomorrow.
Alternatives & Substitutions
• No time for homemade cake? Store-bought layers work too. I won’t tell if you don’t.
• Can’t find yellow cake mix? Vanilla works just fine. Add a drop or two of yellow food coloring if you’re committed to the theme.
• Don’t like honey? First off, who are you? But fine, substitute maple syrup for a different but still delicious flavor profile.
• No almonds for bee wings? Try white chocolate piped into wing shapes, or even cut small wing shapes from edible wafer paper.
• Gluten-sensitive guests? Use gluten-free cake mix. The frosting and decorations are already gluten-free, so you’re halfway there.
FAQ (Frequently Asked Questions)
How far in advance can I make this cake?
The cake layers can be made 1-2 days ahead and wrapped tightly in plastic wrap. The fully decorated cake is best assembled the day before your event. Those chocolate bees aren’t getting any younger sitting in your humid kitchen, ya know?
Can I make cupcakes instead of a layer cake?
Absolutely! Same batter, same frosting, just adjusted baking times (start checking at 18 minutes). Plus, each person gets their own bee on top, avoiding frosting territory disputes.
Do I really need three layers?
Nope! Two layers work fine if that’s all you have pans for. The cake will still look bee-utiful (sorry, had to squeeze in one more). It just won’t be quite as tall and dramatic.
What if my chocolate bees look more like chocolate blobs?
Call them “abstract interpretations of the bee form” and act like that was the plan all along. Art is subjective, right?
How do I transport this cake without destroying it?
Chill the cake solid first (1-2 hours in the fridge). Then use a cake carrier, or insert toothpicks around the top to prevent plastic wrap from touching the frosting. Drive like you’ve got a sleeping baby in the car.
Final Thoughts
There you have it—a bee-themed cake that’s guaranteed to create some buzz! (Last pun, I promise.) The best part about this recipe is that even if things go a little sideways—your bees look wonky or your honeycomb pattern isn’t perfect—it still looks intentional. That’s the magic of themed cakes: a few recognizable elements, and everyone thinks you’re a baking genius.
So channel your inner cake boss, embrace the inevitable mess your kitchen will become, and have fun with it. At the end of the day, it’s cake covered in honey-flavored frosting with chocolate on top—even at its worst, that’s still pretty darn good! Now go forth and pollinate the world with your sweet creation!
