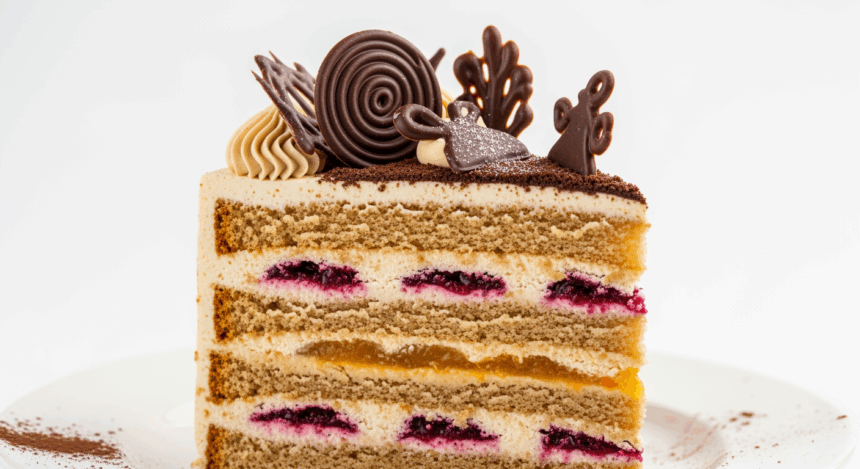
Oh. My. Goodness. Did someone say chocolate decoration on a layered cake? I don’t know about you, but whenever I see those fancy cake slices in bakery windows with their perfect layers and chocolate curls on top, I immediately think, “I want that in my face right now.” Well, guess what? We’re making that happen today! This slice of heaven is easier than it looks, and I’m here to walk you through it while we pretend calories don’t exist. Deal?
Why This Recipe is Awesome
Let me count the ways this layered cake with chocolate decoration will change your life:
First off, it looks ridiculously impressive while secretly being manageable for us normal humans who don’t have pastry degrees. Your Instagram is about to get a serious upgrade.
Second, it’s customizable! Don’t like vanilla? Make it chocolate. Hate chocolate? First, who are you and why are we friends? Second, use fruit instead. The cake police aren’t watching.
Third, those chocolate decorations? They make you look like you graduated from some fancy French culinary school when really you just spent 10 minutes playing with melted chocolate. It’s basically sanctioned chocolate finger painting for adults.
Ingredients You’ll Need
For the cake layers:
- 2 cups all-purpose flour (the regular boring stuff, nothing fancy)
- 1¾ cups granulated sugar (aka happiness crystals)
- ¾ cup unsalted butter, softened (not melted—there’s a difference, trust me)
- 4 eggs (room temperature, because cold eggs are party poopers)
- 1 cup milk (cow, almond, oat—whatever floats your boat)
- 2½ teaspoons baking powder (the magic dust that makes things rise)
- 1 teaspoon vanilla extract (the real stuff if you’re feeling fancy)
- ½ teaspoon salt (to make the sweet stuff taste sweeter—science!)
For the frosting:
- 1 cup unsalted butter, softened (again, not melted—I’m looking at you, microwave enthusiasts)
- 4 cups powdered sugar (prepare for the sneeze cloud when you open it)
- ¼ cup heavy cream (yes, the fatty good stuff)
- 1 teaspoon vanilla extract (or other flavor if you’re feeling rebellious)
- Pinch of salt (trust me on this one)
For the chocolate decoration:
- 4 ounces semi-sweet chocolate (chocolate chips work fine, no need to get fancy)
- 1 tablespoon vegetable oil (helps make the chocolate shiny and cooperative)
Step-by-Step Instructions
Prep Work
- Preheat your oven to 350°F (175°C). I know it’s tempting to skip this step, but resist the urge. Your future cake self will thank you.
- Grease and flour two 9-inch round cake pans. Or use parchment paper if you’re one of those organized people.
- In a medium bowl, whisk together flour, baking powder, and salt. Set aside and try not to snack on the raw flour (weird craving, but we’ve all been there).
Making the Cake
- In a large bowl, beat butter and sugar until fluffy—about 3 minutes. This is not the time to be impatient! The fluffier this mixture, the better your cake.
- Add eggs one at a time, beating well after each addition. If some egg slips down the side of the bowl, congratulations, you’re now officially baking!
- Add vanilla extract and mix well.
- Alternately add the flour mixture and milk to the butter mixture, starting and ending with flour. Don’t overmix unless you’re aiming for a cake with the texture of rubber.
- Divide batter between the prepared pans and smooth the tops. Give the pans a gentle tap on the counter to release any air bubbles—also great for releasing kitchen frustrations.
- Bake for 25-30 minutes or until a toothpick inserted in the center comes out clean. If it comes out with batter, your cake is swimming; if it comes out with a few crumbs, you’re golden!
Making the Frosting
- In a large bowl, beat butter until creamy.
- Gradually add powdered sugar, cream, vanilla, and salt. Beat until smooth and fluffy. If your arm gets tired, you’re doing it right (or just use an electric mixer like a normal person).
- If the frosting is too thick, add more cream. If it’s too thin, add more powdered sugar. It should hold its shape but be spreadable—kind of like good peanut butter.
Creating the Chocolate Decoration
- Melt chocolate and oil together in the microwave in 30-second bursts, stirring between each burst. Or use a double boiler if you want to feel like a professional.
- Spread melted chocolate thinly on a piece of parchment paper. For curls, let it set slightly (about 2-3 minutes) then use a spatula to create curls. For shards, let it harden completely then break into pieces.
- Place your chocolate creations in the refrigerator to firm up while you assemble the cake.
Assembling Your Masterpiece
- Once cakes are completely cool (I mean it—completely cool), level the tops if needed. Eating the scraps is chef’s privilege.
- Place one layer on a serving plate and spread with a thick layer of frosting.
- Top with the second cake layer and frost the entire cake. Get artistic or keep it rustic—both look intentional if you act confident enough.
- Decorate the top with your chocolate creations. Be gentle—these babies are fragile!
- Step back and admire your work. Take pictures for social media before anyone gets to eat it (you know how this works).
Common Mistakes to Avoid
Let’s talk about how not to turn this dream cake into a nightmare:
- Using cold ingredients: Cold butter and eggs are the enemies of a smooth cake batter. Let them come to room temperature first, even if that means planning ahead (I know, the horror!).
- Opening the oven door too early: I get it, you’re excited and want to peek. But your cake will sink faster than my motivation on Monday mornings.
- Frosting a warm cake: Unless you’re going for the “melted snowman” look, wait until your cake is completely cool. Otherwise, your frosting will slide off like it’s trying to escape.
- Overheating the chocolate: Chocolate goes from perfectly melted to burnt disaster in seconds. Microwave in short bursts and stir in between—it’s like babysitting, but tastier.
- Rushing the process: Good cakes, like good relationships, take time. Don’t try to make this when you’re already late for a party. That path leads to tears and takeout.
Alternatives & Substitutions
Because sometimes we need to improvise (or the store was out of something, or you’re too lazy to go shopping—no judgment here):
For the cake:
- No vanilla extract? Use almond extract for a fancy twist, or even bourbon if you’re feeling saucy.
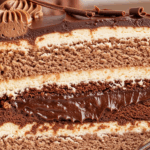
- Make it chocolate: Add ⅓ cup cocoa powder and reduce flour by the same amount.
- No milk? Buttermilk, yogurt, or even sour cream will work—each giving a slightly different flavor profile.
- Gluten-free friends: Use a good gluten-free flour blend with xanthan gum included.
For the frosting:
- Cream cheese frosting: Replace half the butter with cream cheese for a tangier flavor.
- Flavored frosting: Add 1-2 tablespoons of coffee, fruit puree, or liqueur to change up the flavor.
- Lighter option: Whipped cream is a great alternative if you’re looking for something less sweet (but FYI, it won’t hold up as long).
For the decoration:
- White chocolate works beautifully for a different look.
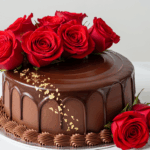
- No chocolate? Use fresh berries, edible flowers, or even crushed cookies.
- Feeling extra? Add some edible gold or silver dust to your chocolate for a metallic shine that screams “I’m fancy!”
FAQ (Frequently Asked Questions)
Can I make this cake ahead of time?
Absolutely! The cake layers can be made up to two days in advance—just wrap them well and store at room temperature. The fully assembled cake is best eaten within 24 hours, though, unless you enjoy slightly stale cake (which, let’s be honest, is still cake).
My chocolate decorations melted when I put them on the cake. What went wrong?
Your frosting was probably still too warm. Next time, refrigerate your frosted cake for about 20 minutes before adding the chocolate decorations. Also, keep your cake away from direct sunlight or heat sources—chocolate is basically a drama queen when it comes to temperature.
Can I use a box cake mix instead?
I mean, technically yes. Will I silently judge you? Also yes. But seriously, if you’re short on time or ingredients, a box mix with homemade frosting and chocolate decorations will still impress most people. Your secret is safe with me.
How do I store leftovers?
Leftovers? What leftovers? But in the unlikely event you have some, store in an airtight container at room temperature for up to 3 days. The refrigerator will extend the life but might dry out the cake—it’s a quality vs. longevity decision.
My cake layers came out uneven. Help!
Welcome to the real world of baking! You have two options: 1) Trim them with a serrated knife to make them even (and enjoy the scraps), or 2) Use extra frosting to level things out. Option 2 is clearly superior because: more frosting.
Final Thoughts
There you have it—your ticket to cake stardom! This layered cake with chocolate decoration might look like something from a fancy bakery window, but now you know the sweet truth: it’s totally doable in your kitchen, even if that kitchen is the size of a postage stamp.
The best part? Even if your cake doesn’t look exactly like the picture (whose ever does?), it’ll still taste amazing. And if anyone criticizes your decorating skills, just remember—they get less cake.
So go ahead, create your masterpiece, snap that Instagram-worthy photo, and then destroy the evidence… by eating it! After all, you’ve just tackled layers and chocolate work—you deserve to celebrate with an extra-large slice. That’s not just permission; it’s practically a directive.
Happy baking, friend! May your layers be even and your chocolate decorations survive the journey from kitchen to table.
