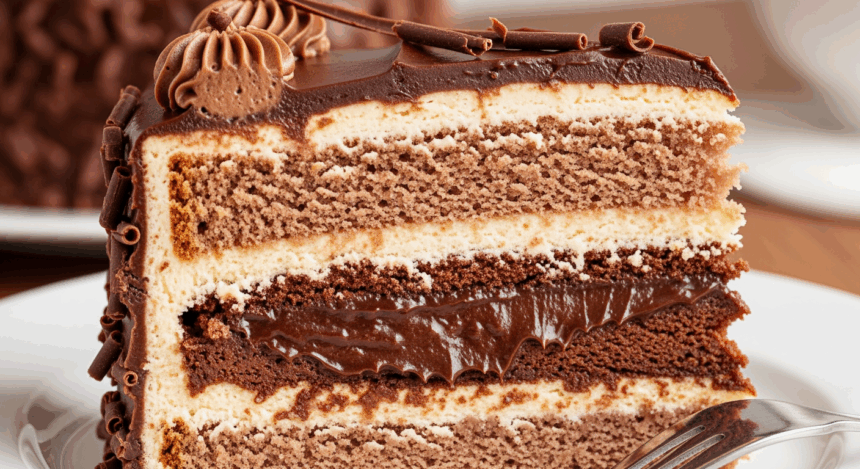
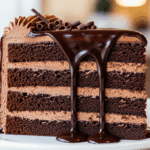
Ah, the chocolate slice of cake – that moment when you take a bite and discover the hidden treasure of chocolate filling inside. Is there anything more satisfying? It’s like finding money in your pocket, except you can actually eat it (and trust me, it tastes way better than cash).
Why This Recipe is Awesome
Let’s be real here – this isn’t just any cake. This is the cake you make when you want people to think you spent hours slaving away in the kitchen, when actually you were binge-watching that show everyone’s talking about. The secret chocolate filling makes people go “Oooh!” when they cut into it, which is worth the price of admission alone.
Plus, it’s surprisingly forgiving. Had a rough day? Take it out on the batter – this cake can handle your aggressive mixing. The chocolate filling actually improves if the cake sits overnight, making it the perfect make-ahead dessert for when you want to seem put-together but definitely aren’t.
Ingredients You’ll Need
For the cake:
- 2 cups all-purpose flour (the regular boring stuff, nothing fancy)
- 1 ¾ cups granulated sugar (because 2 cups would be overkill, apparently)
- ¾ cup unsweetened cocoa powder (the darker, the better – like my soul)
- 1 ½ teaspoons baking powder (the unsung hero)
- 1 ½ teaspoons baking soda (not to be confused with the powder, though we’ve all been there)
- 1 teaspoon salt (to balance out all that sweet – trust me)
- 2 eggs (room temperature, because cold eggs are party poopers)
- 1 cup buttermilk (or regular milk with a splash of vinegar if you’re not fancy)
- ½ cup vegetable oil (keeps it moist – sorry if you hate that word)
- 2 teaspoons vanilla extract (the real stuff, not that imitation nonsense)
- 1 cup hot coffee (gives depth, won’t make your cake taste like a Starbucks)
For the chocolate filling:
- 1 cup heavy cream (the good stuff, diet culture can wait)
- 8 oz semi-sweet chocolate (chopped, or just use chips if chopping sounds like too much work)
- ¼ cup powdered sugar (for sweetness and to make you sneeze while measuring)
- 1 teaspoon vanilla extract (again, the real deal)
- Pinch of salt (because even chocolate needs balance in life)
Step-by-Step Instructions
- Prep your space. Preheat oven to 350°F (175°C). Grease and flour two 9-inch round cake pans. Or use parchment paper if you’re fancy (or lazy and hate cleaning).
- Mix the dry ingredients. In a large bowl, whisk together flour, sugar, cocoa, baking powder, baking soda, and salt. Try not to create a dust storm in your kitchen.
- Add the wet team. Toss in eggs, buttermilk, oil, and vanilla. Mix until just combined – this isn’t a workout session.
- Coffee time! Stir in the hot coffee. Yes, the batter will be thin. No, you didn’t mess up. It’s supposed to look like that.
- Bake it. Pour batter evenly into prepared pans. Bake for 30-35 minutes or until a toothpick comes out clean. If you forget the toothpick test and just wing it, I respect that energy.
- Cool your jets. Let cakes cool in pans for 10 minutes, then flip onto wire racks to cool completely. Patience, grasshopper.
- Make the filling. Heat cream until just simmering (tiny bubbles, not a full boil). Pour over chocolate in a bowl. Let sit for 2 minutes (count slowly if you’re impatient). Stir until smooth. Add powdered sugar, vanilla, and salt. Chill until thick but still spreadable – about 30 minutes.
- Slice and fill. Once cakes are completely cool, slice each horizontally to create four layers. Spread chocolate filling between layers. Don’t eat all the filling before assembling – I see you.
- Chill out. Refrigerate assembled cake for at least 1 hour before serving. This helps everything set and makes you look like you know what you’re doing.
Common Mistakes to Avoid
Let’s talk about ways to not sabotage yourself:
- Impatience with cooling. Trying to fill a warm cake is like trying to spread butter on hot toast – a slippery disaster waiting to happen.
- Overmixing the batter. This isn’t a competition to see how well you can beat things. You’re making cake, not whipping cake into submission.
- Skipping the coffee. “But I don’t like coffee!” I hear you cry. The cake doesn’t taste like coffee – the coffee makes the chocolate taste more chocolatey. Science, baby.
- Getting impatient with the filling. If it’s too runny, your cake layers will slide around like they’re at a skating rink. Not cute.
- Eyeballing measurements. I know you think you’re special, but baking is chemistry. Respect the science.
Alternatives & Substitutions
Life happens. Ingredients go missing. Here’s how to adapt:
No buttermilk? Add 1 tablespoon of lemon juice or white vinegar to regular milk and let it sit for 5 minutes. Boom – DIY buttermilk.
Coffee alternatives: Use hot water if you must, but you’re missing out. You could also use hot chai tea for a spicy twist that’s actually pretty amazing, IMO.
Filling variations: Add 2 tablespoons of raspberry jam to the chocolate filling for a fruity kick. Or stir in 1 tablespoon of bourbon if you’re feeling naughty (and are serving to adults only, obviously).
Dietary restrictions? Replace eggs with ¼ cup applesauce each. For gluten-free, use a 1:1 gluten-free flour blend, but expect a slightly different texture. Not bad different, just different-different.
FAQ (Frequently Asked Questions)
Can I make this cake ahead of time?
Actually, you absolutely should! The filling sets up beautifully overnight, and the flavors meld together like they’re having their own little party. Up to 2 days ahead is perfect.
Do I really need to use hot coffee?
Look, I’m not the coffee police, but hot coffee enhances chocolate flavor without making the cake taste like your morning brew. If you’re morally opposed to coffee, hot water will work, but you’re leaving flavor on the table.
Can I freeze this cake?
You bet! Freeze individual slices for your future self who will thank you during that 10pm dessert craving. Just wrap well in plastic wrap and then foil. Thaw in the fridge overnight.
My filling is too runny! Help!
Chill out – literally. Pop it in the fridge for another 15 minutes and stir occasionally. Still runny? Add a bit more melted chocolate. Crisis averted.
Do I really need to make four layers?
Nope! Two layers works fine if you’re not feeling the whole cake surgeon vibe. The filling-to-cake ratio will be different, but still delicious.
How do I store leftovers?
In the fridge, covered – if there are any leftovers, which I seriously doubt. The cake will keep for up to 5 days, getting slightly better for the first 2-3 days.
Final Thoughts
Listen, you’ve just made a cake that looks like it could be in a bakery window. You’ve created something with a surprise inside, which basically makes you the pastry equivalent of a magician. That’s pretty cool.
The best part? Every slice reveals that gorgeous chocolate filling, meaning every bite is the perfect bite. No more fighting over corner pieces or frosting distribution – democracy in dessert form.
So go ahead, cut yourself a generous slice. You deserve it for reading this whole recipe. And when people ask for your secret, you can either share this recipe or just wink mysteriously. Your call. Either way, you’re now officially too good for store-bought cake.
