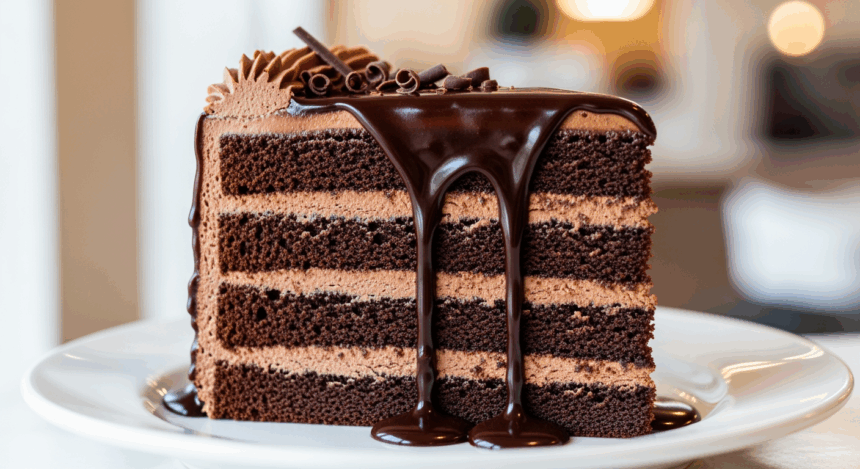
Listen, I don’t want to be dramatic, but this chocolate-topped layered cake slice might just change your life. Or at least your afternoon. You know those moments when you need something fancy-looking without the fancy effort? This is it. The cake that says “I tried really hard” when between us, you kinda didn’t.
Why This Recipe is Awesome
Let’s be real: this cake looks like you spent hours in the kitchen channeling your inner pastry chef, when actually you were probably scrolling TikTok for most of the prep time. It’s deceptively impressive – layers for days, chocolate dripping everywhere in that perfectly imperfect way, and yet… surprisingly doable.
The best part? You can make it ahead of time, so when your friends come over, you can just whip it out of the fridge like “Oh this old thing? I just threw it together.” *hair flip*
Ingredients You’ll Need
For the cake layers:
- 2 cups all-purpose flour (the regular boring stuff, nothing fancy)
- 1½ cups granulated sugar (the white crystals that make everything better)
- ½ cup unsalted butter, softened (not melted – there’s a difference, trust me)
- 2 eggs (from a chicken, preferably)
- 1 cup milk (cow, almond, oat – whatever floats your boat)
- 2 tsp vanilla extract (the real stuff if you’re feeling fancy)
- 1½ tsp baking powder (the stuff that makes things rise, duh)
- ¼ tsp salt (because even sweet things need balance in life)
For the filling:
- 1 cup whipped cream or buttercream (store-bought is FINE, no judgment here)
- ½ cup jam of choice (strawberry is classic, but live your life)
For that glorious chocolate topping:
- 1 cup semi-sweet chocolate chips (the good stuff, not those waxy imposters)
- ½ cup heavy cream (calories don’t count when baking, it’s science)
- 2 tbsp butter (for shine and because… butter)
- Sprinkles, berries, or whatever makes you happy (optional but recommended for your mental health)
Step-by-Step Instructions
- Prep your battle station. Preheat oven to 350°F (175°C). Grease and line two 8-inch round cake pans. If you only have one pan, that’s fine – you’ll just be here longer.
- Mix the dry squad. In a bowl, whisk together flour, baking powder, and salt. Set aside while you handle the fun stuff.
- Beat the butter and sugar. In a larger bowl, cream together the butter and sugar until fluffy and lighter in color. This takes about 3-4 minutes with an electric mixer, or approximately forever by hand.
- Add the wet team. Beat in eggs one at a time, then stir in vanilla. Don’t rush this step – nobody likes scrambled eggs in their cake.
- Combine forces. Alternately add the flour mixture and milk to the butter mixture, starting and ending with flour. Mix until just combined – overmixing makes tough cake, and we want tender, like our hearts.
- Bake it ’til you make it. Pour batter into prepared pan(s) and bake for 25-30 minutes or until a toothpick inserted in the center comes out clean. Cool in pans for 10 minutes, then move to a wire rack to cool completely.
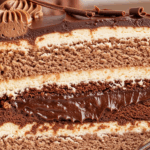
- Layer like a player. Once cool, slice each cake horizontally to create four layers total. If your cutting skills are questionable, you can stick with two layers. I won’t tell.
- Fill it up. Spread jam on the first layer, then top with whipped cream/buttercream. Repeat with remaining layers, but leave the top bare for our chocolate moment.
- Make the chocolate topping. Heat heavy cream until just simmering. Pour over chocolate chips, add butter, and let sit for 2 minutes. Stir until smooth and glossy. If there are still lumps, microwave in 10-second bursts.
- The grand finale. Once the ganache has cooled slightly but is still pourable, drizzle it over your cake. Let it drip down the sides for that dramatic effect we’re all here for. Add your toppings before the chocolate sets.
- Chill out. Refrigerate for at least 30 minutes to set the topping. Take a million photos for the ‘gram – you’ve earned it.
Common Mistakes to Avoid
Let’s be honest, there are plenty of ways to mess this up. Here are the greatest hits:
- Cutting the cake while it’s warm. Unless you want cake crumbs swimming in your filling, patience is key. Let it cool completely, or even better, refrigerate for an hour before cutting.
- Making the ganache too hot. Pour molten lava ganache on your cake and watch your layers slide around like they’re at a skating rink. Let it cool until it’s thick but still pourable.
- Skipping the parchment paper in the pans. Unless you enjoy serving cake pieces instead of slices, use the paper. Your future self will thank you.
- Overthinking the assembly. It doesn’t have to be perfect. Remember, we’re going for “rustic charm” here (the baking term for “slightly messy but still delicious”).
Alternatives & Substitutions
Because sometimes you gotta work with what you’ve got:
- Cake flavor remix: Add 2 tbsp of cocoa powder to the batter for a chocolate layer. Or lemon zest for a citrusy kick. Or both if you’re feeling chaotic.
- No heavy cream? For the ganache, you can use coconut cream or even full-fat evaporated milk in a pinch. The texture will be slightly different, but we’re all about solutions here, not problems.
- Filling options: Not into jam? Try lemon curd, Nutella, peanut butter, or crushed cookies mixed into the cream. I personally think crushed Oreos make everything better, but that’s just me.
- Topping alternatives: If chocolate isn’t your jam (though, who are you?), try a poured fondant, caramel sauce, or even a simple dusting of powdered sugar. But seriously, reconsider the chocolate.
FAQ (Frequently Asked Questions)
Can I make this ahead of time?
Absolutely! In fact, it’s often better the next day when the flavors have had time to mingle and get friendly with each other. Store in the fridge for up to 3 days. Beyond that, you’re entering the danger zone, my friend.
Help! My chocolate topping is too thick to pour!
Add a teaspoon of warm heavy cream and stir. Continue adding tiny amounts until you reach dripping consistency. If you’ve gone too far and it’s too thin, just add more chocolate chips. Ganache is surprisingly forgiving.
Can I freeze this cake?
You can, but I wouldn’t freeze it with the chocolate topping. Freeze the assembled cake without topping, then thaw in the fridge overnight and add the fresh ganache before serving. Your taste buds will thank you.
Do I really need to use unsalted butter?
TBH, salted butter works fine – just omit the added salt in the recipe. But baking purists might show up at your door with pitchforks, so consider yourself warned.
How do I get clean slices?
Run a knife under hot water, wipe it dry, then slice. Repeat for each cut. It’s extra effort, but if you want those Instagram-worthy clean edges, this is the way.
My layers are sliding around. What do I do?
First, panic. Then, grab a few toothpicks and insert them like structural supports. Remove before serving unless you want to add “dental work” to your party activities.
Final Thoughts
Look at you, all fancy with your layered cake! Even if your final result looks nothing like the picture (and TBH, mine rarely does), remember that taste trumps appearance every time. And if anyone criticizes your cake, just remember – they still ate it, didn’t they?
The beauty of this recipe is that it’s basically a template for your wildest cake dreams. Switch up the flavors, the fillings, go nuts with the toppings. It’s your cake journey, I’m just the GPS giving questionable directions.
Now go forth and conquer the cake world, one chocolate-drizzled slice at a time. And if all else fails, scrape it into a bowl, add ice cream, and call it a “deconstructed cake sundae.” Culinary genius, that’s what you are!
