
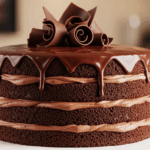
Ever been to a birthday party where the cake was so good you wanted to faceplant directly into it? That’s what we’re making today, folks! This chocolate birthday cake is the kind that makes people forget about their diet plans and ask for seconds. The kind where you’ll be scraping frosting off the empty plate when no one’s looking. Let’s dive into this slice of heaven!
Why This Recipe is Awesome
First off, this isn’t just any chocolate cake—it’s a birthday cake. That means it’s automatically 10x more magical than regular cake. But seriously, this recipe hits the sweet spot between “impressive enough to make people think you’re a kitchen wizard” and “actually doable without a culinary degree.”
Unlike those Pinterest fails waiting to happen, this recipe is surprisingly forgiving. Had a couple glasses of wine while baking? No problem! The cake will still turn out delicious. Plus, it stays moist for days (though good luck having any leftovers).
Ingredients You’ll Need
For the cake:
- 2 cups all-purpose flour (the regular stuff, nothing fancy)
- 2 cups granulated sugar (aka the reason this tastes good)
- ¾ cup unsweetened cocoa powder (the darker, the better)
- 2 teaspoons baking soda (not baking powder, they’re not the same thing—trust me)
- 1 teaspoon salt (to make the sweet taste sweeter, it’s science)
- 2 large eggs (from actual chickens, not the Easter Bunny)
- 1 cup buttermilk (regular milk with an attitude problem)
- ½ cup vegetable oil (makes it moist, deal with it)
- 2 teaspoons vanilla extract (the real stuff, not that imitation nonsense)
- 1 cup hot coffee (wakes up the chocolate flavor)
For the frosting:
- 1 cup unsalted butter, softened (patience, grasshopper—actually soft butter matters)
- 4 cups powdered sugar (yes, that much)
- ½ cup unsweetened cocoa powder (more chocolate, obviously)
- ¼ cup milk (cow, almond, oat—whatever floats your boat)
- 2 teaspoons vanilla extract (again, the real deal)
- Sprinkles (because it’s not a birthday cake without sprinkles, duh)
Step-by-Step Instructions
- Prep your battlefield. Preheat oven to 350°F (175°C). Grease and flour two 9-inch round cake pans. Pro tip: line the bottoms with parchment paper if you’re paranoid about sticking (I always am).
- Mix the dry stuff. In a large bowl, whisk together flour, sugar, cocoa, baking soda, and salt. Make a little well in the center like you’re creating a chocolate volcano.
- Add the wet ingredients. Pour in eggs, buttermilk, oil, and vanilla. Beat with an electric mixer for about 2 minutes until it’s well combined and looks like mud (the tasty kind).
- Coffee time! Stir in the hot coffee. Don’t panic—the batter will be thin. This is normal and actually what you want. Think hot chocolate consistency, not Play-Doh.
- Bake it good. Pour the batter evenly into your prepared pans. Bake for 30-35 minutes or until a toothpick inserted in the center comes out clean. If you stick it in and it comes out with batter, your cake is still taking a bath.
- Cool your jets. Let the cakes cool in the pans for 10 minutes, then remove them and let them cool completely on wire racks. Seriously, don’t rush this step unless you want a frosting avalanche.
- Frosting magic. Beat the butter until it’s creamy. Gradually add powdered sugar, cocoa powder, milk, and vanilla. Beat until smooth and spreadable. If it’s too thick, add more milk. If it’s too thin, add more powdered sugar. It’s like finding the perfect consistency of quicksand—but tastier.
- Assemble the beast. Place one cake layer on your serving plate. Slather a generous amount of frosting on top. Place the second layer on top, then frost the top and sides of the cake. Get artistic with it—or just pile it on, no judgment here.
- Make it rain. Throw sprinkles on top like you’re at a tiny, edible parade. More is more when it comes to birthday sprinkles.
- Slice and devour. Cut a perfect slice, take a photo for the ‘gram, then immediately ruin your masterpiece by digging in. That’s what it’s for!
Common Mistakes to Avoid
Opening the oven door too early. I know you’re excited, but your cake will sink faster than the Titanic if you let cold air in while it’s rising.
Using cold ingredients. Room temperature eggs and buttermilk blend better. Science and stuff.
Frosting a warm cake. Unless you’re going for the “melted snowman” aesthetic, wait until your cake is completely cool. I’m talking cold-shoulder cool.
Skipping the coffee. “But I don’t like coffee!” Trust me, you won’t taste it. It just makes the chocolate flavor pop like it’s on a sugar high.
Measuring flour by dipping the cup. This packs too much flour in. Spoon it into the measuring cup instead. Your cake will thank you by not being dry as the Sahara.
Alternatives & Substitutions
Buttermilk substitute: No buttermilk? No problem. Mix 1 cup of milk with 1 tablespoon of lemon juice or vinegar. Let it sit for 5 minutes until it looks slightly curdled. Voilà—fake buttermilk that works just as well!
Coffee options: Not a coffee drinker? Use hot water instead. The cake won’t have quite the same depth, but it’ll still be delicious. Or use hot chocolate for an extra chocolate kick (because there’s no such thing as too much chocolate, IMO).
Make it boozy: Add 2 tablespoons of Kahlúa or Bailey’s to the frosting for an adults-only version. It’s your party and you’ll spike if you want to.
Gluten-free version: Substitute a good quality cup-for-cup gluten-free flour blend. The texture might be slightly different, but hey, chocolate is still chocolate.
Vegan options: Replace eggs with flax eggs (2 tablespoons ground flaxseed + 6 tablespoons water), use plant milk + vinegar for buttermilk, and use vegan butter for frosting. The cake will still be killer.
FAQ (Frequently Asked Questions)
Can I make this cake ahead of time?
Absolutely! The cake layers actually taste even better the next day. Just wrap them well in plastic wrap once they’re completely cool. You can frost it up to 24 hours before serving.
Do I really need two cake pans?
Unless you want a sad, flat birthday cake, yes. But if you only have one pan, you can bake the layers one after another. Just keep the remaining batter at room temperature while you wait.
Why is my cake dry?
Did you overbake it? Did you measure the flour with a heavy hand? Did you forget the oil? All roads lead to desert-dry cake. Next time, set a timer and spoon that flour gently.
Can I freeze this cake?
FYI, this cake freezes like a dream! Wrap individual slices tightly in plastic wrap, then foil, and freeze for up to 3 months. Midnight cake emergencies = solved.
How do I get that perfect slice for photos?
Warm your knife under hot water, wipe it dry, then slice. Clean the knife between cuts. Or just dig in with a spoon. Who are you trying to impress anyway?
Can I use a 9×13 pan instead?
Sure thing! Bake it for about 35-40 minutes. You’ll have more of a sheet cake situation, but it’ll taste just as awesome.
Final Thoughts
There you have it—a chocolate birthday cake that’s guaranteed to make someone feel special (even if that someone is just you, eating it straight from the pan while watching Netflix). The best part about baking a cake is that even if it doesn’t look perfect, it still tastes amazing. Rustic is the new perfect, anyway.
Remember, calories don’t count on birthdays. It’s basically a law. So cut yourself a slice—a big one—add an extra scoop of ice cream, and celebrate like you mean it. Because life is short, but chocolate cake makes it sweeter!
Now go forth and bake! Your future self (with chocolate frosting on their face) will thank you.
