So, you’re craving that perfect chocolate cake – you know, the one that makes your taste buds do a little happy dance while you contemplate licking the plate when nobody’s looking? Well, grab your mixing bowl because I’ve got THE chocolate cake recipe that’s about to make you look like a pastry genius. The best part? It comes with a glossy, drool-worthy glaze that’ll have your Instagram followers zooming in for details. Let’s get baking!
Why This Recipe is Awesome
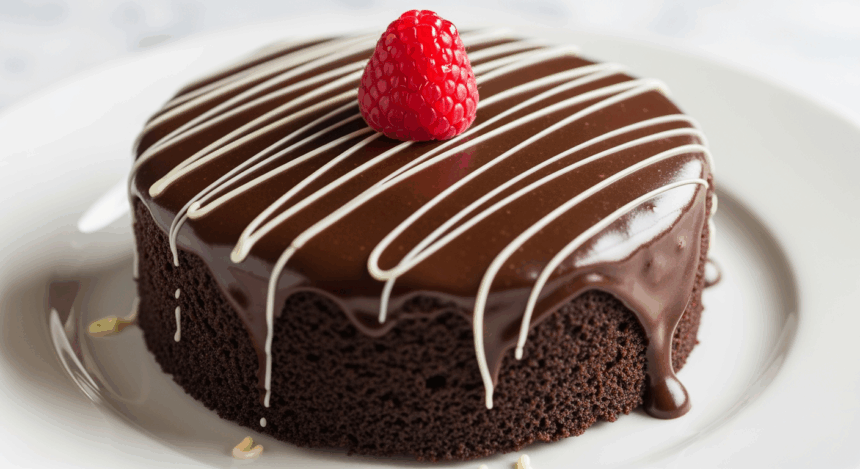
Look, I could tell you this chocolate cake is “delightful” or “scrumptious,” but let’s be real – this cake is basically chocolate therapy in edible form. It’s ridiculously moist (sorry if you hate that word, but there’s no better description), rich without being overwhelming, and topped with a glaze so shiny you might catch your reflection in it.
The beauty of this recipe is its forgiveness level. Had a rough day? Accidentally add a bit too much of something? No biggie! This cake is practically impossible to mess up. Even my friend who once burned water (yes, really) nailed this recipe on her first try. Plus, it uses just one bowl for the cake batter, which means fewer dishes. That alone deserves a standing ovation, amiright?
Ingredients You’ll Need
For the cake:
- 2 cups all-purpose flour (the regular stuff, nothing fancy)
- 2 cups granulated sugar (because we’re not here to count calories)
- ¾ cup unsweetened cocoa powder (the darker, the better for chocolate fiends)
- 2 teaspoons baking powder
- 1½ teaspoons baking soda
- 1 teaspoon salt (trust me, it makes the chocolate pop)
- 1 cup buttermilk (no buttermilk? I’ll tell you a hack later)
- ½ cup vegetable oil (keeps it moist for days)
- 2 large eggs (room temperature, pretty please)
- 2 teaspoons vanilla extract (the real stuff, not that imitation nonsense)
- 1 cup hot coffee (don’t skip this – it won’t taste like coffee, promise!)
For the glaze:
- ½ cup heavy cream
- 4 ounces semi-sweet chocolate, chopped (or just use chips, I won’t judge)
- 2 tablespoons corn syrup (makes it shiny AF)
- ¼ teaspoon vanilla extract (again, the good stuff)
Step-by-Step Instructions
Prep Work:
- Preheat your oven to 350°F (175°C). This is non-negotiable, folks. Don’t be that person who puts cake in a cold oven.
- Grease and flour a bundt pan or 9×13 inch baking pan. If you’re feeling fancy (or lazy), just use baking spray with flour.
For the Cake:
- In a large bowl, whisk together the flour, sugar, cocoa powder, baking powder, baking soda, and salt. Make a little well in the center like you’re creating a chocolate volcano.
- Pour in buttermilk, oil, eggs, and vanilla. Beat with an electric mixer on medium speed for about 2 minutes. Your batter should look like delicious chocolate satin.
- Stir in the hot coffee. Don’t panic! The batter will be thin – this is normal and exactly what we want.
- Pour the batter into your prepared pan. Give it a little shimmy to level it out.
- Bake for 30-35 minutes for a 9×13 pan, or 40-45 minutes for a bundt pan. The cake is done when a toothpick inserted comes out with a few moist crumbs (not wet batter).
- Cool in the pan for 10 minutes, then remove to a wire rack to cool completely. If you’re using a bundt pan, pray to the cake gods that it releases properly (or just use that baking spray like I told you).
For the Glaze:
- Heat the heavy cream in a small saucepan until it just begins to simmer. Don’t boil it – we’re making glaze, not burned milk.
- Put your chopped chocolate in a heat-proof bowl and pour the hot cream over it. Let it sit for 1 minute (count it out, impatient baker).
- Whisk until smooth, then add corn syrup and vanilla. Keep whisking until you have a glossy, drool-worthy glaze.
- Let it cool for about 5 minutes so it thickens slightly but is still pourable.
- Place your cake on a serving plate with some parchment strips tucked underneath the edges (for easy cleanup), then pour the glaze over. Watch it cascade down the sides like a chocolate waterfall. It’s basically cake ASMR.
- Pull out the parchment strips, and voilà! A professionally glazed cake with zero evidence of the mess you actually made.
Common Mistakes to Avoid
Listen up, because these tips might save your cake (and your dignity):
- Skipping the hot coffee. “But I don’t like coffee!” I hear you cry. The cake doesn’t taste like coffee – it makes the chocolate taste MORE chocolatey. Science, baby.
- Opening the oven door too early. I know you’re excited, but peeking before 25 minutes causes cake depression (it sinks in the middle).
- Glazing a warm cake. Unless you want your glaze to slide right off onto your plate. Which, TBH, you could just eat with a spoon. No judgment.
- Measuring flour like a rebel. Don’t scoop directly with the measuring cup. Fluff, spoon, level. Be a flour angel.
- Using cold eggs. They don’t mix well and can make your cake dense. Room temperature, people!
Alternatives & Substitutions
Because we all forget things at the grocery store or have dietary restrictions:
- No buttermilk? Add 1 tablespoon of vinegar or lemon juice to regular milk and let it sit for 5 minutes. Boom! Fake buttermilk.
- Coffee alternatives: Use hot water if you must, but you’re missing out. Hot chai tea is actually amazing if you’re feeling adventurous.
- Gluten concerns? A good quality 1:1 gluten-free flour blend works well here. The cake might be slightly more delicate, so be gentle when removing from the pan.
- Vegan version: Replace eggs with 2 flax eggs (2 Tbsp ground flaxseed mixed with 6 Tbsp water), use plant milk + vinegar for buttermilk, and make sure your chocolate is dairy-free.
- Glaze variations: Add a teaspoon of peppermint extract for mint chocolate vibes, or spike it with 1 tablespoon of your favorite liqueur. Baileys, anyone?
FAQ (Frequently Asked Questions)
Can I make this cake ahead of time?
Absolutely! The cake actually gets better after a day, as the flavors deepen. Just glaze it within a few hours of serving for maximum shine factor.
How do I store this masterpiece?
Room temperature in a cake keeper for 3-4 days. Don’t refrigerate unless it’s super hot in your kitchen – the fridge dries out cake faster than my humor during small talk.
Can I freeze this cake?
Yep! Freeze the unglazed cake tightly wrapped for up to 3 months. Thaw overnight at room temperature and add fresh glaze before serving. Your future self will thank you during unexpected cake emergencies.
Why did my glaze get too thick?
You probably let it cool too long. No worries – warm it gently in the microwave in 5-second bursts, stirring between each, until it’s pourable again. Crisis averted!
My cake stuck to the pan. How do I avoid this cake tragedy?
Next time, go overboard with the greasing AND flouring. And for bundt pans specifically, use that baking spray with flour like it’s going out of style. Also, let the cake cool for exactly 10 minutes before removing – not 5, not 20.
Can I turn these into cupcakes?
For sure! Fill liners about 2/3 full and bake for 18-20 minutes. You’ll get about 24 cupcakes. Dip the tops in glaze for a high-end bakery look that took you minimal effort. #FakeItTillYouMakeIt
Final Thoughts
Congratulations! You’ve just made a chocolate cake that would make grandmas everywhere nod in approval. The combination of that tender, rich cake with the glossy chocolate glaze is honestly what dessert dreams are made of.
Remember, the beauty of this recipe is that it looks fancy enough for special occasions but is easy enough for “it’s Tuesday and I need chocolate” emergencies. Don’t stress if it’s not perfect – even a slightly lopsided chocolate cake is still, you know, CHOCOLATE CAKE.
Now go slice into that beauty, maybe add a completely unnecessary but totally justified scoop of vanilla ice cream, and enjoy every bite. You deserve it! And if anyone asks for the recipe, feel free to mumble something about “family secrets” while you send them a link to this page.
