
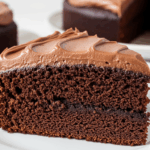
Ever stood in front of a cake and thought, “This would be so much better if it had my name on it”? Well, grab your aprons, friends, because today we’re making a chocolate cake that’s not just delicious but also shouts your name—literally! Whether you’re celebrating a birthday, trying to impress that special someone, or just want to eat a cake with your name on it (no judgment here), this recipe will make you look like a pastry pro while barely breaking a sweat.
Why This Recipe is Awesome
Let’s be real—there are approximately 7 billion chocolate cake recipes on the internet. So why this one? For starters, it’s nearly impossible to mess up. I once made this while simultaneously binge-watching an entire season of a show I won’t name (rhymes with “fridge”), and it still turned out amazing.
But the real magic is the personalized decoration part. It’s like having your cake and seeing your name on it too! Plus, this recipe uses regular ingredients you probably already have in your pantry, which means no emergency trips to that fancy grocery store where you always end up spending $50 on stuff you didn’t even know existed.
Ingredients You’ll Need
For the Chocolate Cake:
- 2 cups all-purpose flour (the regular boring kind, nothing fancy)
- 2 cups granulated sugar (you know, the sweet stuff)
- ¾ cup unsweetened cocoa powder (the darker, the better for your chocolate-loving soul)
- 2 teaspoons baking soda (not baking powder—they’re different, trust me)
- 1 teaspoon salt (just a pinch to make the sweet even sweeter)
- 2 large eggs (from a chicken, preferably)
- 1 cup buttermilk (or regular milk with a splash of lemon juice if you forgot to buy buttermilk…again)
- ½ cup vegetable oil (keeps it moist without making you think about the word “moist”)
- 2 teaspoons vanilla extract (the real deal, not that imitation nonsense)
- 1 cup hot coffee (or hot water if caffeine makes you bouncy)
For the Chocolate Frosting:
- ½ cup butter, softened (leave it out for an hour, or microwave it for 10 seconds and pretend you planned ahead)
- ⅔ cup unsweetened cocoa powder (chocolate overload? Not in my vocabulary)
- 3 cups powdered sugar (yes, that much—we’re not making health food here)
- ⅓ cup milk (cow, almond, oat—whatever floats your boat)
- 1 teaspoon vanilla extract (again, the real stuff)
For the Name Decoration:
- ½ cup white chocolate chips (or candy melts if you’re fancy)
- Food coloring (optional, for those who want a name that’s not just boring white)
- A piping bag or a ziplock bag with the corner snipped off (MacGyver would be proud)
- Parchment paper for practice (because unless you’re a calligraphy expert, your first attempt will look like a toddler wrote it)
Step-by-Step Instructions
- Prep your battlestation. Preheat your oven to 350°F (175°C). Grease and flour two 9-inch round cake pans, or just use parchment paper if you’re lazy smart.
- Mix the dry ingredients. In a large bowl, whisk together flour, sugar, cocoa, baking soda, and salt. Try not to sneeze into it—cocoa powder creates quite the dust cloud.
- Add the wet team. Toss in the eggs, buttermilk, oil, and vanilla. Mix until just combined. Don’t overmix unless you’re aiming for a cake with the texture of a rubber tire.
- Coffee time! Stir in the hot coffee (or water). Yes, the batter will be ridiculously thin. No, you didn’t mess up. This creates super moist cake that’ll make you famous among your friends.
- Bake it till you make it. Pour the batter evenly into your prepared pans and bake for 30-35 minutes, or until a toothpick inserted in the center comes out clean. If it comes out with batter, keep baking. If it comes out with crumbs, you’re golden.
- Cool your jets. Let the cakes cool in the pans for 10 minutes, then flip them onto wire racks to cool completely. Patience is a virtue here—frosting a warm cake is like trying to put makeup on during a sauna session.
- Make that frosting. Beat the butter until creamy, then add cocoa powder. Gradually mix in powdered sugar, milk, and vanilla until smooth. Add more milk if it’s too thick, or more sugar if it’s too thin. Aim for a consistency that won’t slide off the cake but also won’t break your spatula.
- Assemble the masterpiece. Place one cake layer on your serving plate, spread some frosting on top, then add the second layer. Cover the whole thing with the remaining frosting. Don’t worry about making it perfect—we’re going for “homemade charm” here.
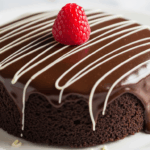
- Prep your name decoration. Melt the white chocolate in the microwave in 30-second intervals, stirring in between until smooth. Add food coloring if desired. Transfer to your piping or ziplock bag.
- Practice makes perfect. On parchment paper, practice writing the name you want on your cake. Once you’re confident (or just tired of practicing), pipe the name directly onto your frosted cake. Let it set for a few minutes before serving.
Common Mistakes to Avoid
Not letting the cake cool completely before frosting. Unless you want a frosting waterslide situation, patience is key. I learned this the hard way and ended up with what looked like a chocolate mudslide. Tasty, but not pretty.
Overthinking the name decoration. Your piping skills don’t have to rival a professional baker’s. Remember, even if your letters look like they were written during an earthquake, chocolate still tastes like chocolate.
Forgetting that hot coffee means HOT coffee. Use freshly brewed, not that cup that’s been sitting on your desk all morning. The heat helps bloom the cocoa flavor. Science!
Opening the oven every five minutes to check. Your cake needs consistent heat to rise properly. Every time you open that door, you’re letting out heat and potentially causing your cake to sink in the middle. No one wants a crater cake.
Alternatives & Substitutions
Buttermilk substitute: No buttermilk? No problem! Mix 1 tablespoon of white vinegar or lemon juice with enough regular milk to make 1 cup. Let it sit for 5 minutes, and voilà—fake buttermilk that works just as well.
Coffee alternatives: Not a coffee fan? You can use hot water instead, but IMO you’re missing out—the coffee doesn’t make the cake taste like a morning latte, it just enhances the chocolate flavor. But you do you.
Decoration options: If melting chocolate seems too fussy, grab a tube of store-bought decorating gel. Is it cheating? Maybe. Will anyone care once they’re stuffing their face with delicious cake? Definitely not.
Gluten-free version: Swap the all-purpose flour for a gluten-free 1:1 baking flour blend. The texture might be slightly different, but it’ll still be tasty enough to disappear quickly.
FAQ (Frequently Asked Questions)
Can I make this cake ahead of time?
Absolutely! The cake layers can be made a day or two in advance—just wrap them well in plastic wrap once cooled. The frosting can be refrigerated for up to a week (bring to room temp before using). I’d recommend doing the name decoration the day you plan to serve it, though.
Will this recipe work for cupcakes?
You bet! Just adjust the baking time to about 18-22 minutes. You’ll get roughly 24 cupcakes, which means 24 tiny canvases for extremely small name decorations. Challenge accepted?
My white chocolate seized up when I added food coloring. What went wrong?
Regular food coloring is water-based, and water makes chocolate seize faster than a cat spotting a cucumber. Use gel or oil-based food coloring instead, or mix the color with a tiny bit of shortening before adding it to the chocolate.
Do I really need to add hot coffee?
Do you really need to experience joy in your life? The answer to both is technically no, but highly recommended. The coffee enhances the chocolate flavor without making it taste like coffee. Trust the process.
How do I store leftovers? (As if there will be any…)
In the unlikely event that you don’t demolish this cake in one sitting, store it in an airtight container at room temperature for up to 3 days or in the fridge for up to a week. Just let it come to room temperature before serving for maximum flavor.
Final Thoughts
There you have it—a chocolate cake that not only tastes amazing but also has your name (or someone else’s) written all over it! Remember that the beauty of homemade cakes is in their imperfections. Crooked letters? Call it artistic. Smudged frosting? That’s your signature style.
Whether you’re making this for a birthday, anniversary, or just because it’s Tuesday and you deserve cake with your name on it, this recipe is sure to bring smiles all around. And hey, if all else fails and your decoration looks like it was done blindfolded, just turn off the lights before serving and call it a “surprise” cake!
Now go forth and bake your name in chocolate history. Your taste buds (and ego) will thank you!
