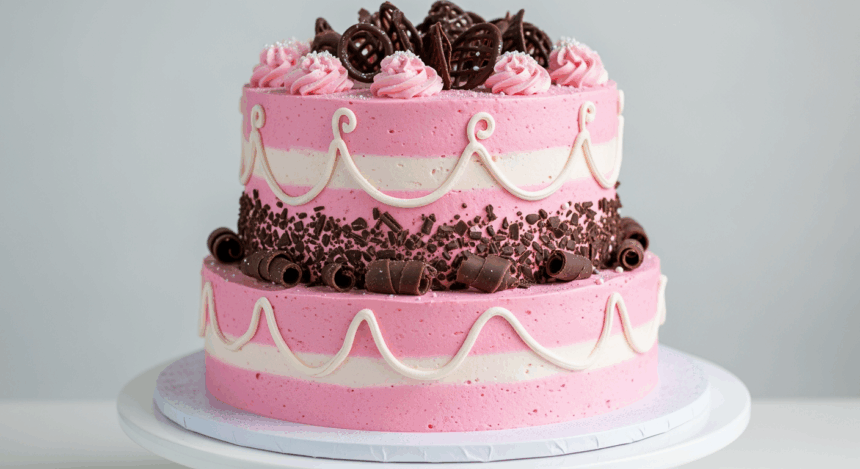
Oh hello there, cake enthusiast! So you’ve got a birthday coming up and you’re thinking, “Pink cake or chocolate cake?” Well, why not have your cake and eat it too? This pink birthday cake with chocolate decorations is basically the mullet of desserts—business on the inside (moist, delicious cake) and party on the outside (hello, chocolate decorations that make you look like a pastry genius). Let’s get baking!
Why This Recipe is Awesome
First off, this cake is a total showstopper without requiring an art degree. The pink-chocolate combo hits that perfect balance of “I clearly put effort into this” and “but I didn’t lose my sanity in the process.” It’s also wonderfully versatile—make it for a kid’s birthday and they’ll think you’re the coolest adult ever; make it for a grown-up and they’ll appreciate your sophisticated-yet-playful aesthetic. Plus, the recipe is surprisingly forgiving. Had a few glasses of wine while baking? No problem! This cake will still turn out Instagram-worthy, I promise.
Ingredients You’ll Need
For the cake:
- 2¼ cups all-purpose flour (the regular stuff, nothing fancy)
- 2 cups granulated sugar (because adulting is hard, and we deserve sweetness)
- 1 teaspoon baking powder (the unsung hero of lift and fluffiness)
- ½ teaspoon baking soda (baking powder’s sidekick)
- 1 teaspoon salt (trust me, don’t skip it)
- 1 cup unsalted butter, softened (like, actually softened, not that cold-but-I’m-impatient nonsense)
- 4 large eggs (room temperature, please—cold eggs are party poopers)
- 1 cup buttermilk (or regular milk with a splash of lemon juice if you forgot to buy buttermilk…again)
- 2 teaspoons vanilla extract (the real stuff, not that imitation garbage)
- Pink gel food coloring (the gel kind, because the liquid stuff is for amateurs)
For the frosting:
- 1½ cups unsalted butter, softened (yes, more butter—this is a celebration, not a diet plan)
- 5 cups powdered sugar (approximately—go with your heart on this one)
- ¼ cup heavy cream (makes it extra fluffy, like clouds of deliciousness)
- 2 teaspoons vanilla extract (still the real stuff)
- Pink gel food coloring (to match the cake, obviously)
- Pinch of salt (brings out the sweetness, ironically)
For chocolate decorations:
- 8 oz semi-sweet chocolate (the good stuff, not those weird chocolate-flavored chips)
- Assorted sprinkles, if you’re feeling extra (because sometimes more IS more)
Step-by-Step Instructions
- Prep your battlefield. Preheat oven to 350°F (175°C). Grease and line two 9-inch round cake pans. If you forget this step, you’ll be chiseling cake out later, so don’t skip it.
- Mix the dry squad. In a medium bowl, whisk together flour, baking powder, baking soda, and salt. Set aside and feel accomplished already.
- Beat that butter. In a large bowl, cream butter and sugar until light and fluffy, about 3-4 minutes. This is not the time to be impatient—think of it as arm day but with cake rewards.
- Egg it up. Add eggs one at a time, beating well after each addition. If you get shell in there, fish it out with another piece of shell—fingers just push it around like an annoying game of chase.
- Color me pink. Add vanilla extract and enough pink food coloring to achieve your desired shade. Remember, it will bake slightly lighter, so go a bit bolder than you think.
- Alternate additions. Gradually add the flour mixture and buttermilk, beginning and ending with flour (flour-milk-flour-milk-flour). Mix until just combined—overbeating is the enemy of tender cake.
- Bake it till you make it. Pour batter evenly into prepared pans and bake for 25-30 minutes, or until a toothpick inserted in the center comes out clean. The cake should also spring back when lightly touched.
- Cool your jets. Allow cakes to cool in pans for 10 minutes, then turn out onto wire racks to cool completely. Trying to frost a warm cake is like trying to apply makeup in a sauna—disaster awaits.
- Frosting time! Beat butter until creamy, then gradually add powdered sugar, cream, vanilla, salt, and pink coloring. Beat until light and fluffy—about 3-4 minutes. If it’s too thick, add more cream; too thin, add more sugar.
- Layer it up. Place one cake layer on your serving plate. Spread a generous amount of frosting on top, then add the second layer. Cover the entire cake with remaining frosting, creating a smooth or textured finish—whatever matches your skill level.
- Chocolate magic. Melt chocolate in the microwave in 30-second increments, stirring between each. Once melted, pour some into a piping bag (or ziplock bag with corner snipped) and create decorative shapes on parchment paper. Make chocolate curls by spreading some on the back of a baking sheet and scraping with a spatula once set.
- Decorate like you mean it. Once chocolate decorations have hardened, arrange them artistically on your cake. Add sprinkles if you’re using them. Stand back and take 47 photos for social media.
Common Mistakes to Avoid
We’re all human (except maybe Mary Berry), so here are some pitfalls to sidestep:
- Impatient measuring. I know it’s boring, but proper measurement prevents the dreaded “this tastes like pink disappointment” scenario.
- Opening the oven repeatedly. Your cake is not a reality TV show contestant—it doesn’t need to be watched every 2 minutes. Opening the door causes temperature drops that lead to sad, sunken cakes.
- Frosting too soon. I get it, you’re excited. But frosting a warm cake is basically a crime against pastry. The frosting will melt and slide right off, taking your dignity with it.
- Going overboard with food coloring. Unless you’re aiming for “radioactive Barbie,” easy does it. You can always add more, but you can’t take it away.
- Rushing the chocolate work. Chocolate is temperamental (aren’t we all?). If you rush it, you’ll end up with a melty mess and possibly a small tantrum.
Alternatives & Substitutions
Life happens. Pantries aren’t always fully stocked. Here’s how to pivot:
- No buttermilk? Mix 1 cup of milk with 1 tablespoon of lemon juice or white vinegar. Let it sit for 5 minutes, and voilà—fake buttermilk that works almost as well as the real thing.
- Gluten issues? Substitute a good quality 1:1 gluten-free flour blend. The texture might be slightly different, but hey, it’s better than sending your guests to the ER.
- Different color vibe? Swap the pink for any color that matches your mood or the occasion. Purple for royalty vibes, blue for “it’s a boy” moments, or black if you’re feeling gothic or dramatic.
- Chocolate alternatives? If dark chocolate isn’t your jam, white chocolate makes for some stunning decorations against the pink background. Or go wild and use both for contrast!
- Vegan needs? This one’s a bigger overhaul, but use plant-based butter, flax eggs (1 tablespoon ground flaxseed + 3 tablespoons water per egg), and plant milk with a splash of vinegar for the buttermilk.
FAQ (Frequently Asked Questions)
Can I make this cake in advance?
Absolutely! The unfrosted layers can be wrapped tightly and frozen for up to a month. The fully decorated cake will hold up in the fridge for 3-4 days, though the chocolate decorations might lose some shine. Just don’t tell anyone how long ago you actually made it.
My cake cracked on top—did I ruin everything?
Nope! That’s what frosting is for—covering up our mistakes, kind of like concealer but tastier. If it’s really bad, you can always turn it into a trifle and pretend that was your plan all along.
Is it normal that my arms hurt from all the mixing?
Yes, baking is surprisingly physical. Consider it your workout for the day and feel free to skip the gym. That’s just science.
Can I use a boxed cake mix to save time?
Look, I’m not the cake police. If you need a shortcut, doctor up a white cake mix with an extra egg, swap water for milk, and add your pink coloring. I won’t tell if you don’t.
My chocolate decorations look like blobs rather than artistic masterpieces. Help?
First, accept that chocolate has a mind of its own. Second, embrace the abstract art movement. Third, call them “modern, deconstructed chocolate accents” and everyone will think you’re a genius.
The birthday person doesn’t like chocolate. Am I in trouble?
First, reconsider your friendship with this person. JK! Substitute the chocolate decorations with fondant cutouts, fresh berries, or candy pieces. The pink cake is still the star anyway.
Final Thoughts
There you have it—a pink birthday cake that says “I care enough to bake something from scratch” but also “I’m fun and don’t take myself too seriously.” The beauty of this recipe is that even if it doesn’t turn out perfect, it will still be delicious. Because at the end of the day, it’s cake! With frosting! And chocolate! The birthday trifecta!
Remember, baking is supposed to be fun (or at least result in something tasty enough to make you forget the chaos you created in the kitchen). So put on your favorite playlist, pour yourself something nice to drink, and embrace the process. Your pink creation awaits, and someone’s birthday is about to get a whole lot more delicious. Now go forth and bake like nobody’s watching—but do take pictures, because if you don’t post it, did you even bake it? 😉
