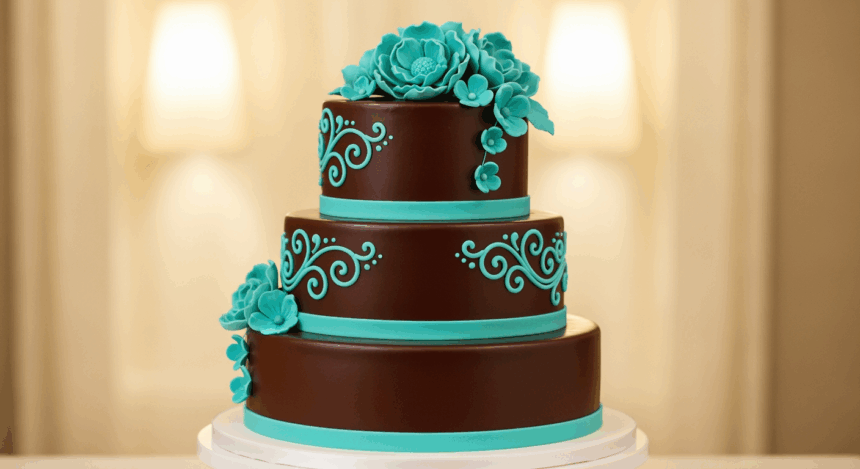
Has anyone ever told you that you can’t have your cake and eat it too? Well, they clearly haven’t met this three-tier chocolate masterpiece with teal accents that’s about to rock your world. This cake isn’t just a dessert—it’s a conversation starter, an Instagram star, and your new favorite way to say “I’m adulting but still fun.” Let’s dive fork-first into chocolate heaven, shall we?
Why This Recipe is Awesome
First off, this cake looks like it should be on the cover of a fancy baking magazine, but—plot twist—it’s totally doable for us regular humans. The chocolate layers are rich without being overwhelming (unlike your ex), and those teal accents? They’re basically the jewelry that makes this cake go from “nice” to “DAAAMN!”
Plus, it’s the perfect balance of impressive and achievable. Your friends will think you spent days on it when really, you were binge-watching your favorite show for most of the time it took to make. The best part? You can break the process into manageable steps over a couple of days if you’re not feeling that kitchen marathon life.
Ingredients You’ll Need
For the Chocolate Cake:
- 2½ cups all-purpose flour (the regular stuff, nothing fancy)
- 2 cups granulated sugar (because adulting means you can have as much sugar as you want)
- 1 cup unsweetened cocoa powder (the good kind, not the sad hot chocolate packets)
- 2 tsp baking soda (it’s not baking powder—don’t mess this up)
- 1 tsp salt (just a pinch to make the sweetness pop)
- 2 large eggs (room temperature, please—cold eggs are party poopers)
- 1 cup buttermilk (or regular milk with a splash of vinegar if you forgot to buy buttermilk… again)
- ½ cup vegetable oil (keeps things moist without tasting like, well, oil)
- 2 tsp vanilla extract (the real deal, not that imitation nonsense)
- 1 cup hot coffee (yes, coffee—it makes chocolate taste more chocolatey, trust me)
For the Chocolate Frosting:
- 1½ cups unsalted butter, softened (like your heart when you see puppies)
- 1 cup cocoa powder (more chocolate because… do I really need to explain?)
- 5 cups powdered sugar (yes, FIVE. Diets are for tomorrow)
- ½ cup heavy cream (makes everything better, like therapy but cheaper)
- 2 tsp vanilla extract (still the real stuff)
- ¼ tsp salt (balances the sweetness, like your friend who tells you when you have spinach in your teeth)
For the Teal Accents:
- 1 cup white chocolate chips (for drip or decorations)
- Teal gel food coloring (not the liquid kind unless you want pastel blue instead)
- Sprinkles, edible pearls, or whatever makes you happy (optional but highly recommended for maximum joy)
Step-by-Step Instructions
Day 1: Bake Those Beautiful Layers
- Preheat your oven to 350°F (175°C). Don’t skip this step! Line three 8-inch round cake pans with parchment paper and grease the sides like your cake’s freedom depends on it.
- In a large bowl, whisk together flour, sugar, cocoa powder, baking soda, and salt. Make a little well in the center like you’re preparing for a tiny chocolate volcano.
- Add eggs, buttermilk, oil, and vanilla to your dry ingredients. Mix until just combined—we’re making cake, not building arm muscles.
- Stir in that hot coffee. The batter will be thin, almost concerningly so. This is normal! It’s supposed to look like you messed up when you actually didn’t.
- Divide the batter evenly between your three pans. Pro tip: Use a kitchen scale if you have one, or just eyeball it and hope for the best like the rest of us.
- Bake for 25-30 minutes or until a toothpick comes out with a few moist crumbs. If it comes out clean, you’ve overbaked it (moment of silence).
- Let the cakes cool in the pans for 10 minutes, then remove to wire racks to cool completely. If you try to frost them warm, you’ll have a delicious disaster on your hands.
Day 2: Frost This Beauty
- Beat the softened butter until creamy. If your arm gets tired, remember this is basically a workout, so you’re multitasking!
- Add cocoa powder and mix until your frosting looks like a chocolate cloud (that’s a good thing).
- Gradually add powdered sugar, alternating with heavy cream. Add vanilla and salt. Keep mixing until it’s smooth and fluffy—about 3-4 minutes. It should hold a peak when you lift your beater.
- Place your first cake layer on a plate or cake stand. Add about 1 cup of frosting and spread it evenly. Top with the second layer, more frosting, then the final layer.
- Apply a thin layer of frosting all over (this is your crumb coat) and chill for 30 minutes. This step is like putting on primer before makeup—not exciting but crucial.
- Once chilled, slather on the remaining frosting generously. Get artistic! Make swirls, ridges, whatever makes you feel like a cake boss.
For the Teal Accents:
- Melt white chocolate chips in the microwave in 30-second bursts, stirring between each burst until smooth.
- Add a tiny amount of teal gel food coloring and mix until you achieve your desired shade. Remember: you can always add more, but you can’t take it out!
- For a drip effect, let the colored chocolate cool slightly, then pour into a squeeze bottle or ziplock bag with the corner snipped off. Apply around the edges of the cake, letting it drip down naturally.
- Use remaining teal chocolate to pipe designs on top, or make chocolate decorations by piping onto parchment paper and letting them set.
- Add any sprinkles or edible decorations before the chocolate sets completely so they stick. Otherwise, they’ll just roll off like your cat from the kitchen counter.
Common Mistakes to Avoid
Opening the oven door too early. I know you’re excited, but every time you peek, the temperature drops. It’s like checking your crush’s social media—just don’t do it for at least 20 minutes.
Skipping the parchment paper. Unless you enjoy cake that’s permanently attached to the pan, take the extra 30 seconds for this step.
Frosting a warm cake. This is the cake equivalent of putting on makeup while running—it’s going to slide right off. Patience, grasshopper.
Using too much food coloring. Remember, we want teal accents, not “my tongue is blue for three days” teal. Start with a drop, then add more if needed.
Forgetting to level your cakes. If you skip this, your cake might look like it’s trying to escape from one side. Cute for a kid’s baking attempt, not so much for your masterpiece.
Alternatives & Substitutions
Not a coffee fan? Use hot water instead. You’ll lose some depth of flavor, but your cake won’t taste like your morning brew, FYI.
Buttermilk substitute: Add 1 tablespoon of lemon juice or white vinegar to regular milk and let it sit for 5 minutes. Boom—fake buttermilk that actually works!
Make it gluten-free by swapping in your favorite cup-for-cup gluten-free flour blend. Just don’t use almond flour alone unless you want a chocolate pancake situation.
Don’t have three identical pans? You can bake in batches, but your cake layers might have slightly different textures. Or just make a two-layer cake and use the extra batter for cupcakes—crisis averted!
Not into teal? Use any color that makes your heart sing! Pink, purple, galaxy colors—go wild. It’s your cake, and you’re the boss of it.
FAQ (Frequently Asked Questions)
Can I make this cake ahead of time?
Absolutely! The unfrosted layers can be wrapped in plastic and stored at room temperature for a day, refrigerated for up to 3 days, or frozen for up to 2 months. The fully assembled cake is best eaten within 3 days—as if it would last that long!
Do I really need three layers? That seems excessive.
First of all, there’s no such thing as “excessive” when it comes to chocolate cake. But if you insist, you can make a two-layer cake and use the remaining batter for cupcakes. Or just make a really tall two-layer cake and eat the extra batter raw (I won’t tell).
What if my teal color turns out more blue or green than teal?
Food coloring is temperamental, like a cat. If it’s too blue, add the tiniest touch of green or yellow. Too green? Add a smidge of blue. Or just rename your creation—”Mermaid Tail Blue” sounds intentional and fancy!
Can I use box mix instead?
Look, I’m not the cake police. If you want to use box mix, go for it! Just doctor it up with an extra egg, replace the water with milk, and use melted butter instead of oil. Your secret is safe with me.
My layers came out flat/domed/uneven. Did I mess up?
Nope! Different ovens have different hot spots. If they’re domed, just trim the tops to flatten (and snack on the scraps—that’s chef’s privilege). If they’re flat, congratulations! Less work for you.
I don’t have a fancy cake stand. Will my cake be sad?
Your cake doesn’t care what it sits on—it only cares about being eaten and appreciated. A dinner plate works fine, or flip over a bowl and put a plate on top for an instant cake stand. Improvisation is the mother of dessert!
Final Thoughts
There you have it—a show-stopping three-tier chocolate cake with teal accents that’s bound to make people think you’ve been taking secret pastry classes. Remember, the beauty of homemade cakes is that they’re supposed to look homemade. Those little imperfections? They’re character, darling!
The next time someone tells you that you can’t have your cake and eat it too, just slice them a piece of this beauty and watch them eat their words (and your cake). Now go forth and bake—your chocolate destiny awaits!
And if anyone asks for the recipe, you can either share it or mysteriously smile and say it’s a family secret passed down for generations. I won’t tell if you don’t.
