You know that feeling when you want something ridiculously delicious, warm, gooey, and maybe a little bit extra, but the thought of a full-blown culinary marathon makes you wanna crawl under a blanket? Yeah, me too. So, let’s talk about a recipe that’s gonna make you feel like a baking superstar without actually making you *work* like one. Get ready for… Peanut Butter Cinnamon Rolls!
Why This Recipe is Awesome
Okay, first things first, this isn’t your grandma’s cinnamon roll recipe. Unless your grandma was secretly a peanut butter fiend, in which case, high five to her! What makes these rolls so ridiculously awesome? For starters, it’s the unexpected yet totally brilliant combo of creamy peanut butter and classic cinnamon sugar. It’s like your favorite childhood sandwich met a fancy pastry and decided to have a delicious baby.
Plus, it looks impressive, but honestly? It’s pretty **idiot-proof**. I’ve messed up simpler things (don’t ask about the pancake incident of ’22), and even I nailed these. They’re soft, they’re fluffy, they’re packed with flavor, and they will make your kitchen smell like the happiest place on earth. Seriously, move over Disneyland.
Ingredients You’ll Need
Time to gather your culinary arsenal! Don’t worry, nothing too exotic here. Most of this is probably already lurking in your pantry.
- For the Dough:
- 1 cup warm milk (think bathwater warm, not lava-hot)
- 2 ¼ teaspoons active dry yeast (one standard packet, the little magic makers!)
- ¼ cup granulated sugar (for the yeasties to snack on and for general sweetness)
- ½ cup unsalted butter, melted (the good stuff, trust me)
- 1 teaspoon salt (enhances all the flavors, don’t skip it!)
- 1 large egg (helps with richness and texture)
- 3 ½ – 4 cups all-purpose flour (start with 3 ½ and add more if needed)
- For the Peanut Butter Swirl:
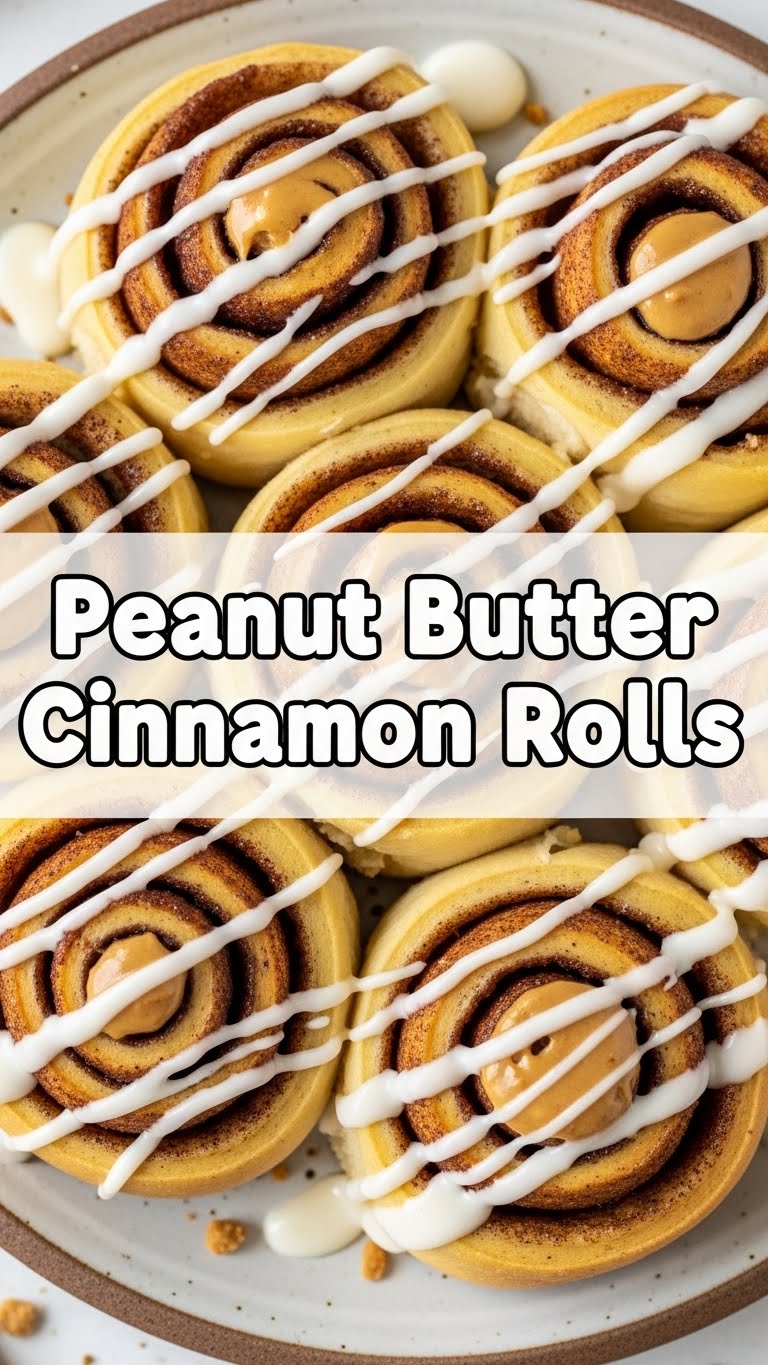
- ½ cup creamy peanut butter (go for a good quality one, IMO)
- ½ cup packed light brown sugar (adds that deep, caramel-y sweetness)
- 1 tablespoon ground cinnamon (the star of the show, besides peanut butter!)
- For the Glaze (because everything’s better with glaze!):
- 1 cup powdered sugar (also known as confectioners’ sugar)
- 2 tablespoons milk (any kind works, just to thin it out)
- ½ teaspoon vanilla extract (a little extra warmth)
Step-by-Step Instructions
- Activate the Yeast: In a large bowl, whisk together the warm milk, yeast, and ¼ cup granulated sugar. Let it sit for about 5-10 minutes until it gets foamy. This tells you your yeast is alive and ready to party!
- Mix the Dough: Add the melted butter, salt, and egg to the yeast mixture. Stir it up. Gradually add 3 ½ cups of flour, mixing until a shaggy dough forms.
- Knead It Good: Turn the dough out onto a lightly floured surface. Knead for 5-7 minutes until it’s smooth and elastic. If it’s too sticky, add a little more flour, a tablespoon at a time. It should spring back when you poke it.
- First Rise: Lightly grease the mixing bowl. Place the dough in the bowl, turning it once to coat. Cover the bowl with plastic wrap or a clean kitchen towel. Let it rise in a warm place for 1-1 ½ hours, or until doubled in size. This is where the magic happens, folks!
- Prep the Filling: While the dough is rising, mix the brown sugar and cinnamon for your swirl in a small bowl.
- Roll It Out: Once risen, gently punch down the dough to release the air. On a lightly floured surface, roll it into a large rectangle, about 12×18 inches.
- Spread the Love: Evenly spread the peanut butter over the entire dough rectangle, almost to the edges. Sprinkle the brown sugar and cinnamon mixture evenly over the peanut butter.
- Roll ‘Em Up: Starting from one of the longer sides, tightly roll the dough into a log. Use a sharp knife or unscented dental floss (yes, really, it makes cleaner cuts!) to cut the log into 12 even slices.
- Second Rise: Arrange the rolls in a greased 9×13 inch baking pan. Cover them again and let them rise for another 30-45 minutes, or until puffy. While they’re puffing up, preheat your oven to 375°F (190°C).
- Bake ‘Em Golden: Bake for 20-25 minutes, or until the rolls are golden brown on top and cooked through. Keep an eye on them!
- Whip Up the Glaze: While the rolls are cooling slightly, whisk together the powdered sugar, milk, and vanilla extract until smooth. If it’s too thick, add a tiny bit more milk; too thin, add more powdered sugar.
- Glaze and Serve: Drizzle the glorious glaze over the warm (but not piping hot) rolls. Serve immediately and watch them disappear!
Common Mistakes to Avoid
Nobody’s perfect, especially in the kitchen, but a little heads-up can save you from a tragic roll fate!
- Hot Milk, Dead Yeast: Using milk that’s too hot will kill your yeast. And dead yeast means no rise. Aim for warm bathwater, not boiling lava. Rookie mistake!
- Skipping the First Rise: The dough needs its beauty sleep to get all fluffy and airy. Don’t rush it! Under-proofing leads to dense, sad rolls.
- Over-flouring the Dough: Adding too much flour makes your rolls tough and dry. Start with the minimum and only add more if the dough is super sticky. You want it slightly tacky, not dry.
- Not Rolling Tightly Enough: If your log isn’t rolled tightly, your swirls will fall apart, and nobody wants a saggy swirl. Be firm, but gentle!
- Preheating the Oven is a Myth, Said No Smart Baker Ever: Always preheat! Putting dough into a cold oven will affect the rise and texture significantly.
Alternatives & Substitutions
Feeling a little adventurous or missing an ingredient? No stress, we can totally improvise!
- Peanut Butter Swap: If you’re not a fan (gasp!) or have an allergy, almond butter or cashew butter would work beautifully here. Or, if you’re feeling extra decadent, a chocolate hazelnut spread could be epic.
- Butter Me Up: While unsalted butter is always my go-to for baking, if you only have salted, just reduce the added salt in the dough by about ¼ teaspoon. Margarine? Well, technically yes, but why hurt your soul like that?
- Milk Matters: Any milk will do the trick – whole, 2%, almond, oat. They all work.
- Glaze It Differently: Not into vanilla? A tiny pinch of cinnamon in the glaze would be divine. Or, a simple cream cheese frosting would elevate these even further (think 4 oz cream cheese, 2 tbsp butter, 1 cup powdered sugar, 1 tsp vanilla, dash of milk).
FAQ (Frequently Asked Questions)
Got questions? I’ve got (mostly sarcastic) answers!
- Can I make these ahead of time? Absolutely! Prepare the rolls, place them in the baking pan, cover tightly, and refrigerate overnight. In the morning, let them come to room temp and rise for about an hour before baking. Fresh rolls for breakfast, FTW!
- My dough isn’t rising, what gives? Did you use warm milk? Is your yeast expired? Yeast is sensitive, bless its heart. If it didn’t foam up in step 1, your yeast is probably dead, or your liquid was too hot/cold.
- Can I use crunchy peanut butter? You *can*, but it might make rolling and spreading a bit trickier, and the texture inside the roll will be… different. I personally prefer creamy for that smooth swirl, but you do you!
- What if I don’t have a stand mixer? No problem! Kneading by hand is a fantastic arm workout. Just follow the steps, and you’ll get there.
- How do I store leftovers? If there *are* leftovers (highly unlikely, IMO), store them in an airtight container at room temperature for 2-3 days, or in the fridge for up to a week. Reheat gently in the microwave or oven.
- Can I freeze these? Yes! You can freeze unbaked rolls (after the second rise) or baked rolls (before glazing). Wrap them tightly. Thaw overnight in the fridge, then proceed with baking or glazing.
Final Thoughts
So there you have it, folks! Your new favorite reason to brag about your baking skills (even if they’re still in the “learning” phase). These Peanut Butter Cinnamon Rolls are a guaranteed crowd-pleaser, a comfort food champion, and a delightful twist on a classic. They’re perfect for a lazy Sunday brunch, a special treat, or just because you deserve something truly delicious.
Now go impress someone—or yourself—with your new culinary superpowers. You’ve earned it!


