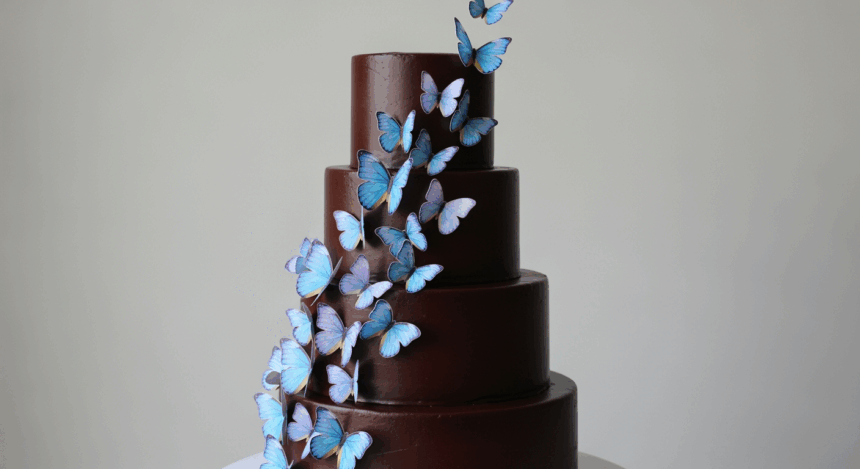
Ah, fancy chocolate cake time! But not just any chocolate cake—we’re talking a show-stopping three-tier masterpiece with fluttering butterflies that’ll make your Instagram followers weep with envy. Is it over-the-top? Absolutely. Is it worth it? You bet your favorite spatula it is! Let’s create some chocolate magic that’s equal parts delicious and dramatic.
Why This Recipe is Awesome
Look, I could tell you this cake is “delightful” or “scrumptious” like every other food blogger, but let’s get real. This cake is basically therapy in dessert form. First, it’s chocolate on chocolate on chocolate—because one layer of chocolate is for amateurs. Second, those butterflies? They’re the perfect way to disguise any frosting disasters. Lumpy icing? Slap a butterfly on it! Nobody will ever know. Finally, this recipe makes you look like a pastry wizard when in reality, it’s surprisingly manageable. Even my friend who burned water (yes, WATER) managed this cake without calling the fire department.
Ingredients You’ll Need
For the cake:
- 3 cups all-purpose flour (the regular stuff, nothing fancy)
- 2½ cups granulated sugar (don’t even think about cutting this down—we’re making cake, not salad)
- 1½ cups unsweetened cocoa powder (the good kind, not that chalky bargain stuff)
- 1 tablespoon baking soda (yes, tablespoon—this isn’t a typo)
- 1½ teaspoons baking powder
- 1½ teaspoons salt
- 4 large eggs (room temperature, because cold eggs are party poopers)
- 1½ cups buttermilk (or regular milk with a splash of vinegar if you forgot to buy buttermilk… again)
- ½ cup vegetable oil (keeps it moist, trust me)
- 2 teaspoons vanilla extract (real vanilla, not that imitation nonsense)
- 1½ cups hot coffee (or hot water if you don’t want the caffeine buzz)
For the frosting:
- 2 cups unsalted butter, softened (that’s 4 sticks, and yes, we’re serious)
- 8 cups powdered sugar (your dentist just felt a disturbance in the force)
- 1 cup unsweetened cocoa powder
- ½ cup heavy cream (the stuff that makes everything better)
- 2 teaspoons vanilla extract
- ½ teaspoon salt
For the butterflies:
- 12 oz colored candy melts (pick colors that won’t make your guests question your taste)
- Butterfly template printed on paper (Google is your friend)
- Parchment paper (not wax paper—learn from my tragic mistakes)
- Optional: edible glitter, because why not?
Step-by-Step Instructions
Prep Work (aka The Boring But Necessary Part):
- Preheat your oven to 350°F (175°C). If you skip this step, you’ll regret it. I’ve been there.
- Grease and line three 8-inch round cake pans. If you only have two pans, I guess you’re baking in shifts today!
- Place your butterfly template under parchment paper on a flat baking sheet.
For the Cake:
- In a large bowl, whisk together the flour, sugar, cocoa powder, baking soda, baking powder, and salt. Feel free to pretend you’re a witch brewing a potion.
- Add eggs, buttermilk, oil, and vanilla. Mix until just combined—don’t beat it to death.
- Slowly pour in hot coffee while mixing. The batter will be thin. This is normal! Don’t panic and add more flour. Seriously, don’t.
- Divide batter evenly between your three pans. Use a scale if you’re the perfectionist type.
- Bake for 30-35 minutes until a toothpick comes out clean. Remember: opening the oven door repeatedly won’t make it bake faster—it actually does the opposite.
- Let cakes cool in pans for 10 minutes, then transfer to cooling racks. If they stick, run a knife around the edges and sweet-talk them a bit.
For the Frosting:
- Beat the butter until creamy. This is your arm workout for the day.
- Gradually add powdered sugar and cocoa powder, alternating with heavy cream. Start your mixer on low unless you want to create a sugar dust storm in your kitchen.
- Add vanilla and salt, then beat on medium-high for 3 minutes until fluffy. It should look like a chocolate cloud.
For the Butterflies:
- Melt candy melts according to package instructions. If they seize up, you probably got water in them. Game over, start again.
- Transfer melted candy to piping bags or squeeze bottles.
- Trace the butterfly outlines on your parchment paper, then fill them in. Get creative with colors and patterns!
- Sprinkle with edible glitter if using. More is more here, people.
- Let harden completely (about 30 minutes) before carefully peeling off the parchment.
Assembly (The Moment of Truth):
- Level your cakes if they have domes. Eat the scraps—this is chef’s privilege.
- Place your largest cake on a serving plate. Add a generous layer of frosting.
- Stack the medium cake on top, add more frosting.
- Top with the smallest cake.
- Apply a thin crumb coat of frosting all over, then refrigerate for 30 minutes.
- Apply the final coat of frosting, making it as smooth or textured as you want.
- Carefully insert butterfly wings into the cake at different heights and angles. If some break, eat the evidence and use the backup butterflies.
Common Mistakes to Avoid
1. Overmixing the batter – You’re making cake, not cement. Mix just until combined.
2. Not letting the cakes cool completely – Unless you want a frosting avalanche, patience is key. Warm cake + frosting = disaster.
3. Making butterflies too thin – These need to stand up in cake, not flop over like they’ve had too many cocktails. Make the center spine thicker for support.
4. Rushing the assembly – This is a three-tier cake, not a race. The fridge is your friend between layers.
5. Forgetting to level the cakes – Unless you’re going for the “Leaning Tower of Chocolate” look, grab that serrated knife.
Alternatives & Substitutions
Make it boozy: Replace 1/4 cup of the coffee with Kahlúa or Baileys. I won’t tell if you don’t.
Gluten-free version: Swap all-purpose flour for a 1:1 gluten-free blend. Just know that the texture might be slightly different. IMO, Cup4Cup blend works best.
Dairy-free option: Use plant-based milk with a tablespoon of vinegar instead of buttermilk, and vegan butter for the frosting. The cake will still be delicious, just slightly less rich.
No candy melts? Use white chocolate colored with gel food coloring for the butterflies. Regular melted chocolate works too, but your butterfly color options become “brown” and “darker brown.”
Less ambitious? Make it a single-layer cake with butterflies on top. Still impressive, half the stress.
FAQ (Frequently Asked Questions)
Can I make this cake in advance?
Absolutely! The cake layers can be baked and frozen for up to a month. The butterflies can be made a week ahead if stored in a cool, dry place. Just don’t assemble until 24 hours before serving at most.
Do I really need three different-sized cake pans?
Nope! You can use three 8-inch pans and just trim the top tiers to be smaller. Or embrace equality and make all three layers the same size. It’s your cake kingdom.
Why coffee in a chocolate cake?
Coffee enhances the chocolate flavor without making it taste like a mocha. If caffeine keeps you bouncing off walls, use decaf or hot water instead.
My butterflies keep breaking! What am I doing wrong?
You’re probably making them too thin or not letting them set completely. Patience, grasshopper. Also, always make extra because butterfly casualties are inevitable.
Can I use store-bought frosting to save time?
Can you also wear pajamas to a wedding? Technically yes, but should you? This cake deserves the good stuff. But if you’re in a pinch, doctor up store-bought frosting with some extra cocoa powder and a splash of heavy cream.
How do I transport this masterpiece?
Very carefully! Assemble on site if possible. Otherwise, insert wooden dowels through all three layers for stability, refrigerate until firm, and pray to the cake gods during transport.
Final Thoughts
Congrats! You’ve just created what I like to call “The Cake That Makes People Think You Have Your Life Together.” Whether you’re celebrating a birthday, anniversary, or just Wednesday, this three-tier chocolate butterfly extravaganza is guaranteed to impress. And remember, even if your butterflies look more like moths or your frosting job wouldn’t win any contests, chocolate cake is still chocolate cake—delicious regardless of aesthetics.
So snap that obligatory social media pic, cut yourself the biggest slice (baker’s privilege), and enjoy the chocolate coma that follows. You’ve earned it after all that work! Next time someone asks if you can bake, you can casually mention, “Oh, I make three-tier butterfly cakes in my spare time.” No big deal.
