So you’re craving something warm, gooey, and utterly divine but the thought of a full-on baking marathon makes you wanna crawl back under the covers? Trust me, I get it. Good news: your Dutch oven is about to become your new best friend, and we’re making *cinnamon rolls*. The kind that makes angels sing, without the all-day fuss. Forget those sad, dry rolls from the freezer aisle. We’re going next-level here, with minimal stress.
Why This Recipe is Awesome
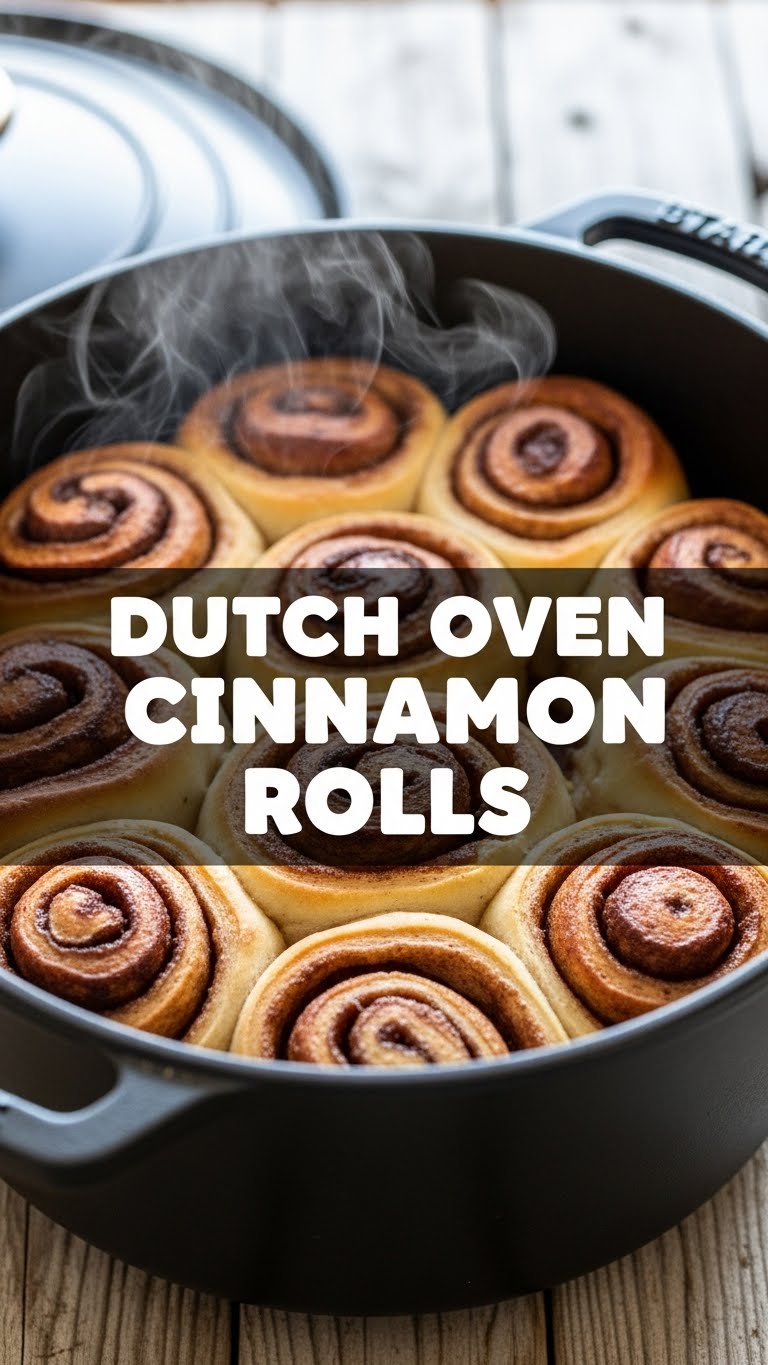
Because who wants to deal with multiple baking sheets and dry rolls? Not us, friend. This recipe delivers maximum gooeyness with minimal effort, all thanks to the magical heat retention of your Dutch oven. It’s practically a cheat code for breakfast pastry perfection. That heavy pot traps all the steam, creating an unbelievably soft, tender crumb, and a sticky, caramelized bottom that’ll make you weep happy tears. Plus, it’s pretty hard to mess up, which is saying something, considering my track record with anything involving yeast (don’t ask about the brioche incident).
Ingredients You’ll Need
Gather your troops! No fancy stuff required, just your usual pantry heroes.
For the Dough:
- 1 cup whole milk: Warm, but not scorching. Think baby bathwater.
- 2 ¼ teaspoons active dry yeast: One packet, usually. The little magic makers!
- ¼ cup granulated sugar: Just enough sweetness to wake up the yeast.
- ½ cup (1 stick) unsalted butter: Melted, then cooled a bit. Because butter makes everything better.
- 1 large egg: Room temp, if you’re feeling extra.
- 1 teaspoon vanilla extract: Optional, but adds a nice depth.
- ½ teaspoon salt: Balances the sweetness. Don’t skip it!
- 3 cups all-purpose flour: Plus a little extra for dusting.
For the Filling:
- ½ cup (1 stick) unsalted butter: Softened, not melted. It needs to spread.
- ¾ cup packed light brown sugar: That caramel-y goodness.
- 1 tablespoon ground cinnamon: The star of the show!
For the Icing:
- 2 cups powdered sugar: Sifted, if you’re fancy and hate lumps.
- 4 tablespoons (¼ cup) unsalted butter: Melted.
- 2-3 tablespoons whole milk (or cream): Add slowly until desired consistency.
- 1 teaspoon vanilla extract: Because why not?
Step-by-Step Instructions
- Activate the Yeast: In a large bowl, warm the milk (microwave for about 30-45 seconds). It should be between 105-115°F. Stir in a pinch of the granulated sugar, then sprinkle the yeast over top. Let it sit for 5-10 minutes until foamy. This means your yeast is alive and ready to party!
- Mix the Dough: Add the rest of the granulated sugar, melted butter, egg, vanilla, and salt to the foamy yeast mixture. Stir until combined. Gradually add the flour, 1 cup at a time, mixing until a shaggy dough forms.
- Knead (Briefly!): Turn the dough out onto a lightly floured surface. Knead for just 3-5 minutes until smooth and elastic. Don’t overdo it! We want tender rolls, not tough ones.
- First Rise: Lightly grease a clean bowl, place the dough in it, and turn once to coat. Cover with plastic wrap or a damp towel and let rise in a warm place for 1-1.5 hours, or until doubled in size.
- Prep the Filling: While the dough rises, combine the softened butter, brown sugar, and cinnamon in a small bowl. Mix until it forms a spreadable paste.
- Roll ‘Em Out: Once risen, punch down the dough and turn it out onto a lightly floured surface. Roll it into a large rectangle, roughly 12×18 inches.
- Spread the Love: Evenly spread the cinnamon-sugar filling over the entire surface of the dough, leaving a small ½-inch border on one of the longer edges.
- Roll and Slice: Starting from the longer edge opposite the border, tightly roll the dough into a log. Pinch the seam closed. Using a sharp knife or unflavored dental floss, slice the log into 10-12 equal pieces, about 1 ½ inches thick.
- Dutch Oven Time: Lightly grease a 6-quart Dutch oven (or similar size). Arrange the cinnamon roll slices cut-side up in the pot. They can be close, they love a good snuggle.
- Second Rise: Cover the Dutch oven with its lid and let the rolls rise again for 30-45 minutes, or until puffy.
- Bake It Up: Preheat your oven to 375°F (190°C). Place the covered Dutch oven in the preheated oven and bake for 20-25 minutes. Then, remove the lid and bake for another 10-15 minutes, or until the tops are golden brown and the rolls are cooked through.
- Whip Up the Icing: While the rolls bake, whisk together all icing ingredients in a bowl until smooth. If it’s too thick, add a tiny bit more milk; too thin, add more powdered sugar.
- Frost & Devour: Let the rolls cool in the Dutch oven for about 10 minutes (to avoid the icing melting completely into oblivion), then drizzle (or slather, let’s be real) with the icing. Serve warm and bask in your glorious achievement!
Common Mistakes to Avoid
- Forgetting to Grease the Dutch Oven: Rookie mistake! Your gorgeous rolls will stick, and you’ll cry. Just do it.
- Over-Kneading the Dough: Unless you’re aiming for hockey pucks instead of fluffy rolls, don’t go crazy. A few minutes is all you need.
- Too-Hot Milk: If your milk is boiling, it’ll kill the yeast, and your dough won’t rise. Tragedy! Aim for warm, not scalding.
- Not Spreading the Filling to the Edges: This results in sad, dry ends. We want maximum sticky, cinnamon-y goodness, so go for it!
- Skipping the Second Rise: Don’t be impatient! That second rise is crucial for light, airy rolls. Trust the process.
Alternatives & Substitutions
Feeling a little rebellious, or just missing an ingredient? No stress, here are some easy swaps:
- No Whole Milk? Half-and-half works great, or even 2% milk in a pinch (though your soul might notice the slight difference). Avoid skim, it’s just not rich enough, IMO.
- Vegan-ish? Swap the butter for a good quality plant-based butter (like Miyoko’s or Earth Balance) and the milk for unsweetened almond or soy milk. You might need to adjust the egg with a flax egg (1 tbsp ground flax + 3 tbsp water, let sit 5 mins), but I haven’t tested it thoroughly for this recipe, FYI.
- Different Spices: Want to get wild? Add a pinch of nutmeg or cardamom to your cinnamon filling. It’s a game-changer!
- Cream Cheese Icing: If you’re a purist, swap half the butter in the icing for softened cream cheese (4oz) and reduce the milk slightly. You’ll thank me later.
FAQ (Frequently Asked Questions)
Got questions? I’ve got (casual) answers!
- Can I make these ahead? Absolutely! Prep them, arrange them in the Dutch oven, cover, and pop them in the fridge overnight. In the morning, pull them out an hour before baking to let them warm up and finish rising. Fresh cinnamon rolls without the early morning panic? Yes, please!
- What if I don’t have a Dutch oven? Well, then you’re missing out on some magic! But a deep casserole dish (like a 9×13) with a tight-fitting lid *might* work. The lid is key for that steamy goodness. Results may vary, so don’t come crying to me if they’re not *quite* as perfect.
- My rolls didn’t rise, help! Did your milk kill the yeast? Was your room too cold? Yeast needs warmth to thrive. Double-check your milk temperature next time and try a warmer spot for rising (like a slightly warm oven, or near a sunny window).
- Can I use self-rising flour? No, no, no! Self-rising flour has leavening agents already mixed in, and it will throw off the delicate balance of this recipe. Stick to all-purpose, my friend.
- How long do they last? Fresh is best, always! But leftovers (covered tightly) are still delicious for 2-3 days at room temperature, or up to a week in the fridge. Pop them in the microwave for 15-20 seconds to bring back that gooey warmth.
- Why is my icing too thin/thick? You’re in control here! Add more powdered sugar for thicker icing, or tiny splashes of milk for thinner. It’s an art, not a science.
Final Thoughts
So there you have it, folks! Your new favorite, ridiculously easy, and unbelievably delicious Dutch oven cinnamon rolls. Go forth and conquer your cravings, impress your friends, or just hoard them all for yourself (no judgment here). You’re basically a pastry chef now. Don’t forget to share… or don’t. I won’t judge. Enjoy!


