So you’re craving something warm, gooey, and utterly delicious for breakfast but the thought of waking up at the crack of dawn to bake makes you want to pull the covers over your head, huh? Same, friend, *same*. But what if I told you there’s a way to wake up to the smell of freshly baked cinnamon rolls without, you know, actually *waking up* super early to make them? Enter: the glorious, life-changing Overnight Cinnamon Rolls. Your future self will thank your past self, big time.
Why This Recipe is Awesome
Okay, let’s be real. This isn’t just *another* cinnamon roll recipe. This is the “sleep in and still win breakfast” recipe. It’s practically a magic trick! You do most of the work the night before, pop ’em in the oven in the morning, and boom—fresh, warm, sticky buns with minimal morning effort. It’s **idiot-proof**, even *I* managed not to mess it up, and my kitchen skills sometimes peak at microwaving popcorn. Plus, the overnight rest makes the dough incredibly flavorful and soft. Trust me on this one, your taste buds are in for a treat.
Ingredients You’ll Need
Before we dive into doughy goodness, let’s gather our edible treasures. Nothing too fancy, just your usual suspects ready to transform into pure bliss. No need for a secret handshake, just good old ingredients.
- For the Dough:
- Warm Milk: About 1 cup. Not boiling, not cold, just “oh, that’s nice” warm.
- Granulated Sugar: A quarter cup for the dough, plus more for the filling. Sweetness overload, baby!
- Active Dry Yeast: 2 ¼ teaspoons, or one of those little packets. It’s the magic dust that makes everything fluffy.
- All-Purpose Flour: Around 3 ½ to 4 cups. The backbone of our rolls.
- Salt: ½ teaspoon. Because even sweet things need a pinch of something savory to truly shine.
- Unsalted Butter: ¼ cup, melted. Because butter makes everything better, obviously.
- Large Egg: One, lightly beaten. It’s like a warm hug for our dough.
- For the Filling:
- Brown Sugar: ½ cup, packed. The darker, the gooier, the better, IMO.
- Ground Cinnamon: 1 tablespoon. Don’t be shy! This is the star of the show.
- Unsalted Butter: ¼ cup, softened. Not melted, not rock hard, just perfectly spreadable.
- For the Cream Cheese Glaze (because what’s a cinnamon roll without a crown?):
- Cream Cheese: 4 ounces, softened. Don’t even *think* about trying to mix it cold.
- Powdered Sugar: 1 ½ to 2 cups. Start with less, add more if you want it sweeter or thicker.
- Unsalted Butter: 2 tablespoons, softened. See a pattern here? Butter is life.
- Vanilla Extract: ½ teaspoon. A tiny splash of pure joy.
- Milk or Cream: 1-3 tablespoons. To get that perfect drizzle consistency.
Step-by-Step Instructions
Alright, let’s get our hands (a little) dirty! We’re breaking this down into a relaxing evening session and a super chill morning finish.
The Night Before: Operation Doughy Dreams
- Activate the Yeast: In a large bowl (or your stand mixer bowl), combine the warm milk, 1 tablespoon of the granulated sugar, and the yeast. Give it a gentle stir and let it sit for about 5-10 minutes. It should get frothy, which means it’s alive and ready to party! If it doesn’t foam, your yeast might be D.O.A. (Dead On Arrival), so grab a fresh batch.
- Mix the Dough: Add the remaining ¼ cup granulated sugar, flour, salt, melted butter, and egg to the yeast mixture. Mix with a wooden spoon or your stand mixer with the dough hook attachment until a shaggy dough forms.
- Knead It Out: Turn the dough out onto a lightly floured surface and knead for about 5-8 minutes until it’s smooth and elastic. If you’re using a stand mixer, let it do its thing for 5-7 minutes. The dough should be slightly tacky but shouldn’t stick to your fingers too much.
- First Rise (the chill part): Lightly grease a clean bowl with a little oil. Place the dough in the bowl, turning once to coat. Cover the bowl tightly with plastic wrap. Now, here’s the magic: Pop it in the fridge overnight (8-12 hours). This slow, cold rise develops incredible flavor and texture. **Don’t skip this step!**
The Morning Of: The Grand Finale!
- Prep for Rolling: In the morning, take the dough out of the fridge. It won’t have doubled in size like a warm rise, but it should be nicely plump. On a lightly floured surface, gently punch down the dough to release any air.
- Roll ‘er Out: Roll the dough into a large rectangle, roughly 12×18 inches. Try to keep the thickness even. If it keeps shrinking back, let it rest for a few minutes, then continue.
- Spread the Goodness: In a small bowl, mix the softened ¼ cup butter, brown sugar, and cinnamon until combined. Spread this glorious mixture evenly over your dough rectangle, going almost to the edges.
- Roll ’em Up Tight: Starting from one of the long sides, carefully roll the dough into a tight log. Pinch the seam closed to seal it.
- Slice and Dice: Using a sharp knife or, even better, unflavored dental floss (seriously, it cuts clean!), slice the log into 12 equal pieces, about 1 ½ inches thick.
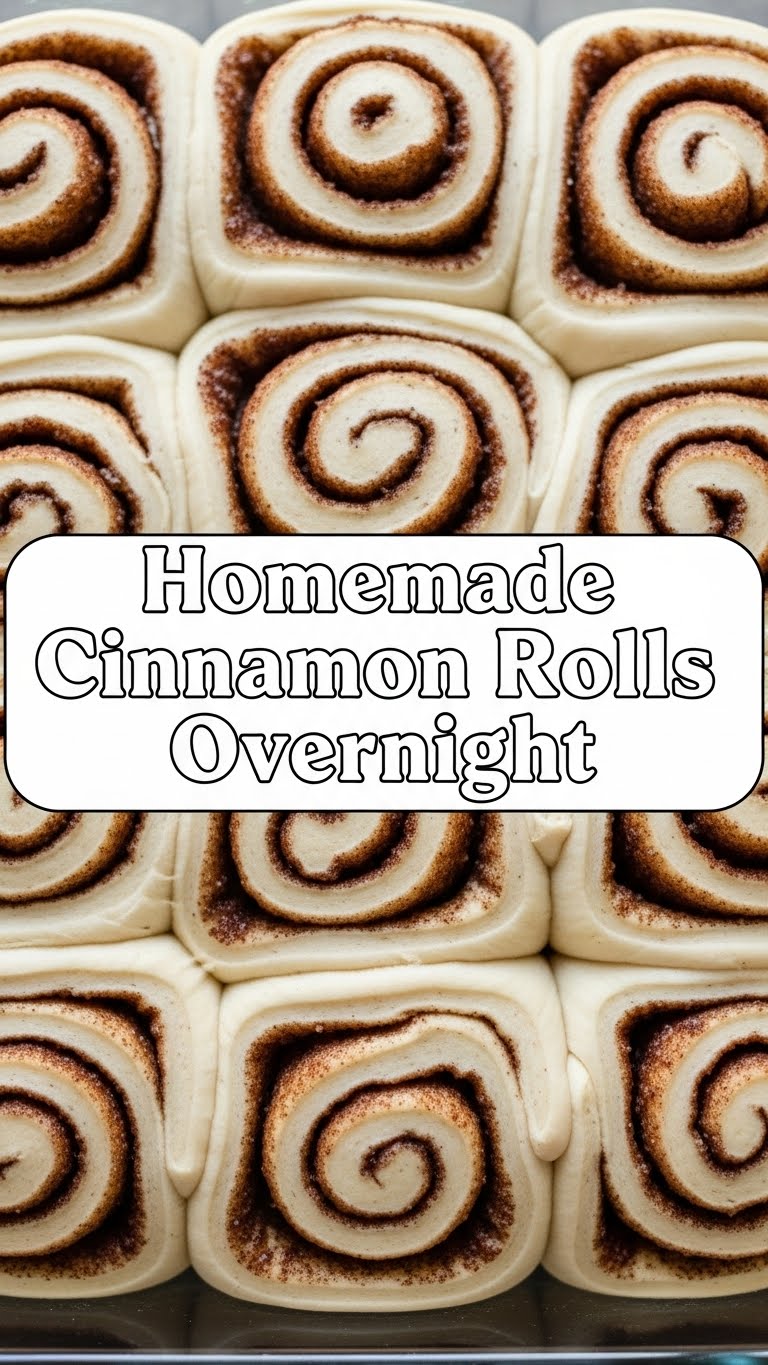
- Second Rise (the cozy part): Lightly grease a 9×13 inch baking dish. Arrange the cinnamon roll slices in the dish, leaving a little space between them (they’ll grow!). Cover the dish loosely with plastic wrap or a clean kitchen towel. Let them rise in a warm spot for 1-1.5 hours, or until they look nice and puffy and nearly doubled in size. This is crucial for fluffy rolls!
- Preheat & Bake: Towards the end of the second rise, preheat your oven to 375°F (190°C). Once preheated and the rolls have risen, bake for 20-25 minutes, or until they’re golden brown and irresistible. **Keep an eye on them!**
- Glaze ’em While Warm: While the rolls are baking, make the glaze. In a medium bowl, beat the softened cream cheese, powdered sugar, softened butter, vanilla extract, and 1 tablespoon of milk/cream until smooth. Add more milk/cream, 1 teaspoon at a time, until you reach your desired drizzly consistency. Once the rolls are out of the oven, let them cool for just 5-10 minutes, then smother them in that glorious glaze.
Common Mistakes to Avoid
Nobody’s perfect, but we can avoid some common pitfalls that turn dreamy rolls into, well, sad rolls. Learn from my past mistakes, folks!
- Ignoring Yeast Bubbles: If your yeast doesn’t get foamy after 10 minutes, it’s dead. Don’t waste your precious ingredients on inactive yeast! Start over with fresh stuff.
- Over-flouring the Dough: Too much flour makes tough, dry rolls. Add flour gradually until the dough is just slightly tacky. **A slightly sticky dough is a happy dough.**
- Cold Cream Cheese for Glaze: Trying to mix rock-hard cream cheese into your glaze is a recipe for lumpy disaster. Let it soften on the counter. Seriously.
- Rolling Too Thinly: If you roll your dough too thin, your rolls will be small and might dry out. Aim for that 12×18 inch, even thickness.
- Not Pinching the Seam: If you don’t pinch the seam of your rolled log, your beautiful swirls might unravel during baking. Sad times.
- Skipping the Second Rise: This is a biggie! If you rush the second rise, your rolls will be dense and heavy. Give them time to get puffy and airy. Patience, young Jedi baker.
Alternatives & Substitutions
Feeling a little rebellious? Want to customize your rolls? I get it. Here are a few ways to tweak this recipe to your heart’s content, because cooking should be fun, not restrictive!
- Dairy-Free? You *can* substitute plant-based milk (almond, soy, oat) and dairy-free butter for the milk and butter in the dough and filling. For the glaze, use dairy-free cream cheese and butter. The texture might be slightly different, but still delish!
- Whole Wheat Flour? You could swap out up to half of the all-purpose flour for whole wheat pastry flour. Just know they might be a bit denser, but hey, fiber!
- Add-ins: Want extra pizzazz? Sprinkle some chopped pecans or walnuts over the cinnamon filling before rolling. Or, for a zesty kick, add a teaspoon of orange zest to the dough or the glaze. **Orange zest in the glaze is a game-changer!**
- No Cream Cheese? If you’re not a fan of cream cheese (gasp!), you can make a simple powdered sugar glaze with just powdered sugar, milk/cream, and vanilla extract. Still yummy, just a different vibe.
FAQ (Frequently Asked Questions)
Got questions? I’ve got answers. Probably. Let’s tackle some common thoughts floating around your brilliant baking brain.
- Can I make these without the overnight chill? You *could*, but you’d need to let the dough rise at room temperature for about 1-1.5 hours after kneading, then proceed. However, the overnight chill truly develops superior flavor and makes the dough easier to handle. Why rush perfection?
- My rolls didn’t rise much, what happened? Oh, the horror! Usually, this means your yeast was either dead (milk too hot or old yeast) or your rising spot wasn’t warm enough. Double-check your milk temp next time – think baby bathwater, not scalding hot tub.
- Can I freeze these? Absolutely! You can freeze the baked and cooled rolls *before* glazing. Thaw overnight in the fridge, then warm gently in the oven and glaze. Or, for ultimate freshness, freeze the unbaked, sliced rolls in the baking dish. Cover tightly, then transfer to a freezer bag once solid. Thaw overnight in the fridge, let rise for 1-2 hours at room temp, then bake. **Game changer for future cravings!**
- How long do they last? Fresh is best, obviously, but properly stored in an airtight container at room temp, they’re usually good for 2-3 days. Pop them in the microwave for a few seconds to revive that fresh-baked gooeyness!
- Can I use margarine instead of butter? Well, technically yes, you *can*, but why hurt your soul like that? Butter truly elevates the flavor and texture of these rolls. If you absolutely must, just be aware the taste and richness might not be quite the same. Butter > Margarine, FYI.
Final Thoughts
And there you have it, future master baker! You’re now armed with the knowledge to conquer the overnight cinnamon roll. Imagine waking up to that smell, that warm gooeyness, that perfect balance of sweet and spice. It’s not just breakfast; it’s an experience. So go forth, get baking, and don’t forget to share (or don’t, I won’t judge). Now go impress someone—or yourself—with your new culinary skills. You’ve earned it!


