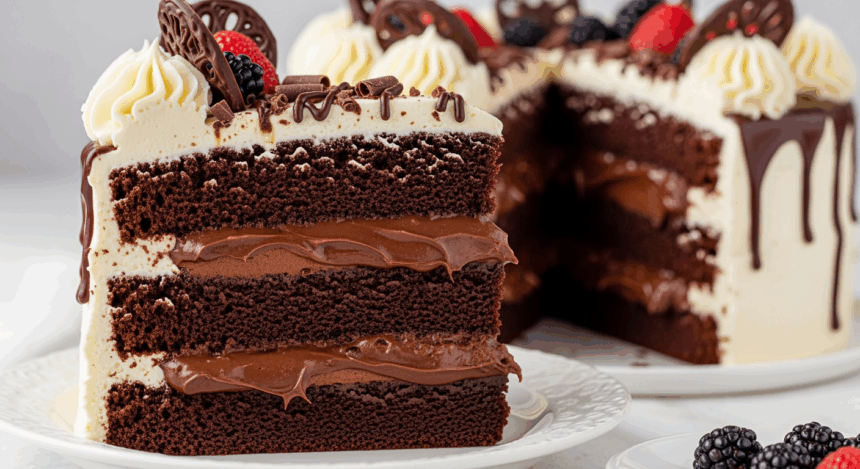
Ever had one of those days when you just need something so decadently chocolatey that it makes your problems seem tiny by comparison? Well, grab your mixer and put on your “I’m-about-to-make-something-amazing” face, because this Chocolate Truffle Cake with Buttercream Frosting is about to become your new therapy session. Who needs a counselor when you have chocolate, am I right?
Why This Recipe is Awesome
Let me count the ways this cake will change your life. First, it’s basically a chocolate lover’s fever dream—rich, moist, and so intense it should come with a warning label. Second, despite looking like something from a fancy bakery window, it’s actually pretty hard to mess up. I’ve made this while simultaneously binge-watching Netflix and texting, and it still turned out Instagram-worthy. Third, that moment when you cut into it and see that perfect crumb structure? Pure. Kitchen. Magic.
Oh, and did I mention it’s the perfect “I’m-sorry-I-forgot-our-anniversary” or “please-forgive-me-for-finishing-the-ice-cream” peace offering? Works every time.
Ingredients You’ll Need
For the Chocolate Truffle Cake:
- 2 cups all-purpose flour (the regular stuff, nothing fancy)
- 1¾ cups granulated sugar (because 2 cups would be sugar overkill… if that’s even possible)
- ¾ cup unsweetened cocoa powder (the good stuff, not the sad dusty one that’s been in your pantry since 2018)
- 1½ teaspoons baking powder
- 1½ teaspoons baking soda
- 1 teaspoon salt (to make the sweet even sweeter, trust me)
- 2 large eggs (room temperature, because cold eggs are party poopers)
- 1 cup whole milk (skim milk is just sad water, don’t even think about it)
- ½ cup vegetable oil (keeps it moist for days, if it lasts that long)
- 2 teaspoons vanilla extract (real vanilla, not that imitation nonsense)
- 1 cup hot coffee (yes, coffee! It makes chocolate taste more chocolatey—science!)
- 4 oz dark chocolate, chopped (the darker the better, like my soul)
For the Buttercream Frosting:
- 1 cup unsalted butter, softened (leave it out for an hour, or microwave it for 10 seconds if you’re impatient like me)
- 4 cups powdered sugar (yes, FOUR cups, we’re not making diet food here)
- ½ cup cocoa powder (same rule applies—use the good stuff)
- ¼ cup heavy cream (because we’re all adults here)
- 2 teaspoons vanilla extract
- ¼ teaspoon salt (balances the sweetness—trust me on this)
- Chocolate shavings or sprinkles for decoration (optional, but who are we kidding, you want them)
Step-by-Step Instructions
- Prep your battlestation. Preheat your oven to 350°F (175°C). Grease and line two 9-inch round cake pans with parchment paper. This is NOT optional unless you enjoy chiseling cake off pans.
- Mix the dry ingredients. In a large bowl, whisk together the flour, sugar, cocoa powder, baking powder, baking soda, and salt. Break up any cocoa clumps—nobody wants to bite into a pocket of dry cocoa. Nobody.
- Combine the wet team. In another bowl, beat the eggs, milk, oil, and vanilla extract until well combined. It should look like a weird yellow soup at this point. That’s normal, I promise.
- Bring it all together. Gradually add the wet ingredients to the dry ingredients while mixing. Stop occasionally to scrape the sides of the bowl because that’s where the good stuff hides.
- Add the magic element. Stir in the hot coffee and chopped chocolate. The batter will be thin—like, suspiciously thin. Don’t panic! This is what gives the cake its amazing texture.
- Bake it ’til you make it. Pour the batter evenly into your prepared pans and bake for 30-35 minutes, or until a toothpick inserted in the center comes out mostly clean with a few moist crumbs. If it comes out with wet batter, keep baking. If it comes out completely clean, you’ve gone too far (moment of silence).
- Cool your jets. Let the cakes cool in the pans for 10 minutes, then transfer to wire racks to cool completely. If you frost a warm cake, you’ll have a buttercream tsunami on your hands.
- Make that frosting. Beat the butter until creamy. Gradually add powdered sugar and cocoa powder, alternating with heavy cream. Add vanilla and salt, then beat on high speed for 3 minutes until it’s fluffy enough to make a cloud jealous.
- Assemble the masterpiece. Place one cake layer on your serving plate. Slather a generous amount of frosting on top. Add the second layer and frost the top and sides. Get artistic with it—or just pile it on, no judgment here.
- Decorate like you mean it. Add chocolate shavings, sprinkles, or whatever makes you happy. This is your chocolate kingdom, you’re the ruler.
Common Mistakes to Avoid
Opening the oven door too early. I know you’re excited, but your cake will sink faster than my motivation on Monday mornings if you let cold air in before the structure sets.
Skipping the parchment paper. “I’ll just use extra butter/cooking spray!” Famous last words before you’re left with half a cake stuck to the pan and tears in your eyes.
Using cold ingredients. Room temperature eggs and milk blend better with the batter. Science doesn’t care about your impatience, sorry!
Under-mixing or over-mixing. The first leaves flour pockets; the second gives you a tough cake. Aim for just incorporated—like when you’re trying to blend into a party where you only know one person.
Frosting a warm cake. Unless you’re going for the “melted snowman” look, wait until your cake is completely cool. I’m talking cold-shoulder-from-your-ex kind of cool.
Alternatives & Substitutions
No coffee? Use hot water instead. You’ll lose some depth of flavor, but your cake will still be delicious. Or use espresso powder mixed with hot water if you have it.
Dairy-free needs? Substitute the milk with almond milk or oat milk. For the frosting, there are some decent plant-based butters out there, but IMO, they’re not all created equal—try to find one specifically made for baking.
Gluten issues? A one-to-one gluten-free flour blend works pretty well here. The cake might be slightly denser, but with all that chocolate, who’s really going to notice?
Want to make cupcakes instead? Same recipe, just adjust baking time to about 18-22 minutes. You’ll get roughly 24 cupcakes from this batter.
Not a dark chocolate fan? First, we can’t be friends. Second, you can use semi-sweet or milk chocolate chips instead of the chopped dark chocolate, but prepare for a sweeter result.
FAQ (Frequently Asked Questions)
Can I make this cake ahead of time?
Absolutely! The cake layers can be made a day ahead and wrapped in plastic wrap. The frosting can be refrigerated overnight too—just let it come to room temperature and give it a quick whip before using.
How do I store leftovers? (Assuming there are any…)
Cover it up and refrigerate for up to 5 days. Let it sit at room temperature for about 30 minutes before serving for maximum flavor. The cake actually gets better on day two—if you have that kind of self-control.
Can I freeze this cake?
You bet! Freeze unfrosted layers wrapped tightly in plastic wrap and aluminum foil for up to 3 months. Thaw overnight in the refrigerator. You can also freeze frosted cake slices—just place them on a baking sheet until frozen solid, then wrap individually.
Why is coffee in a chocolate cake?
Coffee enhances chocolate flavor without making the cake taste like your morning brew. It’s like that friend who makes you look better at parties without stealing your spotlight.
Is this cake kid-friendly with the coffee in it?
Unless your kids are extremely caffeine-sensitive, they’ll be fine. The amount per slice is minimal, and most of the alcohol in vanilla extract bakes off. But if you’re concerned, hot water works too!
My frosting is too thin/thick. Help?
Too thin? Add more powdered sugar, one tablespoon at a time. Too thick? Add a splash of heavy cream. Frosting is very forgiving that way—unlike my ex.
Final Thoughts
Congratulations! You’ve just created a chocolate masterpiece that would make professional bakers slow-clap in appreciation. Whether you’re serving this at a dinner party or eating it straight from the cake stand at midnight (we’ve all been there), this Chocolate Truffle Cake with Buttercream Frosting is guaranteed to bring a moment of pure bliss.
Remember, calories consumed while licking the spatula don’t count, and neither do the ones in any cake made with love. So go ahead—cut yourself a slice, take that Instagram-worthy photo, and then focus on what really matters: getting that chocolate goodness into your mouth as efficiently as possible. You’ve earned it!
