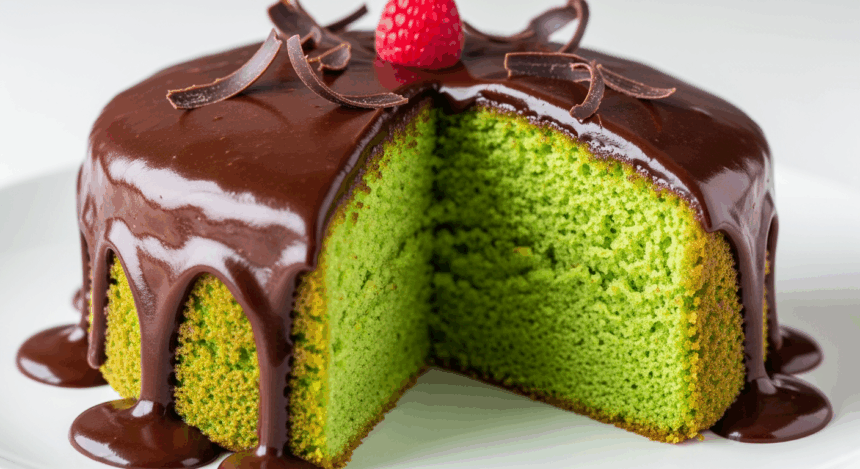
Ever looked at a cake and thought, “This would be way cooler if it were green”? Well, my friend, your weirdly specific dessert dreams are about to come true! This green cake with chocolate glaze is what happens when St. Patrick’s Day meets a chocolate factory – a vibrant, eye-catching treat that’s guaranteed to make people say “Whoa, that’s… green!” before devouring it completely.
Why This Recipe is Awesome
Let’s be real – green food is inherently fun. There’s something slightly rebellious about eating something that looks like it might give you superpowers. But beyond the novelty factor, this cake is genuinely delicious. The vibrant exterior hides a moist, flavorful cake that pairs perfectly with the rich chocolate glaze.
Plus, it’s weirdly versatile. Kids’ birthday? Green cake. St. Patrick’s Day? Green cake. Want to freak out your health-conscious roommate? Green cake on the counter at 3 AM. The possibilities are endless.
Ingredients You’ll Need
For the gloriously green cake:
- 2 cups all-purpose flour (the regular boring white stuff)
- 1 ½ cups granulated sugar (because adulting is hard enough without measuring sugar)
- 1 teaspoon baking powder
- ½ teaspoon baking soda
- ½ teaspoon salt
- 1 cup buttermilk (regular milk with a splash of vinegar works too, no judgment)
- ½ cup vegetable oil (or whatever neutral oil is hiding in your pantry)
- 2 large eggs (from chickens, preferably)
- 1 teaspoon vanilla extract (the real stuff, not that imitation nonsense)
- 1-2 tablespoons green food coloring (depending on how radioactive you want it to look)
For the chocolate glaze that makes everything better:
- 1 cup semisweet chocolate chips (or just chop up that chocolate bar you were saving)
- ½ cup heavy cream
- 2 tablespoons butter (the real deal, salted or unsalted, you do you)
- 1 teaspoon vanilla extract
Step-by-Step Instructions
- Prep your battlefield. Preheat your oven to 350°F (175°C) and grease a 9-inch round cake pan. If you’re feeling fancy, line the bottom with parchment paper. Your future self will thank you during cleanup.
- Mix the dry stuff. In a large bowl, whisk together the flour, sugar, baking powder, baking soda, and salt. Try not to inhale flour and have a coughing fit – we’ve all been there.
- Get wet. In another bowl, combine the buttermilk, oil, eggs, and vanilla. Whisk until smooth, then add your green food coloring. Start with a tablespoon and add more if you want it to look more like something out of a sci-fi movie.
- Bring it together. Pour the wet ingredients into the dry ingredients and mix until just combined. Overmixing is the enemy here – unless you’re trying to make green rubber.
- Bake that beauty. Pour the batter into your prepared pan and bake for 30-35 minutes, or until a toothpick inserted in the center comes out clean. The cake should be springy to the touch, not like a soggy sponge.
- Cool your jets. Let the cake cool in the pan for 10 minutes, then transfer to a wire rack to cool completely. Patience, grasshopper – hot cake + glaze = messy disaster.
- Make the glaze of glory. Place chocolate chips, heavy cream, and butter in a microwave-safe bowl. Heat in 30-second intervals, stirring between each, until smooth. Stir in vanilla. If it seems too thick, add a splash more cream.
- The grand finale. Once the cake is completely cool (I mean it!), pour the glaze over the top, letting it drip down the sides dramatically. For extra pizzazz, add sprinkles or whatever festive decorations strike your fancy.
Common Mistakes to Avoid
Even though this cake is pretty forgiving, here are some ways you might accidentally sabotage yourself:
- Going Hulk-mode with the food coloring. Unless you want your guests’ mouths to look like they’ve been eating grass, start with less and add more as needed.
- Glazing a warm cake. I know it’s tempting, but your glaze will slide right off like it’s making a break for freedom. Patience!
- Opening the oven every 5 minutes. Your cake will sink faster than my motivation on Monday mornings.
- Forgetting that food coloring stains everything. Including your hands, countertops, soul, etc. Wear gloves if you value your manicure.
Alternatives & Substitutions
This recipe is pretty flexible, much like how I imagine yoga would be if I ever tried it:
- Not feeling green? Use any color food coloring. Blue cake? Purple cake? Go wild! It’s your kitchen circus.
- Buttermilk alternative: Mix 1 cup of milk with 1 tablespoon of lemon juice or vinegar, let sit for 5 minutes. Boom – DIY buttermilk.
- Gluten-free version: Swap in your favorite cup-for-cup gluten-free flour blend. The texture might be slightly different, but still delicious.
- Natural green coloring: If food dye freaks you out, try matcha powder or spinach juice (yes, really). The color won’t be as vibrant, but hey, it’s technically healthier, I guess?
- Chocolate options: Dark chocolate makes a richer glaze, while milk chocolate gives a sweeter result. Choose your own adventure.
FAQ (Frequently Asked Questions)
Will this cake turn my mouth green?
Only if you go overboard with the food coloring. But hey, maybe that’s the look you’re going for? No judgment here.
Can I make this cake in advance?
Absolutely! The cake itself can be made a day ahead. Just store it in an airtight container and add the glaze when you’re ready to serve. FYI, the glaze sets up after a few hours.
Can I turn this into cupcakes instead?
You bet! Fill cupcake liners about 2/3 full and bake for approximately 18-20 minutes. This recipe should make about 18 cupcakes – perfect for when you don’t want to share one big cake.
Does this cake need to be refrigerated?
If you’re planning to eat it within 2 days, room temperature in an airtight container is fine. Any longer than that, and you should probably refrigerate it. But let’s be real – this cake isn’t lasting that long.
My cake sank in the middle – what gives?
You probably either opened the oven door too early or didn’t bake it long enough. But guess what? That’s what the glaze is for – to hide your baking crimes.
Final Thoughts
There you have it – a cake that’s as fun to look at as it is to eat! Whether you’re making this for a special occasion or just because you wanted something green in your life, this recipe delivers both visual impact and deliciousness.
Remember, baking is part science, part art, and part having the confidence to say “I meant to do that” when things don’t go exactly as planned. So go ahead and unleash this gloriously green creation on the world – or just eat it all yourself while binge-watching your favorite show. I won’t tell anyone.
