Ever wake up with that specific, undeniable craving for something warm, sweet, and utterly indulgent? You know, the kind that whispers “cinnamon roll” directly into your soul? Yeah, me too. And let’s be real, driving to the store just for one feels like a whole marathon sometimes. So, what if I told you we could whip up some heavenly, gooey cinnamon rolls right in your own kitchen, without turning it into a disaster zone? Spoiler alert: We totally can.
Why This Recipe is Awesome
Why bother, you ask? Because, my friend, this isn’t just any cinnamon roll recipe. This is THE cinnamon roll recipe. It’s the one that makes you look like a pastry chef without all the actual chef-y stress. It’s surprisingly chill, requires no fancy equipment (unless you count a rolling pin “fancy”), and honestly, it’s pretty darn idiot-proof. If I can nail it after a long week, you totally can too. Plus, your house will smell like a dream, and that, my friend, is half the battle won. Imagine warm, soft, swirly goodness, drenched in cream cheese frosting… stop drooling, we have work to do!
Ingredients You’ll Need
Gather your troops, because we’re about to make some magic:
For the Dough:
- 1 cup Warm Milk: Not hot, not cold. Just cozy warm, like a perfect bath for yeast.
- 2 ¼ teaspoons Active Dry Yeast: The little magic makers. Don’t skip this, unless you like brick rolls.
- ¼ cup Granulated Sugar: A little sweetness for the dough’s soul.
- 1 Large Egg: Room temp, please! They mix better when they’re not shivering.
- ¼ cup Unsalted Butter: Melted and cooled. Because butter makes everything better, duh.
- 3 cups All-Purpose Flour: The main character, obvs.
- 1 teaspoon Salt: Just a pinch, to balance the sweetness.
For the Filling:
- ½ cup Packed Light Brown Sugar: The rich, caramelly heart of the roll.
- 2 tablespoons Ground Cinnamon: The star of the show! Don’t be shy.
- ¼ cup Unsalted Butter: Softened. We’re getting cozy here.
For the Cream Cheese Frosting (the best part!):
- 4 ounces Cream Cheese: Softened, full-fat. Go big or go home.
- ¼ cup Unsalted Butter: Softened again. Are you seeing a pattern? Butter is king.
- 1 ½ cups Powdered Sugar (Confectioners’ Sugar): For that smooth, melt-in-your-mouth sweetness.
- ½ teaspoon Vanilla Extract: A splash of pure joy.
- A tiny pinch of Salt: Again, balances things out. Trust me.
Step-by-Step Instructions
- Activate the Yeast: Grab a large bowl. Pour in the warm milk (seriously, check the temp – it should be around 105-115°F / 40-46°C, like warm bathwater). Sprinkle in 1 tsp of sugar and the yeast. Give it a gentle stir and let it chill for about 5-10 minutes. It should get nice and foamy. If it doesn’t foam, your yeast is probably dead, and it’s time for new yeast. No, really.
- Mix the Dough: Add the remaining sugar, egg, melted butter, flour, and salt to the yeast mixture. Mix with a wooden spoon or a stand mixer (with a dough hook, if you’re fancy) until it forms a shaggy dough.
- Knead, Baby, Knead: Turn the dough out onto a lightly floured surface. Knead it for 5-8 minutes until it’s smooth and elastic. If using a stand mixer, let it knead for about 5 minutes. The dough should spring back when you poke it.
- First Rise: Lightly grease a large bowl. Pop the dough in, turn it once to coat, then cover the bowl with plastic wrap or a damp towel. Let it rise in a warm place for about 1-1.5 hours, or until it has doubled in size. This is where the magic happens!
- Prep the Filling: While your dough is rising, mix the softened butter, brown sugar, and cinnamon in a small bowl until it forms a delicious, spicy paste. Resist the urge to eat it all right now.
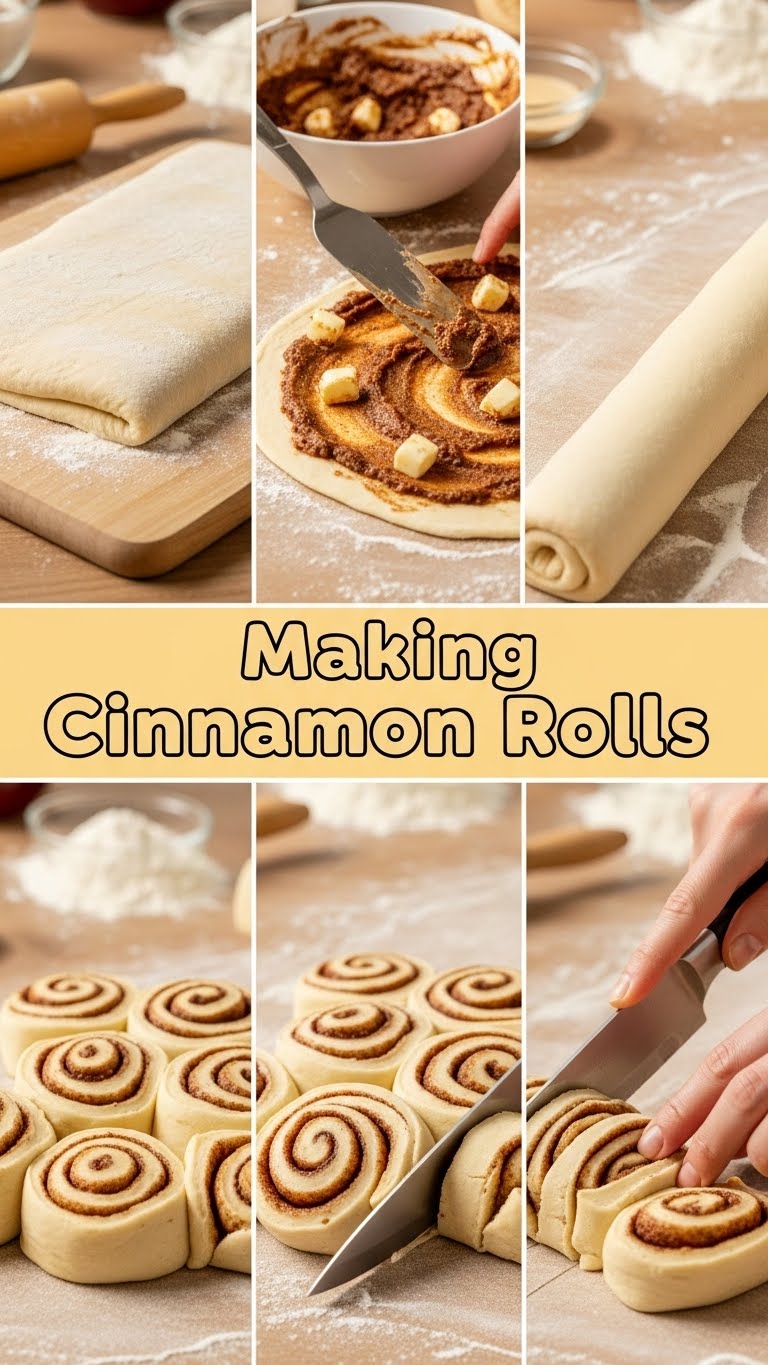
- Roll it Out: Once the dough has risen, punch it down gently (it’s satisfying, try it!). Turn it out onto a lightly floured surface and roll it into a large rectangle, roughly 12×18 inches (30×45 cm). Don’t stress too much about perfect edges, we’re not baking for the Queen.
- Spread the Goodness: Evenly spread the cinnamon-sugar filling all over the dough, leaving a small border at one of the longer edges (about half an inch) free. This helps seal the roll.
- Roll ‘Em Up: Starting from the longer edge opposite your empty border, tightly roll the dough into a log. The tighter the better, or your rolls might unravel.
- Slice and Dice: Use a sharp, un-serrated knife or, even better, unflavored dental floss (seriously, it gives cleaner cuts!) to cut the log into 12 equal slices. About 1.5 inches (4 cm) thick each.
- Second Rise: Arrange the rolls in a lightly greased 9×13 inch baking dish, leaving a little space between each. Cover again and let them rise for another 30-45 minutes, or until they look puffy and snug. Preheat your oven to 375°F (190°C) during the last 15 minutes of this rise.
- Bake Time! Bake for 20-25 minutes, or until they’re golden brown and irresistible. If they start browning too quickly, you can loosely tent them with foil.
- Make the Frosting: While the rolls are baking or cooling slightly, beat the softened cream cheese and butter together in a medium bowl until smooth. Gradually add the powdered sugar, vanilla, and salt, mixing until you have a smooth, creamy, dreamy frosting.
- Frost and Devour: Let the rolls cool for about 10-15 minutes (they’re easier to frost when warm, but not piping hot). Then generously slather that glorious cream cheese frosting all over them. Seriously, be generous. Serve immediately and watch them disappear!
Common Mistakes to Avoid
- Killing the Yeast: Using water that’s too hot will kill your yeast. Too cold, and it won’t activate. Goldilocks zone, people!
- Not Kneading Enough: A sticky, slack dough means you didn’t knead enough. Your rolls will be dense, not fluffy. Don’t be lazy, give that dough some love!
- Over-flouring: Adding too much flour during kneading or rolling makes the dough tough. Use just enough to prevent sticking. A little stick is okay.
- Not Letting Them Rise Fully: Impatience is a virtue, but not here. Don’t rush the rise times, or your rolls will be small and sad.
- Rolling Them Loosely: A loose roll equals messy, unraveled cinnamon rolls. Roll that baby tight!
- Preheating the Oven? Nah: Rookie move! Always preheat. An oven that isn’t hot enough will mess with your baking time and texture.
Alternatives & Substitutions
- Dairy-Free? You can totally swap dairy milk for a non-dairy alternative like almond or oat milk. For butter, use a good quality plant-based butter substitute. The flavor might shift slightly, but still yummy!
- No Cream Cheese? If you’re not a fan of cream cheese, a simple powdered sugar glaze (powdered sugar + milk + vanilla) works wonderfully too. Or just melt some butter and drizzle on top.
- Flavor Twists: Want to get wild? Add a pinch of nutmeg or cardamom to your filling for an extra layer of spice. Throw some chopped pecans or walnuts in there for crunch. Go nuts! (Pun intended.)
- Overnight Option: Want morning rolls without the morning stress? After the second rise, cover the baking dish tightly with plastic wrap and refrigerate overnight. In the morning, pull them out while your oven preheats and bake as usual, maybe adding 5-10 minutes to the baking time if they’re still chilly. Pro tip!
FAQ (Frequently Asked Questions)
- Can I use margarine instead of butter? Well, technically yes, but why hurt your soul like that? Butter just tastes better and gives a richer texture. But if margarine is all you’ve got, go for it, just manage expectations.
- My dough isn’t rising, what gives? Most likely your yeast is expired, or your milk was too hot/cold. Yeast needs to be happy! Check the date on your yeast packet, and double-check that milk temperature next time.
- How do I store leftovers? Leftovers?! What are those? Kidding (mostly). Store unfrosted rolls in an airtight container at room temp for up to 2 days, or in the fridge for up to 5 days. Frosted rolls should ideally be refrigerated due to the cream cheese. Reheat briefly in the microwave or oven for that “fresh out of the oven” feel.
- Can I freeze them? Absolutely! You can freeze the baked and unfrosted rolls, wrapped tightly, for up to a month. Thaw, then warm in the oven and frost. You can also freeze the unbaked rolls after the second rise. Just let them thaw and rise a bit at room temp before baking.
- My rolls are dry. Help! Did you overbake them? Or maybe add too much flour to the dough? Keep an eye on them in the oven; every oven is different. Also, make sure your ingredients (especially butter) are fresh!
- What’s the best way to cut them without squishing? Unflavored dental floss, my friend. Slide it under the log, cross the ends over the top, and pull. Cleanest cuts every time! Or a very sharp, un-serrated knife.
Final Thoughts
Phew! We did it! You just tackled the glorious world of homemade cinnamon rolls. See? Not so scary, right? Now go impress someone—or yourself—with your new culinary skills. Seriously, bask in the glory of that warm, gooey, frosting-covered masterpiece. You’ve earned every single bite. And hey, if you mess up, there’s always next time, and it’ll still probably taste amazing. Happy baking, my friend!


