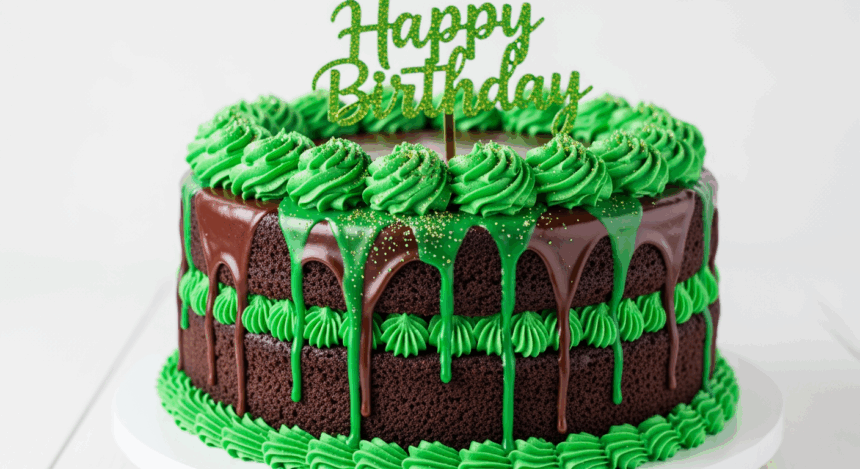
Has anyone else noticed that birthdays call for cake the same way Monday mornings call for coffee? Non-negotiable. But not just any cake—we’re talking about that showstopper that makes everyone whip out their phones before you even finish lighting the candles. Today I’m sharing my chocolate birthday cake with green accents recipe that’s both Instagram-worthy AND actually tastes amazing (shocking concept, I know).
Why This Recipe is Awesome
Let’s be real—this cake is basically the overachiever of the dessert world. It’s rich and chocolatey but not in that overwhelming “I need to lie down now” way. The green accents add that perfect pop of color that says “I’m festive but not trying too hard.” Plus, the recipe is surprisingly forgiving. Had a few glasses of wine while baking? No problem! This cake will still turn out great, which frankly, is the kind of energy we all need in our lives.
Ingredients You’ll Need
For the Chocolate Cake:
- 2 cups all-purpose flour (the regular stuff, nothing fancy)
- 1¾ cups granulated sugar (because 2 cups would just be excessive, right?)
- ¾ cup unsweetened cocoa powder (the good kind, not the sad hot chocolate packets)
- 1½ teaspoons baking powder
- 1½ teaspoons baking soda
- 1 teaspoon salt
- 2 large eggs (room temperature—yes, it matters, don’t @ me)
- 1 cup buttermilk (or regular milk with a splash of vinegar if you forgot to buy buttermilk, again)
- ½ cup vegetable oil
- 2 teaspoons vanilla extract (the real stuff, not that imitation nonsense)
- 1 cup hot coffee (or hot water if caffeine makes you weird)
For the Chocolate Frosting:
- 1 cup unsalted butter, softened (actually softened, not just sitting out for 3 minutes)
- 3½ cups powdered sugar (yes, it seems excessive. No, it’s not)
- ½ cup unsweetened cocoa powder
- ¼ cup heavy cream
- 2 teaspoons vanilla extract
- ¼ teaspoon salt
For the Green Accents:
- ½ cup white chocolate chips (for melting)
- Green food coloring (gel works best, unless you want a pastel situation)
- Green sprinkles (optional, but are sprinkles ever really optional?)
- Mint leaves (for garnish and to make people think you’re fancy)
Step-by-Step Instructions
- Prep your battlestation. Preheat oven to 350°F (175°C). Grease and line two 9-inch round cake pans. Pro tip: those little strips of parchment paper on the bottom will save you from cake-removal drama later.
- Mix the dry ingredients. In a large bowl, whisk together flour, sugar, cocoa powder, baking powder, baking soda, and salt. Create a well in the center like you’re making a little ingredient volcano.
- Add the wet team. Pour in eggs, buttermilk, oil, and vanilla. Mix until just combined—this isn’t a workout session, don’t overdo it.
- Coffee time! Slowly add hot coffee, stirring gently. Yes, the batter will look alarmingly thin. No, you didn’t mess up—that’s how it should be.
- Bake it up. Divide batter between your prepared pans and bake for 30-35 minutes, or until a toothpick comes out with just a few crumbs. If it comes out with wet batter, keep baking. If it comes out clean, you’ve gone too far (but it’ll still taste good).
- Cool your jets. Let cakes cool in pans for 10 minutes before transferring to cooling racks. If you skip this step, you’ll have a pile of crumbs instead of a cake. Just saying.
- Frosting magic. Beat butter until creamy. Add powdered sugar and cocoa powder gradually (unless you enjoy looking like you lost a fight with a sugar bag). Mix in cream, vanilla, and salt until fluffy and spreadable.
- Green machine. Melt white chocolate chips in 15-second bursts in the microwave. Add green food coloring and stir until you reach your desired shade of envy. Transfer to a piping bag or ziplock bag with the corner snipped.
- Assemble the masterpiece. Place one cake layer on your serving plate. Spread a generous layer of frosting. Top with second cake layer. Cover the whole thing with remaining frosting—top and sides.
- Get artistic. Pipe green chocolate in whatever pattern strikes your fancy—drips around the edge, swirls, your ex’s name crossed out (kidding… kind of). Sprinkle with green sprinkles and add mint leaves for that “I totally planned this color scheme” vibe.
Common Mistakes to Avoid
Let’s talk about where things can go sideways faster than a shopping cart with a bad wheel:
- Opening the oven every 5 minutes to “check.” This isn’t a reality TV show—you don’t need constant updates. Your cake needs consistent heat.
- Frosting a warm cake. Unless your aesthetic goal is “melted snowman,” wait until the cake is completely cool before frosting.
- Skipping the parchment paper. Then wondering why your cake is stuck to the pan like it signed a lifetime contract.
- Going wild with the green. Unless it’s St. Patrick’s Day or you’re making a Hulk-themed cake, a little green goes a long way.
- Substituting ingredients willy-nilly. Baking is basically edible science. Respect the chemistry.
Alternatives & Substitutions
Life happens. Pantries aren’t always fully stocked. Here’s how to pivot:
- No buttermilk? Mix 1 cup of milk with 1 tablespoon of lemon juice or vinegar. Let it sit for 5 minutes until it looks slightly curdled (appetizing, I know).
- Coffee-free version: Use hot water instead. You’ll lose some depth of flavor, but your kids won’t be bouncing off the walls at bedtime, so there’s that.
- Color alternatives: Not feeling green? Any color works—blue for boy birthdays, pink for girls (or whatever—it’s 2023, colors don’t have genders anymore).
- Gluten concerns? Sub in a 1:1 gluten-free flour blend. The texture might be slightly different, but hey, it’s better than sending someone to the hospital on their birthday.
- Vegan needs? Replace eggs with flax eggs (1 tbsp ground flaxseed + 3 tbsp water = 1 egg), use plant milk with vinegar for buttermilk, and choose vegan butter. The cake will be slightly denser but still delicious.
FAQ (Frequently Asked Questions)
Can I make this cake ahead of time?
Absolutely! The cake layers can be made 1-2 days ahead and wrapped in plastic wrap. The fully assembled cake will stay fresh for about 3 days at room temperature. Any longer and you’re entering science experiment territory.
Will the green coloring stain everyone’s teeth?
If you’re using a reasonable amount, no. If you’re dumping in half a bottle of food coloring because “go big or go home,” then yes, and everyone will be taking very interesting birthday photos.
Do I really need two 9-inch pans?
You can use one pan and bake the layers sequentially, but honestly, who has time for that? If you only have one pan, you’ll need to adjust baking time (and your schedule).
Can I use chocolate chips instead of cocoa powder?
That’s like asking if you can use orange juice instead of oranges. Different things, friend. Stick with cocoa powder for the right texture and flavor.
My green decorations are looking more like alien slime than elegant accents. Help?
Less is more with food coloring. Start with a tiny amount and add gradually. If disaster has already struck, pivot and call it a “monster theme.” Everyone loves a good theme.
Will this cake impress my mother-in-law?
If your mother-in-law isn’t impressed by this cake, I’m not sure she can be impressed by anything short of you discovering a new planet. Name it after her, maybe?
Final Thoughts
Birthdays come once a year, which means you have exactly one chance to show someone they’re worth the effort of baking this chocolate masterpiece with its fancy green accents. Or maybe it’s your own birthday and you’re treating yourself—in which case, add an extra scoop of ice cream on the side because you deserve it.
The beauty of this cake is that even if it doesn’t look Pinterest-perfect, it’ll still taste amazing. And let’s be honest—after people sing an awkwardly paced rendition of “Happy Birthday” and the candles are blown out, no one’s really judging the aesthetics anymore. They just want cake.
Now go forth and bake something that makes someone’s special day even more memorable. Or at the very least, creates a sugar high that ensures no one will forget the party. Either way, mission accomplished!

