Short, Catchy Intro
Alright, let’s be real. You woke up today, probably scrolled through endless puppy videos, and then BAM! A sudden, overwhelming craving for something warm, gooey, and absolutely *heavenly* hit you like a ton of bricks. And not just any heavenly… we’re talking cinnamon rolls. But not just *any* cinnamon rolls. Oh no, honey. We’re talking fresh-milled, melt-in-your-mouth cinnamon rolls. Sounds intimidating? Pfft! You know me, if it requires a science degree, I’m out. This is surprisingly easy and ridiculously delicious. Let’s get sticky!
Why This Recipe is Awesome
Okay, so why should you ditch your current life plans for this particular recipe? For starters, it uses **fresh-milled flour**, which basically means you’re unlocking a whole new level of flavor and texture that store-bought flour can only dream of. Imagine a dough that’s incredibly tender, more nutritious (shhh, don’t tell the kids), and smells like a warm hug. Plus, the whole “fresh-milled” thing makes you sound super fancy and impressive without actually doing much extra work. It’s also pretty much idiot-proof, even for those of us (ahem, me) who occasionally forget which end of the spoon is up. Seriously, the aroma alone is worth the minimal effort.
Ingredients You’ll Need
Gather your weapons, future cinnamon roll master! Here’s what you’ll need for doughy goodness and that irresistible frosting.
- For the Dough:
- 1 cup warm milk (about 105-115°F/40-46°C) – Not boiling, not cold. Just a nice warm bath for our yeast friends.
- 2 ¼ teaspoons active dry yeast (that’s one packet, if you’re keeping it simple) – The little guys that make magic happen.
- ¼ cup granulated sugar – A sweet kiss for the yeast and a touch of flavor.
- ½ cup unsalted butter, melted and cooled – Because everything’s better with butter. **Seriously, cooled!**
- 2 large eggs, at room temperature – They add richness and a lovely golden hue.
- 1 teaspoon salt – Don’t skip this! It balances all the sweetness.
- 3 ½ – 4 cups fresh-milled all-purpose or soft white wheat flour – The star of the show! Milled from your favorite wheat berries right before baking for ultimate freshness.
- For the Filling:
- ½ cup unsalted butter, softened – Not melted, not hard. Spreadable perfection.
- 1 cup packed light brown sugar – The sticky, caramelly backbone of cinnamon rolls.
- 2 tablespoons ground cinnamon – Go big or go home! This is a *cinnamon* roll, after all.
- For the Cream Cheese Frosting:
- 4 oz cream cheese, softened – The tangy counterpoint to all that sweet.
- ¼ cup unsalted butter, softened – More butter! We’re not health gurus here.
- 2 cups powdered sugar – Sifted, if you’re feeling extra fancy and lump-averse.
- 1 teaspoon vanilla extract – A splash of warmth.
- 1-2 tablespoons milk or cream – To get that perfect drizzly consistency.
Step-by-Step Instructions
Ready? Set? Bake! Follow these simple steps and try not to eat all the dough.
- Activate the Yeast: In a large bowl (or stand mixer bowl), combine the warm milk, yeast, and a pinch of that ¼ cup sugar. Give it a gentle stir and let it sit for about 5-10 minutes. It should get bubbly and foamy—that’s how you know your yeast is alive and ready to party! If it doesn’t foam, your yeast is probably dead, RIP. Start over.
- Mix the Wet Ingredients: Once your yeast is happy, add the melted and cooled butter, eggs, the remaining ¼ cup sugar, and salt to the bowl. Whisk it all together until well combined.
- Add the Flour: Gradually add your fresh-milled flour, about a cup at a time, mixing on low speed with a dough hook (or with a sturdy spoon then your hands) until a shaggy dough forms. Continue adding flour until the dough starts to pull away from the sides of the bowl. It might still be a little sticky, which is fine! Don’t overdo the flour, or your rolls will be tough.
- Knead the Dough: Knead the dough for about 5-7 minutes until it’s smooth and elastic. If using a stand mixer, let it do the work. If kneading by hand, embrace the therapeutic process! You’re building gluten, baby!
- First Rise (Proofing): Lightly grease a clean bowl with a little oil. Place the dough in the bowl, turn it once to coat, then cover with plastic wrap or a clean kitchen towel. Let it rise in a warm, draft-free place for 1-1.5 hours, or until it has doubled in size. This is where patience pays off!
- Make the Filling: While the dough is rising, combine the softened butter, brown sugar, and cinnamon in a small bowl. Mix until it forms a spreadable paste. Set aside.
- Roll it Out: Once your dough has doubled, gently punch it down to release the air (satisfying!). Turn it out onto a lightly floured surface. Roll it into a large rectangle, roughly 12×18 inches. Aim for an even thickness!
- Spread the Filling: Evenly spread your cinnamon-sugar-butter mixture all over the dough, leaving a small border (about ½ inch) along one of the long edges.
- Roll ’em Up: Starting from the opposite long edge, tightly roll the dough into a log. The tighter you roll, the prettier your spirals!
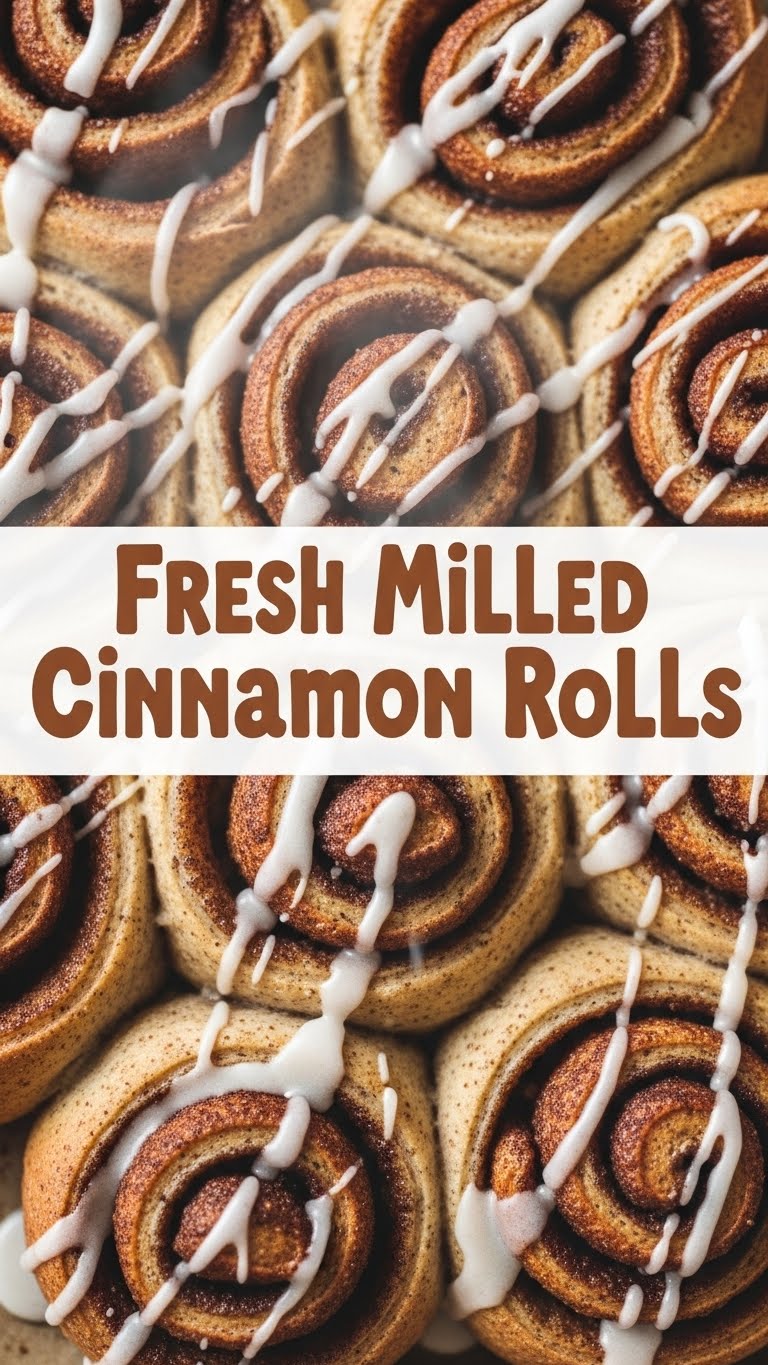
- Slice and Dice: Use a sharp knife or, my personal favorite hack, a piece of unflavored dental floss, to cut the log into 12 even slices (about 1.5 inches thick each). Place the rolls into a lightly greased 9×13 inch baking dish.
- Second Rise: Cover the baking dish with plastic wrap or a towel and let the rolls rise again in a warm place for another 30-45 minutes, or until they look puffy and snug in the pan. Preheat your oven to 375°F (190°C) during the last 15 minutes of this rise.
- Bake ’em! Bake for 20-25 minutes, or until golden brown on top and cooked through. If they start browning too quickly, you can loosely tent them with foil.
- Whip Up the Frosting: While the rolls are baking, beat the softened cream cheese and butter together until smooth. Add the powdered sugar, vanilla, and milk/cream, beating until light and fluffy. If it’s too thick, add more milk a teaspoon at a time. Too thin? More powdered sugar! You got this.
- Frost and Devour: Let the rolls cool for about 5-10 minutes (just barely, you want that frosting to get nice and gooey). Spread that glorious cream cheese frosting generously over the warm rolls. Serve immediately and bask in the adoration of all who behold your masterpiece.
Common Mistakes to Avoid
We’ve all been there. Here’s how to dodge some common pitfalls and maintain your baking cred.
- Using cold ingredients: Especially eggs and milk! Cold stuff slows down yeast activity and can make your dough stiff. Room temp is your friend.
- Over-flouring the dough: More flour does not equal better dough. It equals tough, dry, sad cinnamon rolls. **Resist the urge to add too much flour!** A slightly sticky dough is a happy dough.
- Under-proofing: Rushing the rise times is a cardinal sin in yeast baking. Your rolls will be dense and sad. Give them their space and time to puff up. Trust the process.
- Not letting the butter cool for the dough: Hot butter will kill your yeast. And we don’t want a yeast massacre, do we?
- Over-baking: Dry rolls are a tragedy. Keep an eye on them. They should be golden, not crispy.
- Not spreading the filling to the edge: Leaving too much of a border means you get bland edges. Nobody wants a bland edge.
Alternatives & Substitutions
Feeling adventurous? Or just realized you’re out of something crucial? No worries, we can usually make it work!
- Flour: While fresh-milled soft white or all-purpose wheat is the *chef’s kiss*, you can totally use regular unbleached all-purpose flour. The texture will be slightly different, but still amazing. Or, if you’re feeling extra whole-grainy, fresh-milled whole wheat flour works, but you might need a smidge more liquid.
- Milk: Dairy-free? No problem! Almond milk, oat milk, or soy milk can happily step in.
- Butter: For the dough and filling, a good quality plant-based butter substitute works well. For the frosting, a vegan cream cheese and butter combo is an option, though the texture might vary slightly.
- Filling Variations: Feeling spicy? Add a pinch of nutmeg or cardamom to the cinnamon mix. Or, for a citrusy twist, add some orange or lemon zest. Yum!
- No Cream Cheese Frosting? Gosh, why? (Just kidding… mostly.) A simple powdered sugar glaze (powdered sugar + milk + vanilla) works too if you’re short on cream cheese. It’s not the *same*, but it’s still sweet.
FAQ (Frequently Asked Questions)
Got burning questions? I’ve got (casual) answers!
- Can I prepare these ahead of time? Absolutely! Make the rolls up to step 11, cover the pan tightly with plastic wrap, and pop them in the fridge overnight. The next morning, take them out, let them come to room temp and proof for about an hour, then bake as usual. **Pro-tip:** This is a lifesaver for holiday mornings.
- How do I store leftover cinnamon rolls? Ha! “Leftover.” Good one. If you somehow have any, store them in an airtight container at room temperature for 2-3 days, or in the fridge for up to a week. Reheat gently in the microwave or oven.
- Can I freeze the baked cinnamon rolls? Yep! Bake and frost them, then let them cool completely. Wrap individually or the whole pan tightly in plastic wrap and then foil. They’ll keep in the freezer for up to a month. Thaw at room temp and reheat.
- What kind of grain should I mill for these? For a classic, tender cinnamon roll, **soft white wheat** is generally my top pick. It has a lower protein content, which is great for soft baked goods. All-purpose wheat berries work wonderfully too!
- My dough isn’t rising! What gives? This is usually a yeast issue. Was your milk too hot (killed the yeast) or too cold (yeast went to sleep)? Is your yeast expired? Make sure your yeast is active before you commit. Also, a cold kitchen can slow things down—find a cozy, warm spot for your dough to hang out.
Final Thoughts
Phew! You made it. And honestly, your kitchen probably smells like a bakery exploded in the best possible way. Fresh-milled cinnamon rolls are a labor of love, yes, but mostly a labor of *joy* and the promise of pure, unadulterated comfort. So go ahead, tear into one (or three, I’m not judging). You’ve totally earned those gooey, cinnamony, fresh-milled masterpieces. Now go impress someone—or just yourself—with your new culinary superpowers. You deserve it!

