So you’re craving something tasty but too lazy to spend forever in the kitchen, huh? Same. What if I told you we could make epic, gooey, homemade cinnamon rolls with minimal effort, thanks to our trusty bread machine? Get ready to unleash your inner baking wizard (without, you know, actually doing much wizardry). This isn’t just a recipe; it’s a life hack for your sweet tooth!
Why This Recipe is Awesome
Let’s be real, kneading dough is a workout. And frankly, sometimes we’d rather use that energy to, well, eat cinnamon rolls. This recipe is your secret weapon, your kitchen MVP, the reason you’ll be crowned the Snack King or Queen:
- It’s like magic, but instead of a wand, you have a bread machine doing all the heavy lifting. **Hello, “Dough” cycle!**
- It’s basically idiot-proof. Seriously, even I didn’t mess it up, and my track record with yeast can be… spotty.
- **Minimal effort, maximum reward.** Your bread machine kneads and rises the dough perfectly every single time. All you do is assemble and bake.
- The smell alone is worth it. Your house will smell like a professional bakery, and you’ll be instantly promoted to household hero. FYI.
Ingredients You’ll Need
Gather your troops, buttercups. Here’s what you’ll need to make these dreams a reality. Don’t skimp on the good stuff!
For the Dough:
- 1 cup warm milk: About 105-115°F (like a cozy bath for your finger). Too hot, you kill the yeast; too cold, it stays sleepy.
- 1/2 cup melted butter: Liquid gold.
- 1 large egg: The binder, not the bouncer.
- 1/2 cup granulated sugar: Sweetness personified.
- 1 teaspoon salt: Essential flavor booster; don’t skip it!
- 4 cups bread flour: The sturdy backbone of our rolls.
- 2 1/4 teaspoons active dry yeast: (1 packet) These little guys are the real MVPs. Make sure they’re alive!
For the Filling:
- 1/2 cup unsalted butter: Softened, not melted! Spreadable dreams.
- 1 cup packed light brown sugar: Caramel-y goodness.
- 2 tablespoons ground cinnamon: The star of the show! Don’t be shy.
For the Icing:
- 2 cups powdered sugar: Cloud dust for our rolls.
- 1/4 cup milk (or cream): For extra decadence, if you’re feeling fancy.
- 1 teaspoon vanilla extract: Flavor party!
Step-by-Step Instructions
Alright, let’s get this delicious show on the road. Keep it simple, keep it fun!
- Load Up the Machine: In your bread machine pan, add the milk, melted butter, egg, sugar, and salt. Then, add the bread flour, followed by the yeast on top of the flour. **Don’t let the yeast touch the liquid directly yet!**
- Set and Forget (Mostly): Place the pan in your bread machine and select the **”Dough” cycle**. Press start. Now, go chill. Read a book, watch some reality TV, or mentally plan how many rolls you’ll eat. This usually takes about 1.5-2 hours.
- Prep Your Workspace: While the dough is doing its thing, lightly flour a clean surface. Get your softened butter, brown sugar, and cinnamon ready for the filling.
- Dough Time! Once the dough cycle is complete, carefully remove the dough from the machine. It should be soft and elastic. Give it a gentle punch down to release air.
- Roll It Out: On your lightly floured surface, roll the dough into a large rectangle, roughly 12×18 inches. Think pizza box size.
- Spread the Love: Evenly spread the softened butter all over the dough, leaving about a half-inch border on one of the long edges.
- Sprinkle the Magic: In a small bowl, mix the brown sugar and cinnamon. Sprinkle this mixture generously over the buttered dough.
- Roll ‘Em Up: Starting from one of the long edges (the one *without* the half-inch border), tightly roll the dough into a log. The tighter, the better for pretty spirals!
- Slice and Dice: Using a sharp knife or unflavored dental floss (seriously, it works great!), cut the log into 12-15 equal slices, about 1 to 1.5 inches thick.
- Pan ‘Em Up: Lightly grease a 9×13-inch baking dish. Arrange the sliced rolls in the pan, leaving a little space between each (they’re going to puff up!).
- Second Rise: Cover the pan loosely with plastic wrap or a clean kitchen towel. Let the rolls rise in a warm spot for about 30-45 minutes, or until they’re visibly puffy and almost touching. **This is crucial for soft rolls!**
- Bake ‘Em! Preheat your oven to 375°F (190°C). Once risen, pop the rolls into the preheated oven and bake for 20-25 minutes, or until golden brown on top and cooked through.
- Whip Up the Icing: While the rolls are baking, whisk together the powdered sugar, milk (or cream), and vanilla extract in a medium bowl until smooth. If it’s too thick, add a tiny bit more milk; too thin, add more powdered sugar.
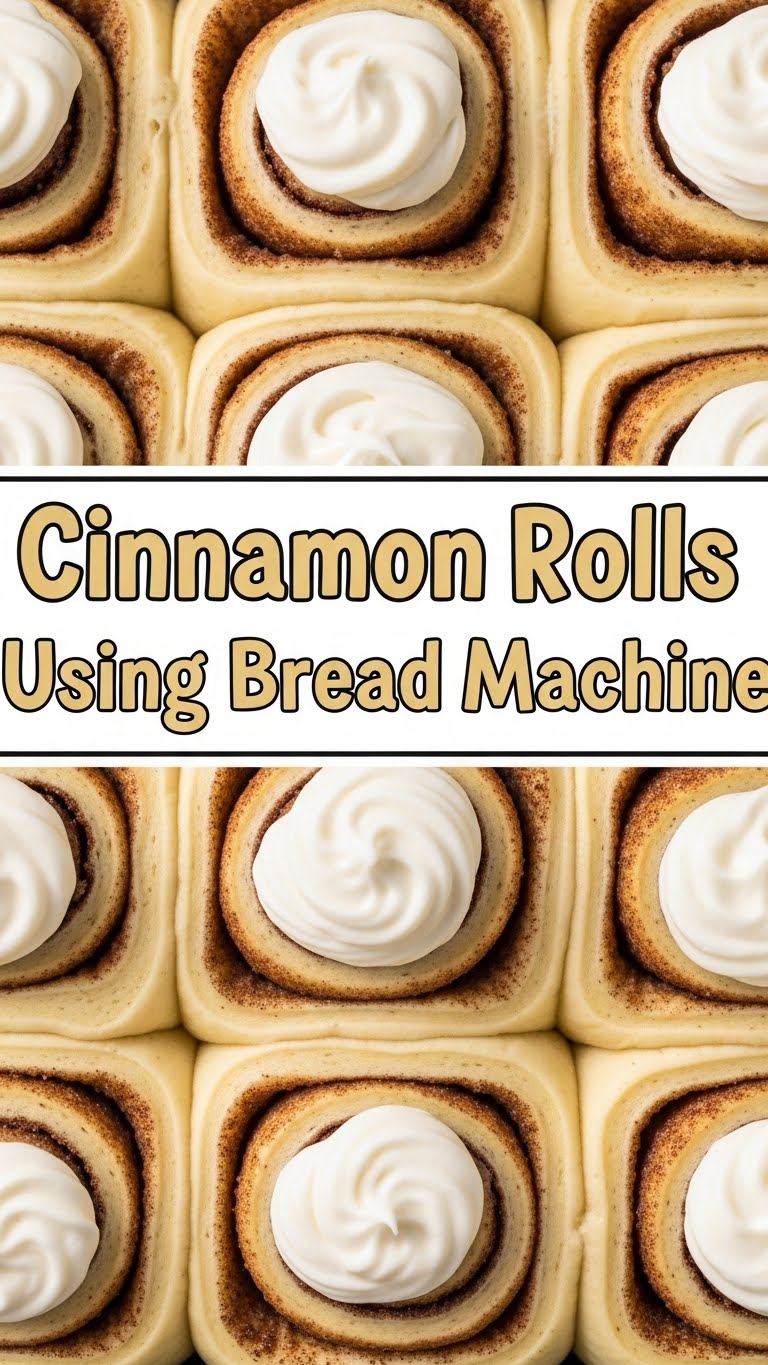
- Drizzle and Devour: As soon as the rolls come out of the oven, let them cool for 5-10 minutes (that molten sugar filling is no joke!). Then, generously drizzle with the icing. Grab a roll (or two!) and enjoy your masterpiece!
Common Mistakes to Avoid
Nobody’s perfect, but we can avoid some common pitfalls that turn glorious rolls into, well, less glorious rolls. Learn from my past errors!
- Thinking you don’t need to preheat the oven: Rookie mistake! A cold oven means uneven baking and sad rolls.
- Not checking your yeast: If your yeast is old or dead, your dough won’t rise. Period. No puffy clouds for you. **Always check the expiry date!**
- Over-flouring your surface: Resist the urge to add tons of extra flour when rolling out the dough. **A slightly sticky dough is a happy dough.** Too much flour makes dry, tough rolls.
- Cramming them into the pan: Give those babies some space to puff up during their second rise. They’re divas, they need room.
- Over-baking: Keep an eye on them! Baking too long will make them dry. **They should be golden brown, not deep brown.**
- Eating them straight out of the oven: Yes, they’re tempting, but that molten sugar filling will burn your tongue faster than you can say “owie.” **Let them cool for 5-10 minutes.** Patience, young grasshopper.
Alternatives & Substitutions
Feeling creative? Or just missing an ingredient? No stress, we got options, friend!
- Milk: Any kind works! Whole, 2%, almond, oat milk… your rolls, your rules. Just make sure it’s warm.
- Butter: For the dough and filling, margarine *can* be used, but honestly, why hurt your soul like that? Butter is superior for flavor and texture, **IMO.**
- Brown Sugar (for filling): You can use white granulated sugar, but brown sugar gives that lovely, deep caramel note that we all crave.
- Add-ins: Get wild! Throw in some chopped nuts (pecans, walnuts), raisins, or dried cranberries into the filling before rolling. Extra texture, extra yum.
- Cream Cheese Frosting: Elevate your icing game by swapping some of the milk for softened cream cheese. Start with 4 oz cream cheese, 1/4 cup butter, 2 cups powdered sugar, and a splash of vanilla. Mix until creamy. **Game. Changer.**
FAQ (Frequently Asked Questions)
Got questions? I’ve got answers (and probably some bad jokes).
- My dough didn’t rise, what gives? Probably dead yeast, or your milk was too hot/cold. **Always check your yeast’s expiry date and water temp!**
- Can I make these ahead? Heck yeah! After slicing and placing them in the baking dish, cover tightly with plastic wrap and refrigerate overnight. The next morning, take them out an hour before baking to come to room temp and rise slightly.
- How do I store leftovers? (Assuming there *are* leftovers!) Pop them in an airtight container at room temp for a day, or in the fridge for a few. Reheat gently in the microwave or oven.
- Can I freeze them? Yup! You can freeze baked rolls (without icing) or unbaked rolls. Thaw completely before reheating (baked) or rising/baking (unbaked).
- My rolls are dry, what did I do wrong? Over-baking is the usual culprit, or too much flour was incorporated into the dough. Keep an eye on your oven and your dough’s texture!
- Do I *have* to use bread flour? For the best, chewiest results, yes. It has a higher protein content. All-purpose flour *can* work in a pinch, but your rolls might be a bit less “bouncy.”
- Can I use a different size baking dish? Sure, but you might need to adjust baking time. If you use a larger pan, they’ll spread more and might bake faster. Smaller pan, they’ll be taller and might need more time.
Final Thoughts
There you have it, folks! Your new go-to recipe for those days when you want to feel like a baking superstar without actually, you know, doing *all* the work. With your bread machine as your trusty sidekick, you’re now equipped to conquer cinnamon roll cravings with glorious ease. Go forth and conquer those cravings. Share ’em (if you must!), bask in the compliments, and remember: life’s too short for bad cinnamon rolls. Now go impress someone—or yourself—with your new culinary skills. You’ve earned it!


