So you’re craving something warm, gooey, and sweet but the thought of spending hours kneading dough sounds about as appealing as doing your taxes? Same, friend, same. Good news: We’re about to transform those humble canned cinnamon rolls into something so ridiculously good, your taste buds will send you a thank-you note. No fancy bakery skills required, just a willingness to elevate the easy button!
Why This Recipe is Awesome
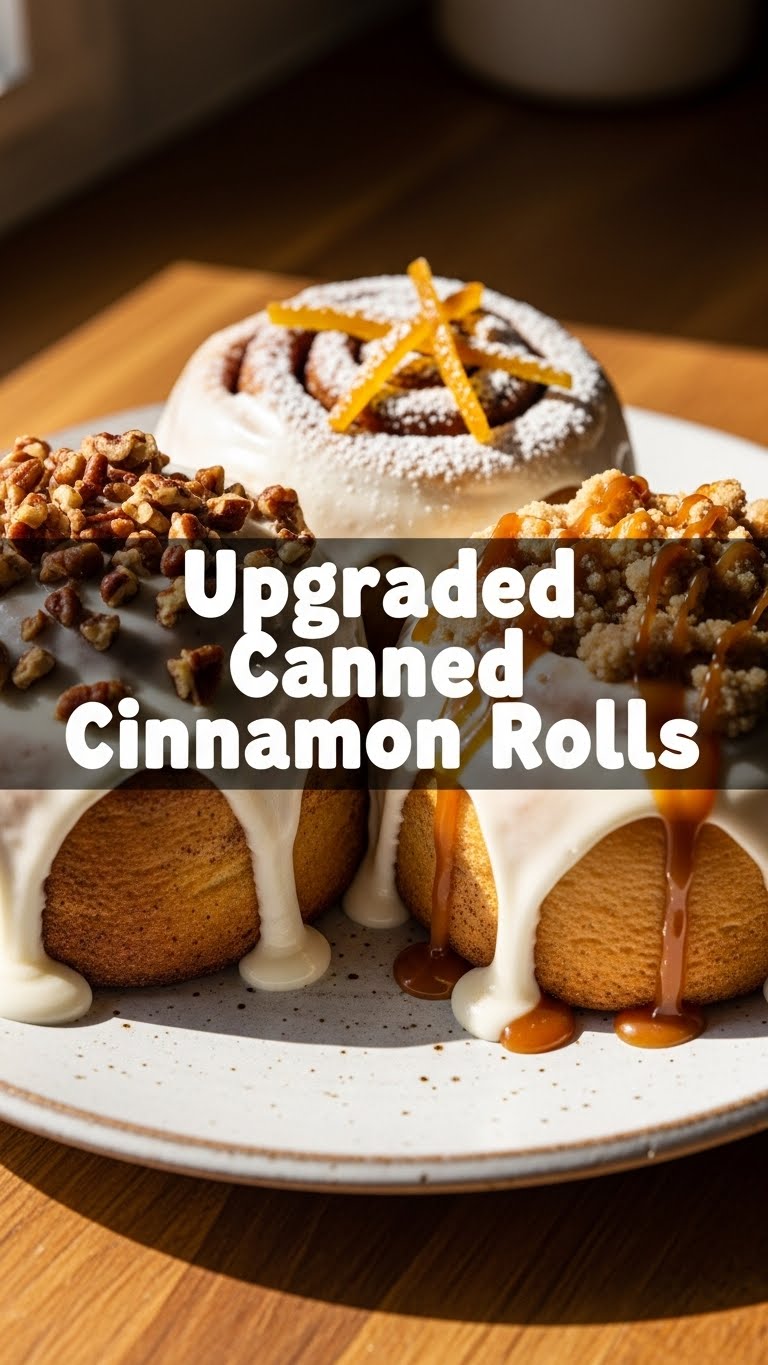
This isn’t just a recipe; it’s a life hack. Why settle for basic when you can have bougie? Seriously, this recipe is awesome because it takes zero effort to open a can, but makes it taste like you put in a million. It’s idiot-proof, even I didn’t mess it up, and that’s saying something! Plus, who doesn’t love the smell of cinnamon rolls wafting through their home without actually having to make them from scratch? It’s the ultimate culinary illusion, and you, my friend, are about to be a master illusionist. You get all the compliments, with minimal cleanup. Win-win, IMO.
Ingredients You’ll Need
Okay, gather your gear, culinary wizard! Here’s what you’ll need for this delicious transformation:
- 1 can of refrigerated cinnamon rolls: The star of our show! Any brand works, but pick your fave.
- 4 oz (half a block) cream cheese, softened: Not the low-fat stuff unless you want to hurt my feelings. Full fat, baby!
- 4 tablespoons (1/2 stick) unsalted butter, softened: Again, full fat. We’re not health fanatics today.
- 1-2 cups powdered sugar (confectioners’ sugar): Adjust to your sweet tooth. More for thick, less for drizzle.
- 1 teaspoon vanilla extract: The good stuff. Not imitation. Unless that’s all you have, then fine, sigh.
- Pinch of salt: Enhances all the other flavors. Don’t skip it!
- Optional upgrades (but highly recommended): A sprinkle of cinnamon or nutmeg for extra warmth, chopped pecans or walnuts for crunch, or even a splash of milk/cream if you like a thinner glaze.
Step-by-Step Instructions
Let’s get this party started! Prepare for glory.
- Preheat and Prep: First things first, get that oven going! Follow the instructions on your cinnamon roll can for temperature. Usually, it’s around 350-375°F (175-190°C). Then, grease a baking dish or line a baking sheet with parchment paper.
- Unleash the Rolls: Pop open that can (try not to jump when it does, it’s startling every time!). Arrange the rolls in your prepared dish, giving them a little space if you want crispier sides, or snuggle them together for softer, gooier rolls.
- Bake ‘Em Up: Slide them into the preheated oven. Bake according to package directions, typically 12-18 minutes, or until they’re golden brown and puffy. Keep an eye on them so they don’t burn!
- Whip Up the Frosting Magic: While your rolls are baking, let’s make the real star. In a medium bowl, combine the softened cream cheese and softened butter. Beat them together with an electric mixer (or a sturdy whisk and some elbow grease) until they’re super smooth and creamy.
- Sweeten and Flavor: Gradually add the powdered sugar, one cup at a time, beating until fully incorporated and lump-free. Stir in the vanilla extract and that tiny pinch of salt. If it’s too thick, add a tiny splash of milk or cream. If it’s too thin, add more powdered sugar. Taste and adjust – this is YOUR masterpiece!
- Frost and Feast: Once the cinnamon rolls come out of the oven, let them cool for just a few minutes. You want them warm, but not scorching hot, otherwise your glorious frosting will melt into oblivion. Slather that homemade cream cheese frosting generously over the warm rolls. Add any optional toppings if you’re feeling fancy.
- Devour: Seriously, don’t wait. Grab one (or two, I’m not judging) and enjoy your elevated treat!
Common Mistakes to Avoid
Listen up, buttercup, because avoiding these rookie errors means the difference between “meh” and “OMG-I-made-this?!”
- Forgetting to Preheat the Oven: Thinking you can just shove them in cold? That’s a one-way ticket to sad, unevenly baked rolls. Always preheat!
- Overbaking: Burnt bottoms are nobody’s friend. Keep an eye on the clock and the color. They should be golden, not charcoal.
- Skipping the Softened Ingredients: Trying to mix cold cream cheese and butter is like trying to make friends with a porcupine – lumpy and frustrating. Soften them beforehand!
- Frosting Super Hot Rolls: Unless you want cinnamon roll soup, give those babies a few minutes to cool down before applying your beautiful, creamy frosting. Patience, padawan.
- Using the Store-Bought Frosting Instead: I mean, you can, but why would you? That little plastic tub frosting just can’t compete with the homemade, velvety goodness we just whipped up. Don’t do it! Trust me on this.
Alternatives & Substitutions
Feeling adventurous, or just missing an ingredient? No stress, we’ve got options!
- Different Extracts: Instead of vanilla, try almond extract for a nutty twist, or a tiny bit of orange zest/extract for a citrusy zing. Lemon zest is also divine!
- Spice It Up: Add a pinch of cardamom to your frosting for an exotic flavor, or a touch more cinnamon to the rolls before baking.
- Nutty Professor: No pecans? Walnuts work wonderfully. No nuts at all? Sprinkles make everything a party! Or skip them and just enjoy the pure, unadulterated roll.
- Thinner Glaze: If you prefer a thinner, pourable glaze, just add a tablespoon or two of milk or cream (or even water) to your frosting mixture until it reaches your desired consistency.
- Make it Chocolatey: Melt in a tablespoon of cocoa powder to your frosting for a chocolate cream cheese vibe. Yes, please!
FAQ (Frequently Asked Questions)
Got questions? I’ve got answers (and a witty remark or two).
- Can I use margarine instead of butter? Well, technically yes, but why hurt your soul like that? Butter just tastes better, and honestly, we’re not cutting corners on flavor today.
- My cream cheese/butter isn’t soft! What do I do? Pop them in the microwave for 10-15 seconds at a time until just softened, but not melted. Or, if you’re feeling old-school, leave them on the counter for 30 minutes.
- Can I make the frosting ahead of time? Absolutely! Whip it up, cover it, and keep it in the fridge for up to 3-4 days. Just let it come to room temp for about 30 minutes and give it a quick whisk before frosting.
- What if I don’t have an electric mixer? A good old-fashioned whisk and some arm strength will work just fine! It’ll take a little more effort, but the results are worth it. Consider it a pre-dessert workout.
- Can I add fruit? Oh, you fancy! A few fresh berries (raspberries or blueberries) on top after frosting would be delicious. Don’t bake them in, though, they’ll get mushy.
- How long do these upgraded rolls last? Ideally, they disappear within minutes. If by some miracle there are leftovers, store them covered in the fridge for up to 2-3 days. Reheat gently in the microwave.
Final Thoughts
So there you have it, folks! You just took a humble can of convenience and turned it into a culinary masterpiece worthy of a fancy brunch spread (or, let’s be real, a Tuesday morning treat for yourself). See? I told you it was easy! Now go impress someone—or yourself—with your new culinary skills. You’ve earned it!


