So there you are, scrolling through Instagram, bombarded by those perfect dessert photos that make your mouth water, when suddenly you realize: “I need something chocolatey, like, RIGHT NOW.” Friend, I’ve got you covered with this ridiculously easy chocolate fudge that looks fancy enough to impress your mother-in-law but is simple enough that you could make it half-asleep. Let’s transform your chocolate cravings into reality!
Why This Recipe is Awesome
Let me count the ways this chocolate fudge deserves your immediate attention. First, it requires zero baking skills. Seriously, if you can stir things together without spilling (most of it), you’re qualified. Second, it takes like 15 minutes of actual work, then the fridge does the rest while you binge-watch your favorite show. Third, displaying it on a cake stand instantly makes it look like you spent hours in the kitchen channeling your inner pastry chef. The effort-to-impression ratio is off the charts!
Plus, this recipe is practically bulletproof. I once made it while simultaneously texting, watching a YouTube tutorial, and trying to keep my cat off the counter. Still turned out perfect. That’s the definition of foolproof, folks.
Ingredients You’ll Need
- 2 cups semi-sweet chocolate chips (the good stuff, not those sad waxy ones hiding in your pantry from 2018)
- 1 (14 oz) can of sweetened condensed milk (aka liquid gold)
- 2 tablespoons butter (real butter, people—this is no time for compromises)
- 1 teaspoon vanilla extract (again, the real deal, not that weird imitation stuff)
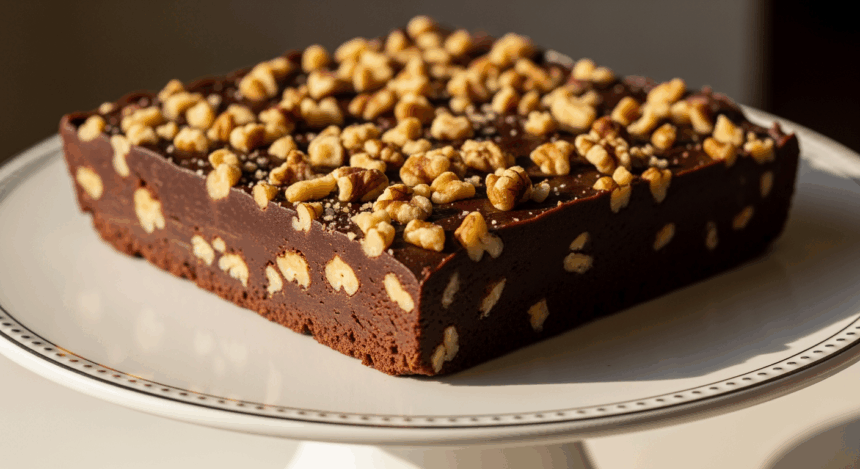
- 1 cup mixed nuts, roughly chopped (walnuts, pecans, almonds—whatever speaks to your soul)
- ¼ teaspoon salt (to make the sweetness pop—trust me on this)
- Optional: 2 tablespoons of your favorite liqueur (bourbon, rum, or coffee liqueur work magic here)
Step-by-Step Instructions
- Line an 8×8 inch pan with parchment paper, leaving some hanging over the edges. This isn’t just for looks—it’s your escape strategy for getting the fudge out later. Don’t skip this step unless you enjoy chiseling fudge out of a pan!
- In a medium-sized, heavy-bottomed saucepan, combine chocolate chips, sweetened condensed milk, and butter. Melt over low heat, stirring constantly. Yes, constantly—this is not the time to check TikTok. Burnt chocolate is a tragedy we want to avoid.
- Once everything is melted and smooth (about 5 minutes), remove from heat. Your arm might be tired from stirring, but consider it your workout for the day.
- Stir in vanilla extract, salt, and your optional liqueur (if you’re feeling fancy). The mixture should look glossy and tempting. Try not to eat it all straight from the pot.
- Fold in about ¾ of your chopped nuts, saving some pretty pieces for the top. Every bite should have a nice nutty crunch.
- Pour the mixture into your prepared pan, smoothing the top with a spatula. Sprinkle remaining nuts over the top and press them gently into the fudge.
- Refrigerate for at least 2 hours, or until firm. I know waiting is hard, but it’s worth it, I promise!
- Once set, lift the fudge out using the parchment paper handles, place on a cutting board, and cut into squares (whatever size matches your mood).
- Arrange your fudge pieces artistically on a cake stand, take a photo for the ‘gram, then proceed to devour.
Common Mistakes to Avoid
Let’s keep you from the fudge fails I’ve already endured so you don’t have to:
- Rushing the melting process by cranking up the heat. Unless you’re aiming for chocolate-flavored cement, keep it low and slow.
- Skipping the parchment paper and thinking a generous spray of cooking oil will do the trick. Narrator: It will not.
- Not chopping the nuts and throwing them in whole. Unless you enjoy dental emergencies, take the extra 30 seconds to chop them.
- Cutting the fudge while it’s still warm because you lack patience. You’ll end up with chocolate lava (which, TBH, isn’t the worst problem to have, but still).
- Storing it at room temperature during summer and wondering why it looks like the Wicked Witch of the West after Dorothy threw water on her. Keep it cool, friend.
Alternatives & Substitutions
Not everyone’s pantry is perfectly stocked, so here are some clutch substitutions:
- No semi-sweet chocolate? Dark chocolate works beautifully and gives a more sophisticated flavor. Milk chocolate makes it sweeter (maybe too sweet, IMO).
- Nut allergies? Swap for seeds (sunflower, pumpkin) or go nuts-free and top with sea salt flakes instead.
- No sweetened condensed milk? Sorry, but this is non-negotiable. It’s the backbone of this recipe. Make a grocery store run or pick a different dessert.
- Dairy-free? Use coconut condensed milk and plant-based butter. The texture will be slightly different but still delicious.
- Want to fancy it up? Add dried cranberries, a sprinkle of espresso powder, or swirl in some peanut butter before it sets.
FAQ (Frequently Asked Questions)
How long does this fudge last?
In the fridge, about a week. In the freezer, up to 3 months. In my house? Approximately 48 hours, and that’s being generous.
Can I use a microwave instead of the stovetop?
You can, but proceed with caution! Use 30-second intervals, stirring between each. Chocolate goes from “perfectly melted” to “completely ruined” in about 3 seconds flat in a microwave.
Do I really need a cake stand?
Of course not! But does it make your average Tuesday night fudge look like you should be charging $8 a square at a fancy bakery? Absolutely. If you don’t have one, a nice plate works too.
My fudge is too soft. What went wrong?
Did you refrigerate it long enough? Are you in a super hot kitchen? Did you measure the condensed milk correctly? If you answered “maybe not” to any of these, there’s your culprit.
Can I mail this to someone?
FYI, this isn’t the best “mail across the country” treat unless you’re shipping it in a cooler with ice packs. For gifting, stick to local deliveries or choose something more shipping-friendly like cookies.
Final Thoughts
There you have it—chocolate fudge that’s impressive enough for company but easy enough for a random Wednesday night when your sweet tooth is screaming. The beautiful thing about this recipe is that it looks like you put in way more effort than you actually did (my favorite kind of recipe).
Remember, the cake stand is half the magic here—it’s like putting sweatpants in a fancy shopping bag. Suddenly, they’re “loungewear.” So arrange your fudge pieces with artistic flair, maybe dust some cocoa powder around for drama, and watch your friends’ eyes widen when you casually mention, “Oh, I just threw this together.”
Now go get your chocolate fix, you deserve it! And when someone asks for the recipe, send them this link… or don’t, and keep your minimal-effort dessert wizardry a secret. I won’t tell if you don’t.


