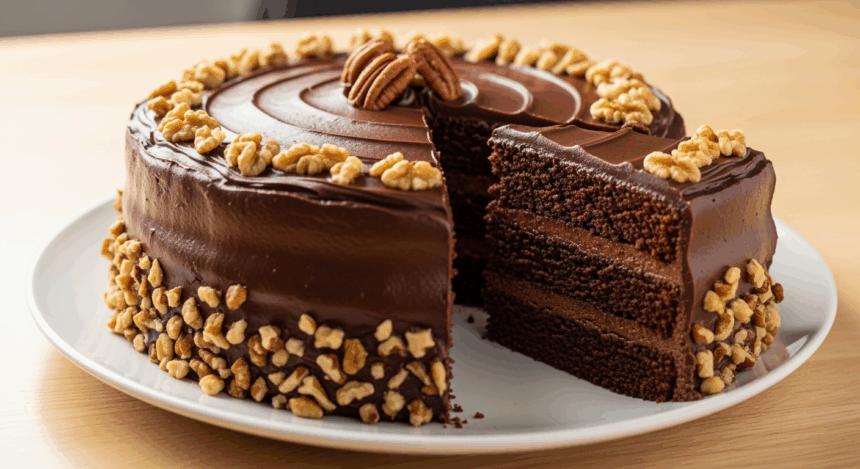
Ah, chocolate cake. Is there any dessert more universally beloved? Or more capable of turning a regular Tuesday into something worth celebrating? I think not! Today we’re diving into my absolute favorite chocolate cake recipe that’s loaded with crunchy nuts and slathered in the kind of icing that’ll make you lick the spatula, the bowl, and possibly your fingers when nobody’s looking.
Why This Recipe is Awesome
Let me count the ways this cake will change your life. First off, it’s virtually impossible to mess up. Like, even that friend who once burned water could handle this. Second, it hits all the perfect texture notes—moist cake, crunchy nuts, and smooth icing that creates the holy trinity of dessert experiences. And third, it makes your house smell so good that neighbors might “coincidentally” drop by. Consider yourself warned.
Ingredients You’ll Need
For the cake:
- 2 cups all-purpose flour (the regular stuff, nothing fancy)
- 2 cups granulated sugar (because let’s not pretend this is health food)
- ¾ cup unsweetened cocoa powder (the darker, the better, folks)
- 2 teaspoons baking powder (the magic dust that makes things rise)
- 1½ teaspoons baking soda
- 1 teaspoon salt (trust me, it makes the chocolate taste chocolatier)
- 2 large eggs (room temperature, because cold eggs are just rude to the batter)
- 1 cup buttermilk (or regular milk with a splash of vinegar if you’re not a buttermilk-keeping kind of person)
- ½ cup vegetable oil (keeps things moist without you having to try)
- 2 teaspoons vanilla extract (the real stuff, not the fake stuff that tastes like chemicals)
- 1 cup hot coffee (don’t worry, it won’t taste like coffee—it just makes chocolate more chocolate-y)
- 1 cup chopped nuts (walnuts or pecans work best, but you do you)
For the icing:
- ½ cup butter (softened, not that rock-hard fridge stuff)
- ⅔ cup unsweetened cocoa powder
- 3 cups powdered sugar (yes, THREE cups—we’re not here to count calories)
- ⅓ cup milk
- 1 teaspoon vanilla extract
- Extra chopped nuts for topping (because more nuts = more better)
Step-by-Step Instructions
1. Prep your battlefield. Preheat oven to 350°F (175°C). Grease and flour two 9-inch round cake pans, or line with parchment paper if you’re fancy (or just hate cleaning stuck-on cake).
2. Mix the dry gang. In a large bowl, whisk together flour, sugar, cocoa, baking powder, baking soda, and salt. Make a little well in the center like you’re preparing for a tiny chocolate volcano.
3. Bring in the wet team. Add eggs, buttermilk, oil, and vanilla to your dry ingredient volcano. Mix until just combined—don’t beat it to death, it hasn’t done anything to you.
4. Coffee time! Stir in the hot coffee. Yes, your batter will seem too thin. No, you haven’t ruined anything. This is exactly how it should look!
5. Go nuts. Fold in your cup of chopped nuts. Be gentle—we’re folding, not aggressively stirring like we’re mad at the batter.
6. Divide and conquer. Pour batter evenly into your prepared pans. Give the pans a couple of gentle taps on the counter to release air bubbles (and to feel like you know what you’re doing).
7. Bake it ’til you make it. Bake for 30-35 minutes, or until a toothpick inserted in the center comes out with just a few moist crumbs. If it comes out wet, keep baking. If it comes out clean, you’ve gone too far (but it’ll still taste great, don’t panic).
8. Patience, grasshopper. Let cakes cool in pans for 10 minutes before transferring to wire racks to cool completely. I know you’re excited, but melted icing is just sad.
9. Icing magic time. Beat butter until creamy, then add cocoa powder and beat some more. Gradually add powdered sugar, milk, and vanilla, beating until you reach a spreadable consistency. Add more milk if it’s too thick or more powdered sugar if it’s too thin.
10. Assembly required. Place one cake layer on your serving plate, spread a generous layer of icing on top, add the second cake layer, then frost the top and sides. While the icing is still tacky, press additional chopped nuts onto the sides if you’re feeling extra.
Common Mistakes to Avoid
Opening the oven door too early. I know you’re excited to peek, but your cake will sink faster than my motivation on Monday mornings if you let cold air in before the structure sets.
Overmixing the batter. This isn’t a stress-relief exercise. Mix until combined, then step away from the bowl.
Using cold ingredients. Room temperature eggs and buttermilk blend better. It’s science, not just me being picky.
Frosting a warm cake. Unless you want your icing to slide right off like it’s trying to escape, be patient and let that cake cool completely.
Alternatives & Substitutions
No coffee, no problem. Hot water works if you’re caffeine-averse, but you’ll miss out on that depth of chocolate flavor. FYI, you won’t taste coffee in the final cake.
Nut alternatives. Not a walnut fan? Pecans, almonds, or hazelnuts all work beautifully. For allergy folks, toasted pumpkin seeds can provide that crunch without the nuts.
Make it boozy. Replace 2 tablespoons of coffee with Kahlúa or Baileys for an adult version that’ll make your dinner party slightly more interesting.
Gluten sensitivities? A good quality 1:1 gluten-free flour blend works well here. The cake might be slightly denser, but with all that chocolatey goodness, who’s going to notice?
FAQ (Frequently Asked Questions)
Can I make this as a single layer cake?
Sure thing! Use a 9×13 inch pan and bake for 35-40 minutes. You’ll need less frosting, which means more for sneaky finger-licking when no one’s looking.
Will this work as cupcakes?
Absolutely! Fill cupcake liners about 2/3 full and bake for 18-22 minutes. Makes about 24 cupcakes, which means you can share… or not. Your call.
Can I make this cake ahead of time?
You bet! The cake layers can be made a day ahead, wrapped in plastic wrap, and stored at room temperature. The fully assembled cake keeps well in the refrigerator for 3-4 days—if it lasts that long, which it won’t.
Is the coffee taste strong?
Nope! Coffee enhances chocolate flavor without adding coffee flavor. It’s like coffee is chocolate’s hype man, making it taste more like itself.
Can I skip the nuts entirely?
I mean, it’s your kitchen and your rules, but then it’s just a chocolate cake with icing. Still delicious, just not the recipe I promised you. Maybe add chocolate chips instead?
Why did my cake sink in the middle?
Either you’re at high altitude, you opened the oven too early, or your leavening agents (baking powder/soda) are older than some of your friendships. Time to restock!
Final Thoughts
There you have it—a chocolate cake that’s worthy of celebration, even if the only thing you’re celebrating is making it to the end of a Tuesday. The combination of moist chocolate cake, crunchy nuts, and smooth, rich icing is pretty much unbeatable.
Don’t stress if your cake doesn’t look Instagram-perfect. Remember, messy cakes taste just as good, and you can always claim it has “rustic charm.” Now go forth and bake! Your future self (and anyone lucky enough to score a slice) will thank you. And if anyone asks for the recipe, just send them my way—or claim it’s a family secret. I won’t tell.
