So, you’re chilling, maybe binge-watching that new show everyone’s talking about, and suddenly… BAM! A craving hits. Not just any craving, but a warm, gooey, cinnamon-spiced, frosting-drenched cinnamon roll craving. But who has the energy to make a giant batch for just little ol’ you (or you and your favorite couch buddy)? Not me, friend. And probably not you either.
That’s where these “Small Bath Cinnamon Rolls” come in. Because sometimes, you just want a little treat, not a full-on bakery operation. Think of it as self-care, but delicious.
Why This Recipe is Awesome
Let’s be real, most cinnamon roll recipes are designed for an army. Or at least a very hungry family reunion. This one? It’s for you. It’s for when you want instant gratification without a fridge full of leftovers staring at you, judging your life choices.
Not only is it a small batch (duh!), but it’s also pretty much **idiot-proof**. Seriously, if I can pull this off without setting off the smoke alarm, you’re golden. Plus, the dough is ridiculously forgiving, so no need to stress about getting it “perfect.” It’s less commitment, more deliciousness. Win-win, IMO.
Ingredients You’ll Need
Get ready to raid your pantry! Most of these are probably already hanging out in there. For about 4-6 glorious rolls, you’ll need:
- For the Dough:
- 1 cup All-Purpose Flour: The humble hero. Don’t overthink it.
- 2 tbsp Granulated Sugar: Just a little sweetness to get things going.
- 1 tsp Active Dry Yeast: The magic fairy dust that makes things puffy. Make sure it’s not expired!
- 1/4 tsp Salt: Balances all that sweetness. Don’t skip it!
- 1/4 cup + 2 tbsp Warm Milk (about 105-115°F/40-46°C): Not boiling, not cold. Think comfy bathwater for your yeast.
- 2 tbsp Unsalted Butter, melted: Because butter makes everything better.
- For the Filling:
- 1.5 tbsp Unsalted Butter, melted: More butter, obvi.
- 1/4 cup Packed Light Brown Sugar: Hello, caramel-y goodness.
- 1 tbsp Ground Cinnamon: The star of the show. Don’t be shy!
- For the Cream Cheese Frosting (optional, but c’mon):
- 2 oz Cream Cheese, softened: Half a block, usually. Or just eyeball it.
- 1/2 cup Powdered Sugar: For that dreamy, smooth sweetness.
- 1 tbsp Unsalted Butter, melted: You know the drill.
- 1/2 tsp Vanilla Extract: A little hug in a bottle.
- 1-2 tsp Milk or Heavy Cream (optional): To get your desired drizzle consistency.
Step-by-Step Instructions
- Activate Your Yeast: Grab a small bowl. Pour in the warm milk and sprinkle the granulated sugar and yeast over it. Give it a gentle stir. Let it sit for 5-10 minutes until it looks foamy. If it doesn’t foam, your yeast is probably dead. Sorry, start over.
- Make the Dough: In a larger bowl, whisk together the flour and salt. Pour in the foamy yeast mixture and the melted butter. Mix with a spoon or your (clean!) hands until a shaggy dough forms.
- Knead It Out: Turn the dough out onto a lightly floured surface. Knead for about 5-7 minutes. It should become smooth and elastic. If it’s sticky, add a tiny bit more flour.
- First Rise (The Quick Version): Lightly grease the bowl you used, pop the dough back in, cover it with plastic wrap or a damp towel. Let it rise in a warm spot for about 30-45 minutes, or until it’s noticeably puffier (it might not quite double, and that’s okay for a quick batch).
- Roll ’em Up: While your dough is doing its thing, lightly grease a small baking dish (like an 8×8 inch pan or a small pie dish). Once the dough has risen, punch it down gently. On a lightly floured surface, roll it into a rectangle, roughly 8×10 inches.
- Fill and Roll: Brush the melted butter for the filling all over the dough rectangle, leaving about a half-inch border on one of the long edges. In a small bowl, mix the brown sugar and cinnamon. Sprinkle this delicious mixture evenly over the buttered dough. Tightly roll the dough up from the long edge that has the filling all the way to the unbuttered edge.
- Slice and Second Rise: Use a sharp knife or even dental floss (seriously, it works wonders!) to slice the log into 4-6 equal pieces. Arrange them cut-side up in your prepared baking dish. Cover again and let them rise for another 20-30 minutes. They should look a bit plumper.
- Bake ’em! While the rolls are on their second rise, preheat your oven to 375°F (190°C). Once preheated, bake the rolls for 15-20 minutes, or until they’re golden brown and smell absolutely heavenly.
- Whip Up the Frosting: While the rolls are baking, combine the softened cream cheese, powdered sugar, melted butter, and vanilla extract in a small bowl. Whisk until smooth. If it’s too thick, add a tiny bit of milk or cream until it reaches your desired consistency.
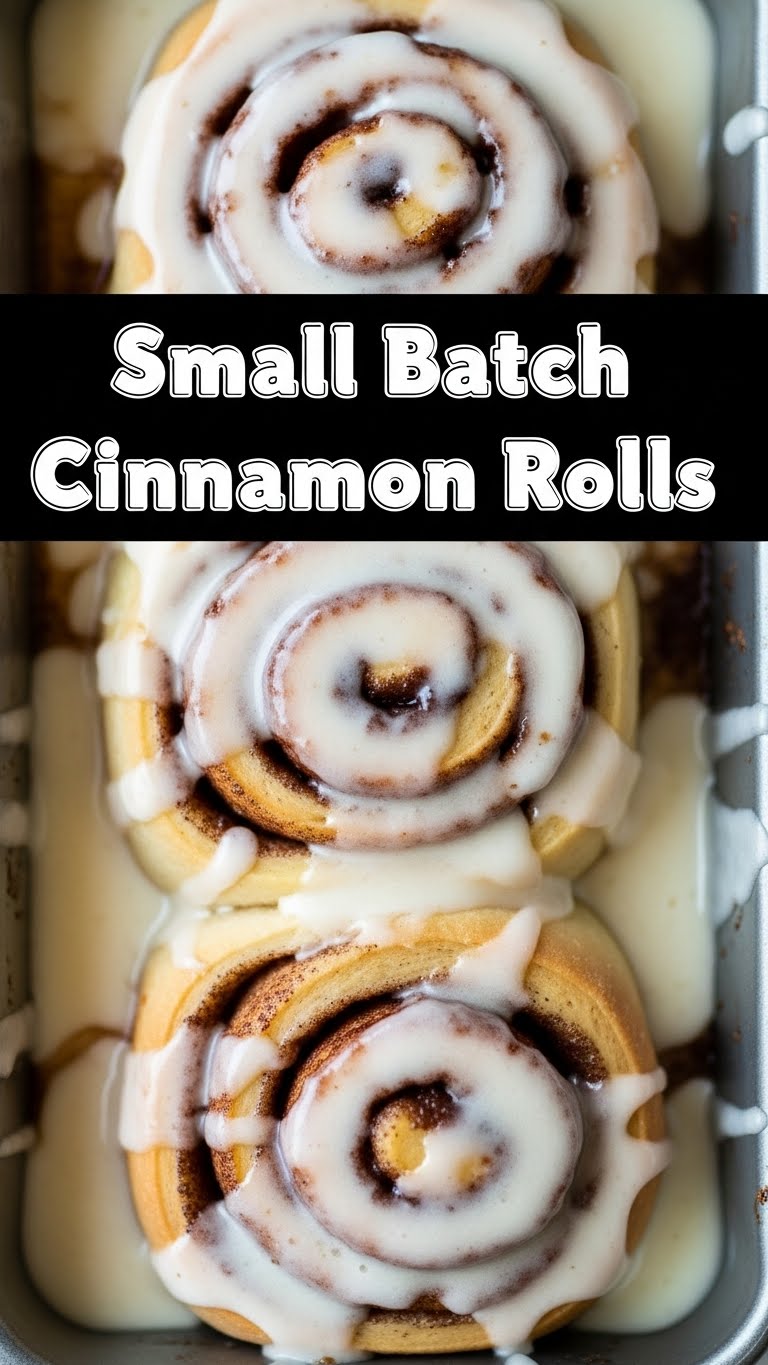
- Frost and Devour: As soon as the rolls come out of the oven, dollop that gorgeous frosting all over them. The warmth helps it melt into every crevice. **Eat immediately** for maximum bliss.
Common Mistakes to Avoid
- Using Cold Milk: Your yeast will just sit there, unimpressed. It needs warmth to activate. Aim for bathwater temp, not hot tub (which will kill it).
- Over-flouring: Too much flour makes tough, dry rolls. Add flour sparingly during kneading if needed, but don’t go crazy.
- Under-baking: Pulling them out too soon means raw dough in the middle. Check for that golden brown top and a lovely aroma.
- Impatience is NOT a Virtue Here: The rise times are important! Don’t rush them, or your rolls will be dense and sad.
- Skipping the Frosting (or Skimping): Is it a mistake? Spiritually, yes. Don’t deny yourself this joy.
Alternatives & Substitutions
Feeling adventurous? Or just missing an ingredient? No worries, we can totally improvise:
- Milk: Any dairy milk works! Almond or soy milk can also work in a pinch, but the rolls might be slightly less rich.
- Butter: If you’re out of butter, margarine could work for the dough and filling, but for the frosting… **really try for butter or cream cheese.** The flavor is just superior, trust me.
- Add-Ins: Want to jazz it up? Sprinkle some chopped pecans or walnuts with the cinnamon sugar. A few raisins or dried cranberries could also be fun.
- Frosting Variations: No cream cheese? A simple glaze of powdered sugar and a splash of milk/vanilla will also hit the spot. You could even add a little lemon zest for a zippy kick!
FAQ (Frequently Asked Questions)
- Can I make these ahead of time? You totally can! Make the rolls up to step 7, then cover them tightly and pop them in the fridge overnight. In the morning, pull them out and let them come to room temperature (about 30-60 mins) before baking. So fresh, so easy!
- What if my dough isn’t rising? First, check your yeast’s expiration date. Second, was your milk warm enough (but not too hot)? Third, is your kitchen super cold? Try placing the bowl in a slightly warmer spot, like near a sunny window or in a turned-off oven with the light on.
- How long do these small batch rolls last? Honestly? Not long, because you’ll eat them all. But seriously, they’re best on day one. If you have leftovers, store them in an airtight container at room temp for up to 2 days, or in the fridge for a few more. Reheat gently in the microwave.
- Can I use self-rising flour? Nope, not for this one. Self-rising flour has baking powder/soda in it, which reacts differently with yeast. Stick to good old all-purpose.
- Why not just buy store-bought dough? Well, you could. But then you’d miss out on the incredible smell of freshly baked goodness filling your home, and the bragging rights of “I made these!” Plus, homemade always tastes better, FYI.
Final Thoughts
See? That wasn’t so bad, was it? You just whipped up a small batch of glorious cinnamon rolls, probably while still in your pajamas. That, my friend, is what we call winning at life. Now go grab a warm roll (or three), brew some coffee, and pat yourself on the back. You’ve earned it. Enjoy every single gooey bite!


