So you’re craving something warm, gooey, and sweet, but you’re also rocking the gluten-free life and low-key dreading another dry, crumbly “treat”? Oh, honey, I get it. We’ve all been there, staring into the abyss of disappointing GF baked goods. But what if I told you that you could whip up a batch of cinnamon rolls so good, so fluffy, so utterly delightful, that even your gluten-loving friends would fight you for the last one? And get this: you won’t even need a degree in pastry science. 😉
Why This Recipe is Awesome
Okay, let’s be real. Finding truly *amazing* gluten-free cinnamon rolls is like finding a unicorn that bakes. Most of them taste like disappointment wrapped in good intentions. But not these! This recipe, my friend, is a game-changer. It’s:
- **Stupid-easy:** Seriously, if I can make these without burning down my kitchen, you absolutely can too.
- **Unbelievably fluffy:** We’re talking cloud-like dough, not brick-like. No dry GF crumb here, thank you very much!
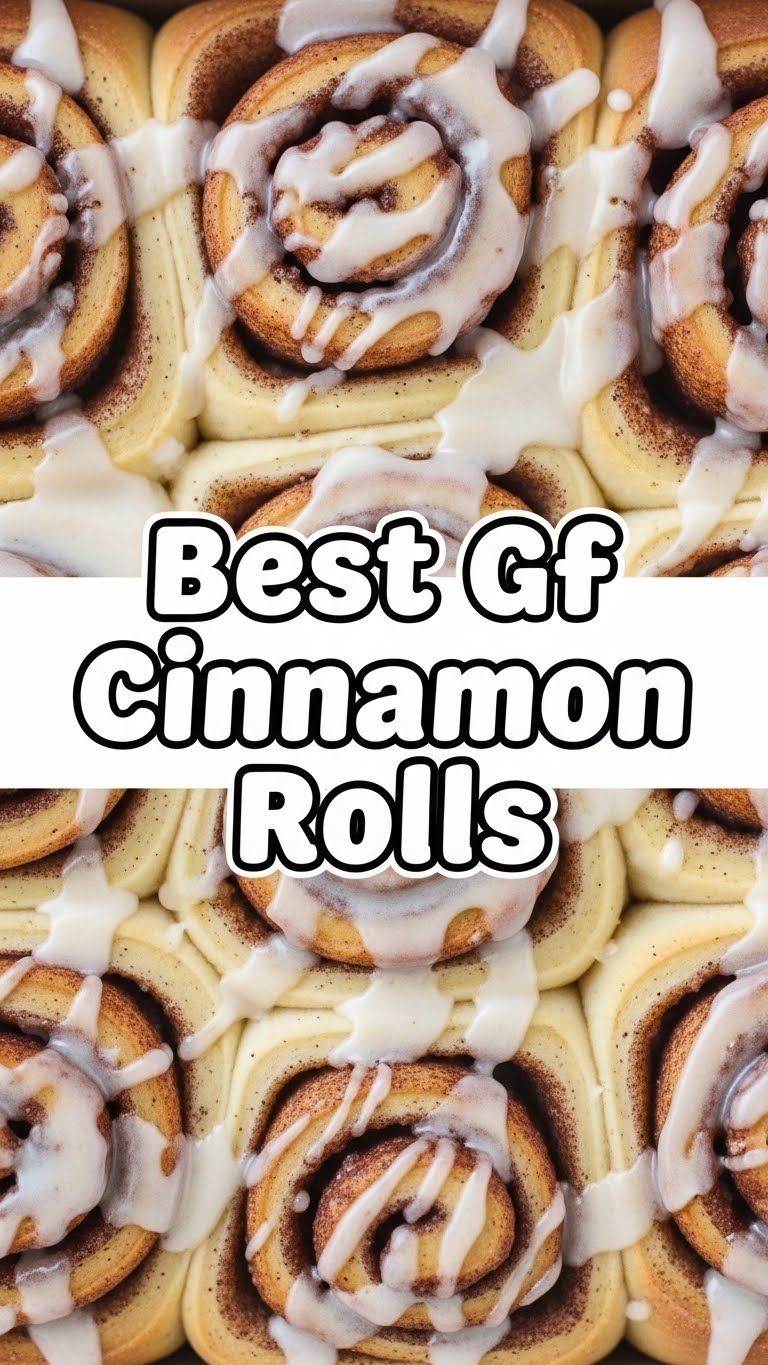
- **Packs a flavor punch:** That classic cinnamon-sugar swirl with a decadent cream cheese frosting? Yeah, it’s all there, and it’s glorious.
- **Proof that GF doesn’t mean “less than”:** These will rival (and probably beat) many traditional cinnamon rolls you’ve had. Prepare to be smug.
Ingredients You’ll Need
Time to gather your baking arsenal! Don’t fret, most of these are pantry staples. The key is using a good quality **gluten-free all-purpose flour blend** that contains xanthan gum. My personal faves are Bob’s Red Mill 1-to-1 or King Arthur Measure for Measure – they just work wonders for GF yeast doughs, IMO.
For the Dough:
- 1 cup warm milk: (dairy or non-dairy, around 105-115°F – think bathwater, not boiling lava!)
- 2 ¼ teaspoons active dry yeast: (one standard packet, the magical stuff that makes things rise!)
- ¼ cup granulated sugar: (because life needs a little sweetness)
- ½ cup unsalted butter, melted: (the good stuff, don’t skimp!)
- 2 large eggs, at room temperature: (helps with structure and richness)
- 1 teaspoon vanilla extract: (adds a little extra oomph)
- 1 teaspoon salt: (balances all that sweetness)
- 3 ½ cups gluten-free all-purpose flour blend: (with xanthan gum, as discussed, the true hero here!)
For the Filling:
- ½ cup unsalted butter, softened: (spreadable, not melted)
- ½ cup packed light brown sugar: (for that caramelly goodness)
- 2 tablespoons ground cinnamon: (don’t be shy!)
For the Cream Cheese Frosting:
- 4 ounces cream cheese, softened: (the essential tangy counterpoint)
- ¼ cup unsalted butter, softened: (more good stuff!)
- 1 ½ cups powdered sugar: (for that silky smooth sweetness)
- ½ teaspoon vanilla extract: (because, vanilla)
- 1-2 tablespoons milk or cream: (to get the perfect consistency)
Step-by-Step Instructions
Alright, apron on, good vibes only! Let’s get baking!
- Activate the Yeast: In a large mixing bowl (or the bowl of your stand mixer), combine the warm milk, yeast, and 1 tablespoon of the granulated sugar. Give it a gentle stir and let it sit for about 5-10 minutes. It should get nice and foamy; that’s how you know your yeast is alive and ready to party! If it doesn’t foam, your yeast might be dead, or your milk was too hot/cold. Start over.
- Mix the Wet Ingredients: Add the melted butter, eggs, remaining granulated sugar, vanilla extract, and salt to the yeast mixture. Whisk everything together until it’s well combined and looks delightfully uniform.
- Introduce the Flour: Gradually add the GF flour blend, about a cup at a time, mixing on low speed with a dough hook or with a sturdy spoon until a soft, sticky dough forms. Unlike traditional dough, you’re not looking for a smooth, elastic ball; GF dough will remain a bit tacky. Do not overmix!
- Let it Rise (the First Time): Cover the bowl with plastic wrap or a clean kitchen towel and place it in a warm, draft-free spot. Let it rise for 1 to 1 ½ hours, or until it has noticeably increased in size (it won’t double like gluten dough, but it will puff up nicely!).
- Prep the Filling: While your dough is rising, combine the softened butter, brown sugar, and cinnamon for the filling in a small bowl. Mix until well combined and spreadable.
- Roll ‘Em Out: Once your dough has risen, gently turn it out onto a lightly floured (with GF flour!) surface. Don’t punch it down aggressively like you would with regular dough; be gentle. Use a rolling pin to carefully roll the dough into a rectangle, roughly 12×18 inches.
- Spread the Love: Evenly spread the cinnamon-sugar filling over the entire surface of the dough, making sure to go almost to the edges.
- Roll it Up: Starting from one of the longer sides, carefully roll the dough into a tight log. Take your time with this step to keep it snug.
- Slice and Dice: Use a sharp, un-serrated knife or, even better, unflavored dental floss to slice the log into 12 equal rolls, about 1 ½ inches thick. Trust me, floss makes for perfectly clean cuts!
- Second Rise & Bake: Arrange the rolls cut-side up in a greased 9×13 inch baking pan. Cover the pan lightly with plastic wrap and let them rise again in a warm spot for another 30-45 minutes. Preheat your oven to 375°F (190°C) during this time. Once risen, bake for 20-25 minutes, or until golden brown on top and cooked through.
- Whip the Frosting: While the rolls are baking (or cooling slightly), beat the softened cream cheese and butter together until smooth. Add the powdered sugar, vanilla, and 1 tablespoon of milk/cream, beating until light and fluffy. Add more milk/cream if needed to reach your desired consistency.
- Frost and Devour: Once the rolls are out of the oven, let them cool for just about 5-10 minutes before slathering them generously with that heavenly cream cheese frosting. Serve warm and watch them disappear!
Common Mistakes to Avoid
We’ve all had our kitchen mishaps, but let’s try to dodge these common pitfalls, shall we?
- **Dough that’s too dry:** GF dough needs adequate moisture. If your dough feels too stiff, a tiny bit more milk can save the day.
- **Over-mixing the dough:** Unlike traditional bread, you don’t want to develop gluten. Mix just until combined; a sticky, soft dough is good!
- **Under-proofing (not letting it rise enough):** Patience, grasshopper! Don’t rush the rise times. Warmth is your friend here.
- **Over-baking:** Dry cinnamon rolls are a sad, sad sight. Keep an eye on them. They should be golden brown, not dark and crusty.
- **Not preheating your oven:** Rookie mistake! Always, always preheat. Your oven needs to be at the correct temperature from the get-go for even baking.
- **Using cold ingredients:** Especially the eggs and softened butter for the frosting. Room temperature ingredients blend much better and create a smoother result.
Alternatives & Substitutions
Feeling adventurous? Or just out of an ingredient? No worries, we can tweak!
- Dairy-Free Delight: For a completely dairy-free version, simply swap out the milk for your favorite non-dairy milk (almond, soy, oat all work great!). Use a good quality dairy-free butter alternative (Miyoko’s Kitchen or Earth Balance sticks are excellent) for both the dough, filling, and frosting. Dairy-free cream cheese alternatives are also widely available now for the frosting.
- Spiced Up Filling: Feeling fancy? Add a pinch of nutmeg, cardamom, or even a tiny bit of allspice to your cinnamon filling for an extra layer of warmth.
- Frosting Variations: Don’t love cream cheese? No judgment! You could do a simple powdered sugar glaze (powdered sugar + milk + vanilla) or even a maple glaze (powdered sugar + maple syrup + a splash of milk).
- Egg-Free? This recipe relies heavily on eggs for structure in GF baking. While some egg replacers *might* work, I haven’t personally tested it for these rolls. Proceed with caution if you go this route!
FAQ (Frequently Asked Questions)
Got questions? I’ve got (casual) answers!
Can I make these ahead of time?
Absolutely! After slicing the rolls and placing them in the baking pan (Step 9), cover them tightly with plastic wrap and pop them in the fridge overnight. In the morning, take them out and let them come to room temperature and rise for about 45-60 minutes before baking as usual. Freshly baked rolls for breakfast? You’re a genius!
What if my dough isn’t rising? Help!
Oh no! This usually points to a yeast issue. Was your milk too hot (killed the yeast) or too cold (didn’t activate it)? Or perhaps your yeast is old? Make sure your water temp is just right (like a warm bath) and try again with fresh yeast if you suspect yours is past its prime. Also, ensure your rising spot is truly warm and draft-free.
Can I use a different type of GF flour?
You *can*, but results will vary widely. **Seriously, stick to a reputable GF all-purpose blend with xanthan gum for this one.** Single flours like rice flour or almond flour won’t behave the same way in a yeast dough, and you’ll likely end up with something dense and disappointing. Don’t risk it!
My rolls look a little dry. What happened?
Most likely, they were over-baked. GF goods can go from perfectly baked to dry in a flash. Keep a close eye on them during the last few minutes of baking. A quick temp check with an instant-read thermometer (around 200-205°F in the center) can help, but visually, golden brown is your cue.
Can I use margarine instead of butter?
Well, technically yes, but why hurt your soul like that? Butter brings so much flavor and richness that margarine just can’t replicate. If you’re going for dairy-free, use a good quality plant-based butter alternative. Your taste buds will thank you.
How do I store leftovers? (If there are any!)
Good luck having leftovers! But if you do, store them in an airtight container at room temperature for a day or two, or in the fridge for up to 4-5 days. Warm them gently in the microwave or oven before eating for that fresh-baked feel.
Is it really as easy as you say? My GF baking track record is… spotty.
YES! I promise! The key is following the steps, being gentle with the dough, and trusting the process. This recipe is designed to be forgiving and deliver fantastic results without a ton of fuss. You’ve got this!
Final Thoughts
There you have it, my friend! Your new go-to recipe for the best darn gluten-free cinnamon rolls you’ll ever sink your teeth into. Get ready for cozy mornings, happy brunch guests, and the pure joy of a truly excellent GF treat. Now go impress someone—or yourself—with your new culinary skills. You’ve earned it!


