So, you’ve been scrolling through Pinterest, eyeing those ridiculously gorgeous desserts, and thinking, “Yeah, I could *never* make that.” Or maybe you just hit a wall after a long week and deserve something utterly decadent without selling your soul to a complicated recipe. My friend, have I got news for you. We’re about to make Creme Brulee Cinnamon Rolls. Yes, you read that right. And no, it’s not as hard as it sounds. Pinky swear.
Why This Recipe is Awesome
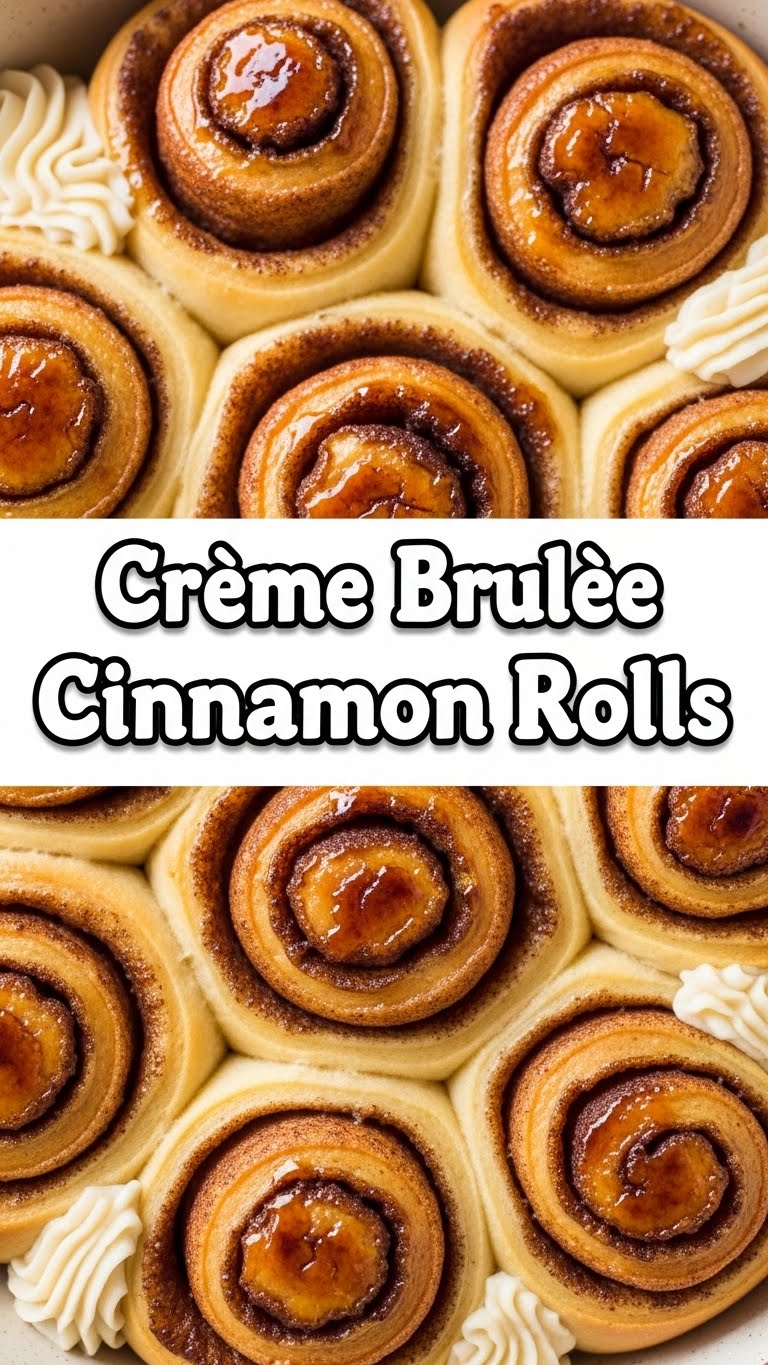
Okay, let’s be real. This isn’t just *another* cinnamon roll recipe. This is the cinnamon roll recipe that got a glow-up, went to finishing school, and learned how to torch a sugar crust like a boss. Why is it awesome? First off, it tastes like a fancy brunch spot had a baby with your coziest childhood memory. Secondly, it looks ridiculously impressive, making you look like a culinary wizard even if your last “culinary adventure” involved burning toast. It’s practically idiot-proof, I swear, even I didn’t mess it up (and I once set off a smoke detector making popcorn). Plus, it combines the buttery, gooey comfort of a cinnamon roll with the elegant, caramelized crunch of a creme brulee. What’s not to love, honestly?
Ingredients You’ll Need
For the Rolls:
- Warm Milk (about 105-115°F / 40-46°C): Not too hot, not too cold. Think a comfy bath, not a sauna or an ice bath.
- Active Dry Yeast: The tiny superheroes that make everything fluffy.
- Granulated Sugar (for the dough): For a little sweetness and to wake up that yeast.
- Unsalted Butter (melted, then cooled): Because butter makes everything better, duh.
- Large Eggs: Room temp, please! They mix better.
- All-Purpose Flour: The backbone of our rolls.
- Salt: Just a pinch to balance things out.
For the Filling:
- Unsalted Butter (softened): Again, butter. We’re not skimping here.
- Light Brown Sugar: For that deep, caramel-y sweetness.
- Ground Cinnamon: The star of the show! Or co-star with the creme brulee. It’s a power duo.
For the Creme Brulee Topping:
- Heavy Cream: The secret to that rich, velvety custard.
- Egg Yolks: These give us that gorgeous color and classic custard texture. Don’t worry, you can make meringues with the whites later!
- Granulated Sugar: For sweetness and, of course, that epic torched crust.
- Vanilla Extract: A splash of pure happiness.
- Pinch of Salt: Enhances all those lovely flavors.
Step-by-Step Instructions
- Activate the Yeast: In a large bowl, whisk together the warm milk, 1 tablespoon of granulated sugar (from the dough ingredients), and the yeast. Let it sit for 5-10 minutes until it gets foamy. This means your yeast is alive and ready to party!
- Make the Dough: To the foamy yeast mixture, add the melted butter, eggs, and the remaining 1/4 cup sugar. Mix well. Gradually add the flour and salt, mixing until a shaggy dough forms.
- Knead It Out: Turn the dough out onto a lightly floured surface and knead for 5-8 minutes until it’s smooth and elastic. Don’t skip this part; it’s a mini arm workout!
- First Rise: Place the dough in a lightly oiled bowl, cover it with plastic wrap, and let it rise in a warm spot for 1-1.5 hours, or until doubled in size. This is where patience pays off.
- Prepare the Filling: While the dough is rising, mix the softened butter, brown sugar, and cinnamon together in a small bowl until it forms a paste. Mmm, smell that?
- Roll ‘Em Up: Once the dough has risen, punch it down gently. On a lightly floured surface, roll it into a large rectangle (about 12×18 inches / 30×45 cm). Spread the cinnamon filling evenly over the entire surface, leaving a small border at one long edge.
- Slice and Dice: Tightly roll the dough up from one long side. Pinch the seam to seal. Use a sharp knife or unscented dental floss (seriously, it works wonders!) to slice the roll into 12 equal pieces.
- Second Rise: Arrange the rolls in a lightly buttered 9×13 inch (23×33 cm) baking dish. Cover with plastic wrap and let them rise again for another 30-45 minutes, or until puffy. Preheat your oven to 375°F (190°C) during this time.
- Bake to Golden Perfection: Bake the rolls for 20-25 minutes, or until golden brown and cooked through. If they’re browning too quickly, you can loosely tent them with foil.
- Whip Up the Creme Brulee Topping: While the rolls are baking, whisk the heavy cream, egg yolks, granulated sugar, vanilla extract, and a pinch of salt together in a medium bowl until well combined.
- Pour & Bake Again: As soon as the rolls come out of the oven, immediately pour the creme brulee mixture evenly over the hot rolls. Don’t let them cool! Return the dish to the oven and bake for another 10-15 minutes, or until the custard is set but still slightly jiggly in the center.
- Cool & Torch: Let the rolls cool for about 15-20 minutes. Sprinkle a thin, even layer of granulated sugar over the top of the cooled custard. Grab your kitchen torch and caramelize that sugar until it’s a beautiful, crunchy, amber crust. If you don’t have a torch, you *could* pop it under the broiler for a minute, but keep a hawk-eye on it because it burns fast!
- Devour: Serve warm and enjoy your masterpiece!
Common Mistakes to Avoid
- Using Water That’s Too Hot (or Cold) for Yeast: Too hot, and you kill the yeast. Too cold, and it won’t activate. Think Goldilocks: just right (105-115°F / 40-46°C). This is crucial, folks!
- Not Kneading Enough: Your arms might ache, but under-kneaded dough means less fluffy rolls. Keep pushing through!
- Over-Flouring: Adding too much flour makes your rolls tough and dry. Start with the recommended amount and only add more if your dough is *super* sticky.
- Skipping the Second Rise: Those extra 30-45 minutes are essential for light, airy rolls. Don’t rush perfection.
- Pouring the Custard on Cold Rolls: The heat from the freshly baked rolls helps the custard cook properly. Don’t wait!
- Forgetting to Torch (or Broil Carefully): That signature crunch is what makes these CRÈME BRULEE cinnamon rolls. Without it, they’re just… really fancy custard rolls. Still good, but not *the* thing.
Alternatives & Substitutions
Feeling adventurous or missing an ingredient? No stress, my friend. We can improvise!
- Milk: You can use plant-based milks like almond or soy, but whole milk generally gives the best richness. Just sayin’.
- Butter: Can you use margarine? Well, technically yes, but why hurt your soul like that? Butter gives superior flavor and texture, IMO. Stick to butter if you can.
- Flour: While all-purpose is standard, you could try bread flour for a chewier roll, though you might need a tiny bit more liquid.
- Vanilla Extract: Ran out? A tiny splash of almond extract or even a scraped vanilla bean (if you’re feeling *really* fancy) works.
- Cinnamon: Feeling wild? Add a pinch of nutmeg or cardamom to the filling for a different spice profile.
- No Kitchen Torch? As mentioned, a broiler works in a pinch. Place the sugar-topped rolls a good distance from the heat, and watch like a hawk. Seriously, it goes from perfect to burnt in seconds!
FAQ (Frequently Asked Questions)
- Can I make the dough ahead of time? Absolutely! After the first rise, you can punch it down, cover it tightly, and refrigerate it overnight. Let it come to room temp for about 30-60 minutes before rolling and proceeding with the recipe.
- My rolls didn’t rise, what gives? Most likely your yeast was expired or your milk was too hot/cold. Always check your yeast’s expiry date!
- What if I don’t have a stand mixer? No problem! You can knead the dough by hand. It’s a great stress reliever (and arm workout)!
- Can I bake these in a round pan? Yep! A 9 or 10-inch round springform pan works great. Just arrange them snugly.
- How do I store leftovers? Store them covered in the fridge for up to 3 days. Reheat gently in the microwave or oven. The torched crust might soften, but they’ll still be delicious!
- Is it really necessary to torch the sugar? Okay, “necessary” is a strong word, but it’s like going to a concert and skipping the encore. That crunchy, caramelized top is what makes these truly *crème brûlée* cinnamon rolls. Don’t miss out on the magic!
Final Thoughts
And there you have it, folks! Your very own, incredibly impressive, Creme Brulee Cinnamon Rolls. You’ve tackled yeast, mastered a custard, and wielded a kitchen torch like a pro. Go on, pat yourself on the back! Now go impress someone—or yourself—with your new culinary skills. You’ve earned it, and your taste buds are definitely thanking you. Happy baking, my friend!


