So, you’ve scrolled past one too many glorious cinnamon roll pics on Instagram and now your soul demands stickiness, sugar, and pure, unadulterated comfort? But, like, without the whole ‘spending three days in the kitchen’ thing, right? I feel ya. Good news: Fitwaffle’s Cinnamon Rolls are here to save your sweet tooth (and your sanity!). Get ready to impress everyone, including yourself, with minimal fuss and maximum deliciousness.
Why This Recipe is Awesome
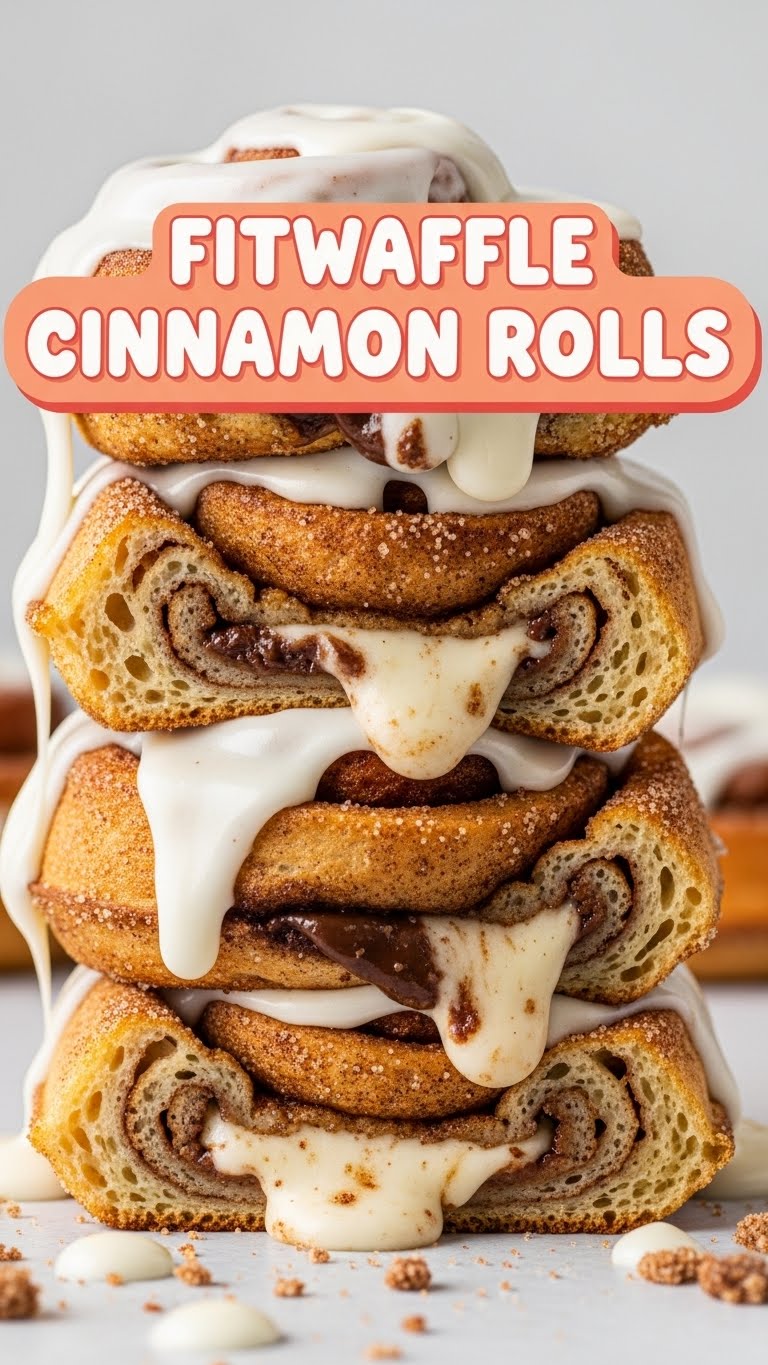
Honestly, if *I* can make these without summoning a fire truck, anyone can. This recipe is pretty much idiot-proof. Seriously. It’s perfect for those days when you want something homemade and ridiculously tasty but lack the energy for a culinary marathon. These rolls are fluffy, gooey, smell like pure happiness, and deliver that signature cinnamon swirl without requiring an advanced degree in pastry science. Plus, that cream cheese frosting? Game. Changer. It’s basically a hug in food form, and who doesn’t need more hugs?
Ingredients You’ll Need
Gather ’round, my sweet-toothed friend. Here’s what you’ll need to conjure these beauties. Don’t worry, it’s nothing too wild!
- For the Dough:
- 300ml Warm Milk: Not hot, not cold. Think warm bathwater, just right for your yeastie friends.
- 7g Sachet Instant Dry Yeast: Your tiny, bubbly best friend. Make sure it’s still alive and kicking!
- 75g Caster Sugar: For that essential sweet kiss in the dough.
- 1 Large Egg (room temp): Helps with richness and structure.
- 75g Unsalted Butter (melted, cooled): Because everything is better with butter. Period.
- 500g Strong White Bread Flour: The backbone of all carbs. Strong flour gives you that lovely chew.
- 1/2 tsp Salt: Don’t skip it! It balances the sweetness and brings out the flavor.
- For the Filling:
- 100g Unsalted Butter (softened): Spreading magic!
- 100g Light Brown Sugar: Deeper flavor, extra gooeyness.
- 2 tbsp Ground Cinnamon: The star of the show! Don’t skimp on this spice.
- For the Cream Cheese Frosting:
- 100g Cream Cheese (softened): The tangy secret weapon. Use full-fat, trust me.
- 50g Unsalted Butter (softened): More butter, more joy.
- 100g Icing Sugar (sifted): For that smooth, sweet glaze.
- 1 tsp Vanilla Extract: A splash of warmth.
Step-by-Step Instructions
Alright, apron on, spirit high! Let’s get these rolls rolling.
- Activate Your Yeast: In a large bowl, whisk together the warm milk, yeast, and 1 teaspoon of the caster sugar. Let it sit for about 5-10 minutes until it looks frothy and bubbly. This means your yeast is happy and ready to party!
- Mix the Wet Stuff: Add the rest of the caster sugar, egg, and cooled melted butter to your yeast mixture. Give it a good whisk until everything is combined.
- Add the Dry Stuff: Gradually add the flour and salt to the wet ingredients. Mix with a spoon or your hand (get in there!) until a shaggy dough forms.
- Knead It Out: Turn the dough out onto a lightly floured surface. Knead for about 8-10 minutes until it’s smooth, elastic, and not too sticky. Don’t skip the kneading! It’s crucial for that soft texture.
- First Rise: Place the dough in a lightly oiled bowl, turning it once to coat. Cover the bowl with cling film or a damp tea towel and let it rise in a warm place for about 1-1.5 hours, or until doubled in size. This is where the magic happens!
- Make the Filling: While your dough is rising, mix the softened butter, brown sugar, and cinnamon in a small bowl until it forms a spreadable paste. Set aside.
- Roll It Out: Once risen, punch down the dough gently to release the air. On a lightly floured surface, roll it into a large rectangle, roughly 40x30cm (about 16×12 inches).
- Spread the Love: Evenly spread your cinnamon-sugar filling over the entire surface of the dough, leaving a small border on one of the longer edges.
- Roll ‘Em Up: Starting from the longer edge opposite the border, tightly roll the dough into a log. The tighter, the better for those beautiful swirls!
- Slice and Arrange: Using a sharp knife or even unflavored dental floss (seriously!), cut the log into 12 equal-sized rolls. Arrange them snugly in a lightly greased 9×13 inch baking dish.
- Second Rise: Cover the baking dish again and let the rolls rise in a warm place for another 30-45 minutes, or until they look puffy and almost doubled. Meanwhile, preheat your oven to 180°C (350°F).
- Bake to Perfection: Bake for 20-25 minutes, or until golden brown and cooked through. They should be soft and slightly jiggly in the middle.
- Whip Up the Frosting: While the rolls are baking (or cooling slightly), beat the softened cream cheese and butter together until smooth. Gradually add the sifted icing sugar and vanilla extract, beating until light and fluffy.
- Frost and Devour: Once the rolls are out of the oven, let them cool for about 5-10 minutes before slathering that glorious cream cheese frosting all over them. Seriously, don’t wait too long – warm rolls and melting frosting are a match made in heaven!
Common Mistakes to Avoid
We’ve all been there! Learn from my (many) mistakes, fellow baker.
- Cold Milk/Water with Yeast: This is a rookie mistake! If your liquid is too cold, your yeast will be too sleepy to activate. Too hot? You’ll kill it faster than I finish a pizza. Aim for lukewarm.
- Not Kneading Enough: Your arms might ache a little, but proper kneading is non-negotiable for that fluffy texture. Don’t be lazy, or you’ll end up with dense bricks.
- Forgetting to Let the Dough Rise: Patience, young padawan! Your dough needs its beauty sleep. Rushing the rise means sad, small rolls.
- Over-flouring: While rolling, resist the urge to dump a ton of flour on your surface. Too much extra flour makes the dough tough and dry. Just a light dusting is enough.
- Baking Too Long: Over-baked cinnamon rolls are dry cinnamon rolls. Keep an eye on them; they should be golden, not dark brown.
Alternatives & Substitutions
Feeling a little adventurous, or just missing an ingredient? No worries, we can tweak this!
- Dairy-Free Option: Swap regular milk for a plant-based alternative like almond or soy milk (make sure it’s unsweetened). Use a good quality dairy-free butter substitute for both the dough and the filling/frosting.
- Different Fillings: Not a cinnamon fanatic (gasp!)? Try a pumpkin spice blend, cocoa powder with a dash of chili for a Mexican hot chocolate vibe, or even finely chopped nuts.
- No Cream Cheese? No Problem (sort of): You can make a simple glaze with just icing sugar, a splash of milk, and vanilla extract. It won’t have the tang, but it’ll still be sweet and delicious. IMO, the cream cheese is key, but you do you!
- Less Sweet Frosting: If you find the frosting too sweet, you can slightly reduce the icing sugar, but only by a little to maintain consistency.
FAQ (Frequently Asked Questions)
- Can I make these ahead of time? Absolutely! After the second rise, you can cover the baking dish and pop it in the fridge overnight. In the morning, let them come to room temperature for about 30-60 minutes before baking.
- What if my dough isn’t rising? First, check your yeast expiry date. Second, was your milk too hot or too cold? If it’s really not moving, your yeast might be dead. Start fresh!
- Can I freeze the baked rolls? Yes! Once completely cooled (without frosting), wrap them individually in cling film, then foil. They’ll last a month or so. Thaw and warm gently before frosting.
- My rolls are too dry! What happened? Most likely over-baked or you added too much flour to the dough. Keep an eye on the oven next time, and try to knead without adding excessive extra flour.
- Do I really need strong bread flour? While plain (all-purpose) flour can work, strong bread flour has higher protein content, which develops gluten better and gives you that lovely, chewy, fluffy texture. For the best results, stick to bread flour!
Final Thoughts
So there you have it! Your ticket to cinnamon roll glory, courtesy of Fitwaffle and a little guidance from your friendly kitchen confidante. These aren’t just rolls; they’re a mood-booster, a conversation starter, and a fantastic excuse to eat sugar for breakfast (or lunch, or dinner, I’m not judging). Now go forth and create! Impress someone—or yourself—with your new culinary skills. You’ve earned it!


