
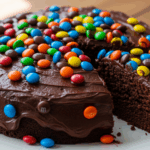
Look, I’m not saying this chocolate-decorated round cake will solve all your problems, but have you ever been sad while eating cake? Didn’t think so. This recipe is basically edible therapy that happens to look fancy enough to make your Instagram followers think you’ve got your life together (even if your kitchen looks like a crime scene afterward).
Why This Recipe is Awesome
Let’s be real for a second—most impressive-looking desserts require the patience of a saint and the skill set of someone who didn’t spend four years of art class drawing the same stick figure. Not this cake! It’s deceptively simple but looks like you spent hours on it. The chocolate decorations are basically adult finger painting that somehow transforms into elegant décor. The best part? When someone asks if you made it from scratch, you can smugly nod while conveniently forgetting about the box mix hiding in your trash.
Ingredients You’ll Need
For the cake:
- 1 box of devil’s food cake mix (or make it from scratch if you’re showing off)
- 3 eggs (room temperature, because cold eggs are apparently offensive to baking gods)
- ½ cup vegetable oil (or butter if you’re feeling fancy)
- 1 cup water (from the tap, nothing special here)
For the frosting:
- 2 cups unsalted butter (softened, not melted into a sad puddle)
- 4 cups powdered sugar (prepare for the sneeze cloud)
- 1 teaspoon vanilla extract (the real stuff, not that imitation nonsense)
- Pinch of salt (trust me on this one)
For the chocolate decorations:
- 8 oz dark chocolate (the good stuff, not the sad baking chips)
- 2 oz white chocolate for contrast (optional, but makes you look extra)
- Parchment paper (your new best friend)
Step-by-Step Instructions
- Prep your battle station. Preheat oven to 350°F (or whatever your cake mix demands). Grease and flour two 8-inch round pans like your success depends on it—because it does.
- Mix that cake. Dump cake mix into a large bowl, add eggs, oil, and water. Beat it like it owes you money for about 2 minutes until smooth. Don’t overmix unless you’re going for the “tough rubber tire” texture.
- Bake until done. Pour batter evenly into your pans and bake for 25-30 minutes. How do you know it’s done? The toothpick test—stick it in the center and if it comes out clean, you’re golden. Literally.
- Cool your jets. Let cakes cool in pans for 10 minutes, then flip them onto a wire rack. Try not to break them in half during this delicate operation. If you do, congratulations—you’re now making trifle!
- Make the frosting. Beat butter until it’s fluffy and questioning its life choices. Gradually add powdered sugar (emphasis on “gradually” unless you enjoy looking like a ghost). Add vanilla and salt, then beat until it’s irresistibly smooth.
- Create chocolate decorations. Melt dark chocolate in the microwave in 30-second bursts, stirring between each. Pour onto parchment paper and spread thin. Get creative—make squiggles, circles, triangles, or write passive-aggressive messages that will dissolve before anyone can read them. Pop in fridge to set.
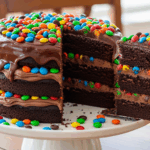
- Assemble the cake. Place one layer on your cake stand, slather with frosting, top with second layer. Frost the entire cake smooth—or rustic if your smoothing skills are questionable (we call that “artistic texture”).
- Add your chocolate masterpieces. Once frosting is set but not completely hard, carefully peel chocolate shapes from parchment and stick them around the sides and top of your cake. The heat from your hands will slightly melt the chocolate, so work quickly or enjoy your new chocolate-covered fingers.
Common Mistakes to Avoid
Let’s talk about where things could go sideways (because they will, but we can minimize the damage):
- Trying to frost a warm cake. Unless you’re aiming for frosting soup with cake islands, be patient and wait until it’s completely cool.
- Making chocolate decorations too thin. Paper-thin chocolate breaks faster than your New Year’s resolutions. Aim for thickness somewhere between “transparent” and “chunk.”
- Overbeating your cake batter. This isn’t a personal vendetta—you’re making cake, not bread. Step away from the mixer.
- Working with warm hands on chocolate. Your body heat is the enemy of chocolate artistry. Run your hands under cold water first or accept your chocolate-covered destiny.
Alternatives & Substitutions
Not everyone has a fully-stocked professional kitchen (shocking, I know), so here are some workarounds:
- No cake mix? Make it from scratch with 2 cups flour, 2 cups sugar, ¾ cup cocoa powder, 2 tsp baking powder, 1½ tsp baking soda, 1 tsp salt, 2 eggs, 1 cup milk, ½ cup oil, 2 tsp vanilla, and 1 cup hot coffee (the secret weapon).
- No fancy chocolate? Chocolate chips will work in a pinch, just add a teaspoon of oil to help them melt smoother. They won’t temper as well, but hey, we’re not on Bake Off.
- Dairy-free needs? Substitute plant-based butter and milk. Your cake won’t know the difference, I promise.
- No piping skills? Skip the fancy frosting work and let your chocolate decorations do the heavy lifting. Stick some fresh berries on top and call it “rustic chic.”
FAQ (Frequently Asked Questions)
How far in advance can I make the chocolate decorations?
Up to a week ahead if you store them in a cool, dry place. Just don’t put them in the fridge unless you enjoy watching chocolate sweat (it’s called “blooming” but let’s call it what it is—chocolate pit stains).
Can I use milk chocolate instead of dark?
Sure, if you want your decorations to be sweeter and less stable. Milk chocolate has less cocoa solids, meaning it melts faster than your willpower at a dessert buffet. But you do you.
My cake layers baked unevenly. Am I doomed?
Nah, just grab a serrated knife and give those domes a haircut. Bonus: cake scraps for immediate stress-eating.
How do I transport this masterpiece without destroying it?
Refrigerate the assembled cake for at least an hour before transport. Then, use a cake carrier or—in a pinch—stick toothpicks around the top and loosely tent with foil. Drive like there’s an open cup of coffee between your legs.
The recipe seems complicated. Can I just buy a cake and stick some Hershey’s bars on it?
I mean… technically yes. But that’s like showing up to a costume party in a name tag that says “costume.” Low effort, but points for showing up.
Final Thoughts
Remember, at the end of the day, it’s just cake. Delicious, impressive-looking cake that might have caused minor kitchen trauma, but cake nonetheless. If it falls apart, call it a “deconstructed chocolate experience” and serve it in cups with ice cream. FYI, nobody has ever complained about cake served with ice cream, regardless of its structural integrity.
Now go forth and create your chocolate masterpiece! Your social media feed needs the content, and your soul needs the sugar rush. And if anyone asks for the recipe, send them this link and take full credit for discovering it. I won’t tell if you don’t.
