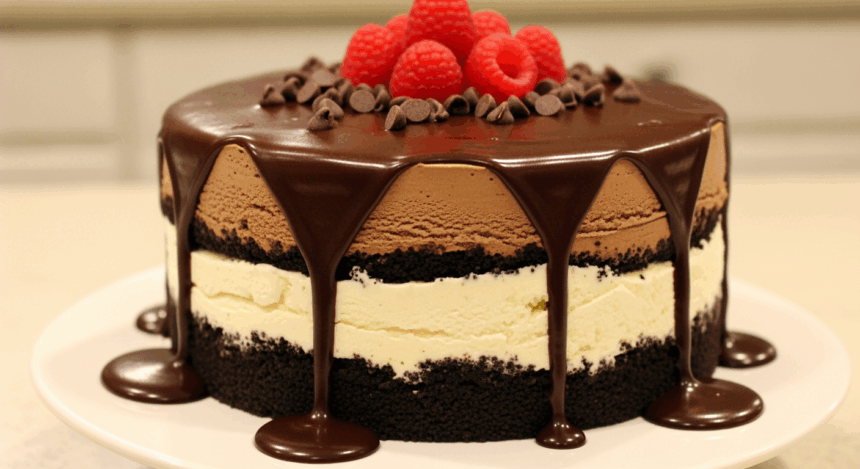
Ever had one of those days when you’re scrolling through Instagram and suddenly stop at a gorgeous ice cream cake photo that makes you drool on your phone screen? Yeah, me too. But instead of paying $50 at that fancy bakery downtown, why not make your own showstopper at home? This homemade ice cream cake with chocolate ganache is basically therapy you can eat—and it’s way easier than it looks.
Why This Recipe is Awesome
First of all, this cake is basically fool-proof. If you can stack things and wait patiently (the hardest part, TBH), you can make this. It’s also completely customizable—want mint chocolate chip instead of vanilla? Go for it! Feeling fancy? Add some crushed cookies between layers. Plus, there’s something wildly satisfying about slicing into something you made yourself and watching people’s jaws drop when you casually mention, “Oh this? Just threw it together.”
Ingredients You’ll Need
For the cake:
- 2 quarts ice cream (1 quart each of two flavors—I like vanilla and coffee, but you do you)
- 1 package of Oreos (or similar cookies), crushed (about 2 cups)
- 4 tablespoons butter, melted (the real stuff, not that “I Can’t Believe It’s Not” nonsense)
- 1 cup fudge sauce (store-bought is fine—we’re making a cake, not solving world hunger)
For the chocolate ganache:
- 1 cup heavy cream (the fatty goodness that makes life worth living)
- 8 oz semi-sweet chocolate chips (or a fancy chocolate bar chopped up if you’re feeling bougie)
- 1 teaspoon vanilla extract (the real kind, not that imitation stuff)
- Pinch of salt (trust me on this one)
Step-by-Step Instructions
- Prep your workspace: Take out your ice cream to soften for about 15-20 minutes. Meanwhile, line a 9-inch springform pan with plastic wrap, leaving extra hanging over the sides. This will make your life significantly easier later.
- Make the cookie crust: Mix crushed Oreos with melted butter until it resembles wet sand. Press firmly into the bottom of your pan. Pop it in the freezer for 10 minutes to set.
- Create your first layer: Scoop one flavor of softened ice cream onto the crust. Spread it evenly with a spatula (or the back of a spoon if you’re in your “minimal kitchen tools” era). Freeze for 30 minutes.
- Add the fudgy middle: Pour the fudge sauce over the first ice cream layer and spread evenly. Freeze for another 15 minutes.
- Top it off: Add your second ice cream flavor, smooth the top, and freeze for at least 4 hours or overnight. Patience, grasshopper.
- Make the ganache: Heat cream in a saucepan until it’s just about to simmer (tiny bubbles around the edge). Pour over chocolate chips in a bowl. Let sit for 2 minutes, then stir until smooth. Add vanilla and salt. Let cool for 10 minutes.
- The grand finale: Remove cake from freezer and pan. Peel off plastic wrap. Pour slightly cooled ganache over the top, letting it drip dramatically down the sides. Return to freezer for 15 minutes to set the ganache.
- Serve: Let cake sit at room temperature for 5-10 minutes before slicing. Use a knife dipped in hot water for clean cuts. Watch as friends assume you’re some kind of dessert wizard.
Common Mistakes to Avoid
Being impatient with freezing times. I know, I know—waiting is torture, but rushing will give you a melty mess instead of clean layers.
Pouring hot ganache directly onto the cake. Unless you want a sad ice cream puddle, let that ganache cool down a bit first.
Forgetting to line the pan. Nothing says “I hate myself” quite like trying to pry frozen ice cream from a pan.
Using rock-hard ice cream. You’ll bend your spoon, tear the cake, and question your life choices. Let it soften!
Alternatives & Substitutions
Ice cream flavors: Any combination works! Try chocolate and peanut butter, strawberry and chocolate, or go wild with mint chocolate chip and coffee.
Cookie crust: Graham crackers, chocolate chip cookies, or even brownies can replace Oreos. Just make sure they’re crushed finely.
Filling options: Instead of fudge sauce, try caramel, fruit preserves, or crushed candy bars. Reese’s Pieces between layers? Life-changing.
Dairy-free version: Use coconut-based ice cream and coconut cream for the ganache. It’s different but still delicious (and your lactose-intolerant friends will worship you).
FAQ (Frequently Asked Questions)
How far in advance can I make this?
Up to a week ahead! Just wrap it well after the ganache sets. Though honestly, good luck keeping it in your freezer that long without “taste testing.”
Can I use store-bought cake instead of the cookie crust?
Absolutely! Slice a thin layer of pound cake or even brownies for the base. I won’t tell the dessert police.
My ganache split and looks grainy—what happened?
You likely overheated it, my friend. Next time, go slow with the heat. For a quick fix, whisk in a tablespoon of warm cream to bring it back together.
Do I really need a springform pan?
Technically no—any cake pan or even a bread loaf pan works. But removing it will be like an Olympic sport without that springform magic.
How do I store leftovers?
Leftovers? What’s that? But if by some miracle you have restraint, wrap slices in plastic wrap and store in a freezer container for up to two weeks.
Can I add alcohol to this?
You magnificent rebel. Yes, a tablespoon of Kahlúa or Bailey’s mixed into the ice cream or ganache adds a grown-up twist.
Final Thoughts
See? That wasn’t so hard! You’ve just created a dessert that looks like it belongs in a fancy patisserie window, and all without breaking a sweat (or the bank). The best part? You can pretend you slaved away for days when people ask for your secret recipe. This cake is perfect for birthdays, dinner parties, or Wednesday afternoons when you just need something amazing in your life. Now go forth and freeze with confidence—your ice cream cake game is officially strong!
