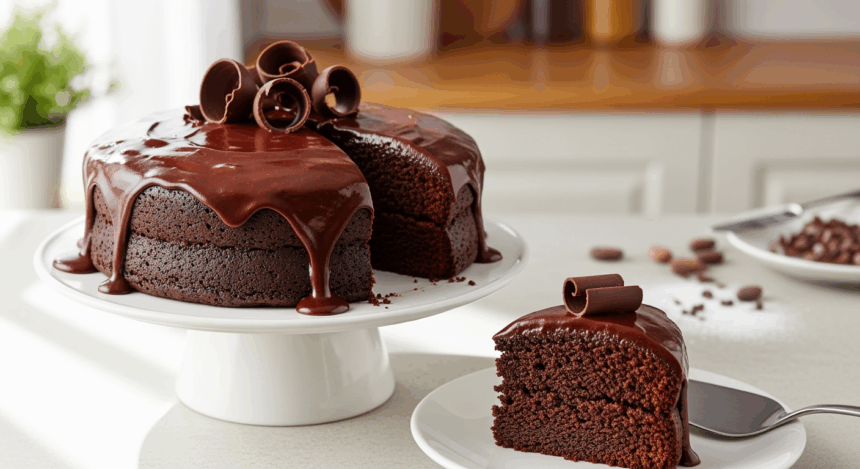
I still remember the first time I tried to bake a cake for my vegan friend’s birthday. There I was, staring at my egg carton like it had betrayed me, wondering “how the heck do you make something fluffy WITHOUT eggs?” Well, friends, I’ve since discovered the magical world of eggless baking, and let me tell you—this chocolate cake recipe is about to become your new best friend. No chicken products required!
Why This Recipe is Awesome
First off, this cake is basically foolproof. Seriously, I once made it while simultaneously binge-watching Netflix AND texting my mom about her computer problems. Still turned out perfect. It’s also ridiculously moist (sorry if you hate that word, but there’s no better description) and nobody—I repeat, nobody—will ever guess it’s eggless. Plus, the chocolate icing? It’s the kind that makes you lick the spatula, the bowl, and possibly your fingers in public. No judgment here.
Ingredients You’ll Need
For the cake:
- 1½ cups all-purpose flour (the regular boring kind)
- 1 cup granulated sugar (because adulting is hard enough without cutting sugar)
- ¼ cup unsweetened cocoa powder (the good stuff, not the weird chalky kind)
- 1 teaspoon baking soda (not baking powder—they’re different, trust me)
- ½ teaspoon salt (just a pinch to make the sweet taste sweeter—science!)
- 1 cup water (from the tap, nothing fancy)
- ⅓ cup vegetable oil (or any neutral oil that doesn’t smell like your last stir-fry)
- 1 tablespoon white vinegar (the secret egg replacer—mind blown, right?)
- 1 teaspoon vanilla extract (the real stuff if you’re feeling fancy)
For the icing glory:
- ¼ cup butter, softened (leave it out while you make the cake, genius planning)
- 2 cups powdered sugar (also called confectioners’ sugar for the posh bakers)
- ¼ cup cocoa powder (again, the good stuff)
- 2-3 tablespoons milk (dairy or plant-based, we don’t discriminate)
- 1 teaspoon vanilla extract (because more vanilla is always better)
Step-by-Step Instructions
- Prep your battlefield. Preheat oven to 350°F (175°C). Grease and flour an 8-inch square baking pan, or line with parchment paper if you hate cleaning up.
- Mix the dry gang. In a large bowl, whisk together flour, sugar, cocoa powder, baking soda, and salt. Create a little well in the center like you’re making a volcano science project.
- Add the wet squad. Pour water, oil, vinegar, and vanilla into your dry ingredient volcano. Mix until just combined. Don’t overmix unless you want a cake with the texture of a rubber tire.
- Bake it to make it. Pour batter into your prepared pan. Bake for 30-35 minutes, or until a toothpick inserted in the center comes out clean (or with a few moist crumbs—not wet batter).
- Cool your jets. Let the cake cool completely in the pan on a wire rack. Attempting to ice a warm cake is like trying to put makeup on in a sauna—messy and pointless.
- Icing magic time. Beat softened butter until creamy. Gradually add powdered sugar and cocoa powder, alternating with milk. Add vanilla. Beat until smooth and spreadable. If it’s too thick, add milk by the teaspoon until it reaches “I want to face-plant in this” consistency.
- Frost like a boss. Once the cake is completely cool, spread icing evenly over the top. Get artistic if you want, or just slather it on—it’ll taste amazing either way.
Common Mistakes to Avoid
Let’s be real, we all mess up sometimes. Here’s how not to:
- Substituting baking powder for baking soda. They’re not twins, they’re distant cousins who don’t even like each other.
- Overmixing the batter. This isn’t a workout session. Mix until just combined, then step away from the bowl.
- Opening the oven door too early. Your cake will sink faster than my motivation on Monday mornings.
- Icing a warm cake. Unless you want a melty disaster that looks like chocolate lava (which, tbh, still sounds delicious).
- Expecting perfection the first time. Even if it looks ugly, it’ll still taste amazing. That’s what I tell myself, anyway.
Alternatives & Substitutions
Because we all know you’re going to check the recipe and realize you’re missing something:
- No white vinegar? Apple cider vinegar or lemon juice will work. You just need something acidic to react with the baking soda.
- Gluten concerns? Swap in a 1:1 gluten-free flour blend. The cake might be slightly less fluffy, but still delicious.
- Reducing sugar? You can cut it by ¼ cup and still have a tasty cake. Any less and, IMO, you’re just eating bread with cocoa powder.
- Fancy it up? Add a teaspoon of instant coffee to the dry ingredients—it makes chocolate taste more chocolatey. Science is cool!
- No butter for icing? Use coconut oil (solid, not melted) for a slight tropical twist.
FAQ (Frequently Asked Questions)
How long does this cake stay fresh?
If it lasts more than 24 hours in your house, I’ll be genuinely shocked. But theoretically, it stays moist for 3-4 days in an airtight container at room temperature.
Can I make this into cupcakes instead?
Absolutely! Fill cupcake liners about 2/3 full and bake for approximately 18-20 minutes. You’ll get about 12-15 cupcakes depending on how much batter you “taste test” before baking.
Why does the vinegar not make it taste weird?
Chemistry, my friend! The vinegar reacts with the baking soda to create bubbles (carbon dioxide) that make the cake rise. The vinegar flavor completely disappears in the process. Magic!
Can I make this cake in advance?
Yes! The cake layers actually taste even better the next day. Just wrap them well and frost before serving. Your future self will thank you.
Help! My icing is too runny/thick!
Too runny? Add more powdered sugar, a tablespoon at a time. Too thick? Splash in more milk, a teaspoon at a time. Icing is forgiving like that—unlike my ex who never forgave me for forgetting our anniversary.
Is this actually as good as a cake with eggs?
Better, if you ask me. It’s more moist and has a deeper chocolate flavor. But I might be biased because I’ve made this cake approximately 247 times.
Final Thoughts
Look at you, about to make an amazing eggless chocolate cake that’ll have people questioning everything they thought they knew about baking! Whether you’re avoiding eggs for allergy reasons, ethical choices, or just opened your fridge to find you’re out of eggs (again), this recipe has your back.
Remember, the best thing about baking is that even the “failures” are usually still edible. And with this recipe, you’re practically guaranteed success. So go on, flour up those hands, get a little cocoa powder on your shirt (it’s a badge of honor), and create some chocolate magic. Your taste buds are waiting!
