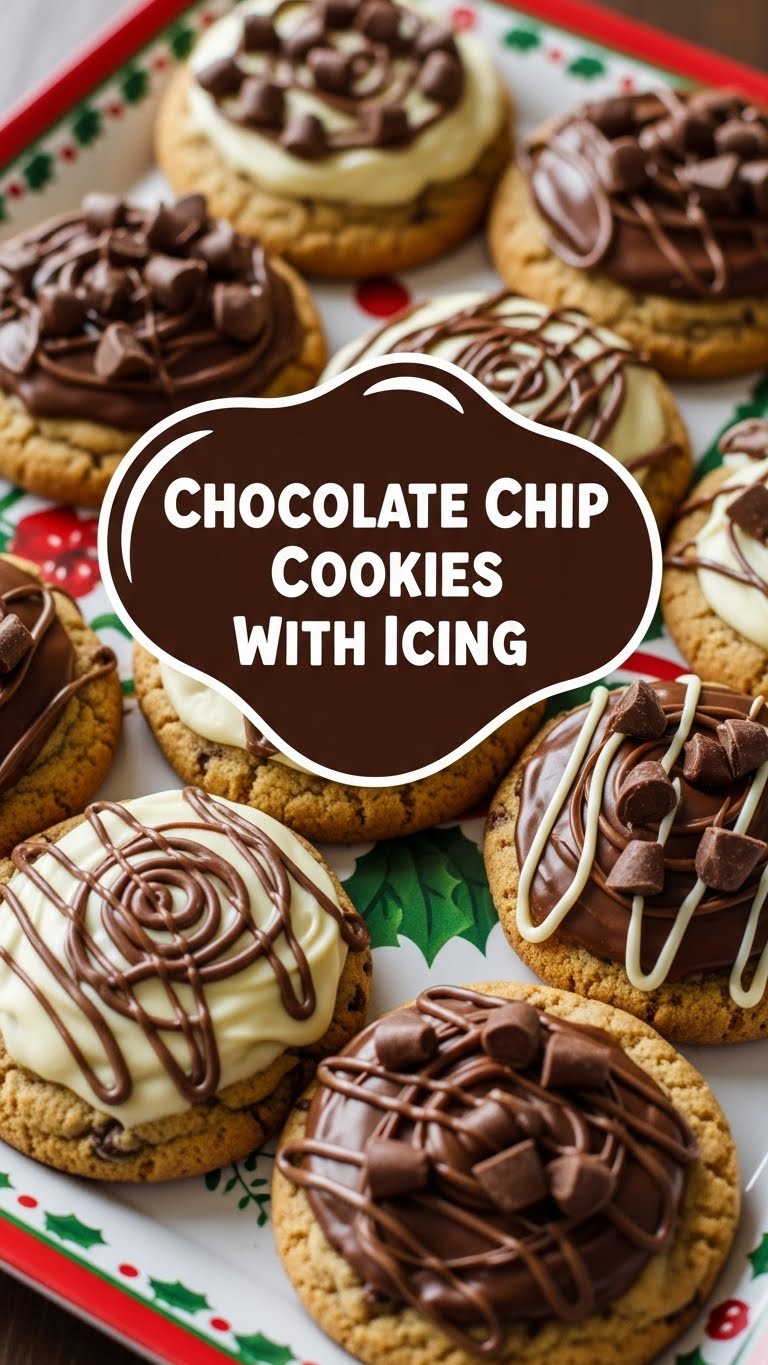
So you’re craving something ridiculously tasty but also too lazy to spend forever in the kitchen, huh? Same, friend, *same*. We’re talking about that sweet spot between ‘I deserve a treat’ and ‘I don’t want to make a huge mess.’ Good news: I’ve got your back with a recipe that’s about to make your taste buds sing and your lazybones happy: Chocolate Chip Cookies… but wait for it… *with icing*. Because why stop at perfection when you can achieve sugary, frosted nirvana?
Why This Recipe is Awesome
Look, I’m not going to lie, chocolate chip cookies are already a national treasure. But adding a silky, sweet glaze? That’s just next-level genius, if I do say so myself. This isn’t just a recipe; it’s a passport to pure joy. Here’s why it’s about to become your new kitchen MVP:
- It’s practically **idiot-proof**. Seriously, even I didn’t mess it up, and my kitchen adventures often end in… ‘creative’ results.
- **Quick gratification.** From zero to cookie hero in under an hour. You’re welcome.
- The **icing** isn’t fussy. No fancy piping bags needed, unless you’re feeling extra bougie (in which case, go for it!).
- It’s the ultimate comfort food with a little extra sparkle. Perfect for impressing friends, bribing neighbors, or just treating your magnificent self.
Ingredients You’ll Need
Gather your troops, folks! Most of this stuff is probably already chilling in your pantry.
For the Cookies:
- 1 cup (2 sticks) unsalted butter, softened. Because you control the salt, not some factory, right?
- ¾ cup granulated sugar
- ¾ cup packed light brown sugar. The dynamic duo for ultimate chewiness.
- 2 large eggs, at room temperature. Trust me on this one; it makes a difference.
- 2 teaspoons vanilla extract. Don’t skimp! Good vanilla is worth its weight in gold.
- 2 ¼ cups all-purpose flour
- 1 teaspoon baking soda
- ½ teaspoon salt
- 1 ½ cups chocolate chips. Milk, semi-sweet, dark, a mix… live your best life!
For the Icing:
- 1 ½ cups powdered sugar (aka confectioners’ sugar). For that silky smooth magic.
- 2-3 tablespoons milk or heavy cream. Just a splash to get that perfect drizzly consistency.
- ½ teaspoon vanilla extract. More vanilla? Yes, always more vanilla.
- Pinch of salt (optional, but it really brightens the flavor!)
Step-by-Step Instructions
Alright, apron on (or not, we’re not judging), let’s get baking!
- Preheat & Prep: Crank your oven to 375°F (190°C). Line two baking sheets with parchment paper or silicone mats. This is a **game-changer** for easy cleanup and no-stick cookies.
- Cream the Dream: In a large bowl, using an electric mixer, beat the softened butter, granulated sugar, and brown sugar together until it’s light and fluffy. This usually takes about 2-3 minutes.
- Egg-cellent Addition: Beat in the eggs, one at a time, until fully combined. Then, stir in that glorious vanilla extract.
- Dry Goods Unite: In a separate medium bowl, whisk together the flour, baking soda, and salt. Make sure it’s all mixed well!
- Combine Forces: Gradually add the dry ingredients to the wet ingredients, mixing on low speed until *just* combined. **Do not overmix!** Nobody wants a tough cookie.
- Chocolatey Goodness: Fold in your chosen chocolate chips with a spatula. Because life’s too short for cookies without enough chocolate.
- Scoop & Bake: Drop rounded tablespoons (or use a cookie scoop for perfectly uniform cookies) of dough onto your prepared baking sheets, about 2 inches apart. Bake for 9-11 minutes, or until the edges are golden brown and the centers are still slightly soft.
- Cool Down: Let the cookies cool on the baking sheets for 5 minutes before transferring them to a wire rack to cool completely. **Patience is a virtue here!**
- Whip Up the Icing: While the cookies are cooling (or once they’re cool), whisk together the powdered sugar, milk/cream, vanilla extract, and that optional pinch of salt in a small bowl until smooth and lump-free. Add more milk a tiny bit at a time if it’s too thick, or more powdered sugar if it’s too thin.
- Drizzle & Devour: Once the cookies are **completely cool**, drizzle or spread the icing over them. Let the icing set for about 15-20 minutes, then dig in!
Common Mistakes to Avoid
We’ve all been there. Learn from my past kitchen mishaps!
- Thinking you don’t need to preheat the oven: Rookie mistake! A properly preheated oven ensures even baking and prevents your cookies from spreading too much.
- Overmixing the dough: I said it once, I’ll say it again: **STOP MIXING once the flour is just combined.** Overmixing develops the gluten, leading to tough, cakey cookies. No fun.
- Baking on warm sheets: If you’re doing multiple batches, make sure your baking sheets are cool between uses. Putting dough on a warm sheet makes the butter melt too fast, leading to flat, sad cookies.
- Icing hot cookies: Don’t do it! You’ll end up with a sugary puddle instead of a beautiful glaze. **Patience, grasshopper.**
- Eyeballing the flour: Flour is tricky. Too much, and your cookies are dry and crumbly. Too little, and they spread like crazy. **Use a spoon to fluff up your flour, then gently scoop it into your measuring cup and level it off** with a straight edge.
Alternatives & Substitutions
Feel free to get creative! This recipe is pretty forgiving.
- Chocolate Swap: Not a semi-sweet fan? Go for milk chocolate, dark chocolate, white chocolate chips, or even chopped chocolate bars. Throw in some peanut butter chips or M&Ms for extra flair!
- Nutty Crunch: Add ½ cup of chopped walnuts or pecans along with the chocolate chips for a delightful crunch.
- Spice it Up: A pinch of cinnamon or nutmeg in the cookie dough can add a warm, cozy twist.
- Gluten-Free Option: You can absolutely use a 1:1 gluten-free baking flour blend for this recipe. Just be aware that the texture might be slightly different.
- Icing Flavors: Feeling adventurous with the icing? Swap out the vanilla extract for almond extract, or add a little lemon zest for a zesty kick. You could even use a different type of frosting, like a simple cream cheese frosting, but this easy glaze is fantastic, IMO.
FAQ (Frequently Asked Questions)
Got questions? I’ve got (casual) answers!
Can I use margarine instead of butter?
Well, technically yes, you *can*, but why hurt your soul like that? Butter just tastes better and gives a superior texture. If you must, use a stick margarine (not the tub kind) for best results, but be warned, it’s not quite the same magic.
My cookies spread too much! What happened?
Ah, the flat cookie dilemma! This can happen for a few reasons: your butter was too soft (or even melted), your oven wasn’t hot enough, or you might have overmeasured your wet ingredients/undermeasured your dry ones. Make sure your butter is softened but still cool to the touch, and your oven is fully preheated!
Can I make the dough ahead of time?
Heck yeah! Make the dough, form it into balls, and chill them in the fridge for up to 3 days. Or, freeze them for up to 3 months! Just add a couple extra minutes to the baking time if baking from frozen. **FYI**, chilling often results in even more flavorful cookies!
How do I store these beauties?
Once the icing is fully set, store them in an airtight container at room temperature for up to 3-4 days. If it’s humid or you want them to last longer, pop ’em in the fridge.
Why room temperature eggs?
Good question! Room temperature eggs emulsify better with the butter and sugar, creating a smoother, more uniform batter. This leads to a better texture in your final cookie. Cold eggs can seize up the butter mixture!
What if I don’t have brown sugar?
You *can* use all granulated sugar, but your cookies might be less chewy and slightly crisper. Brown sugar adds moisture and that signature caramel-y flavor that we all love in a chocolate chip cookie!
Final Thoughts
There you have it, folks! Your new go-to recipe for chocolate chip cookies that are just a little bit extra, in the best possible way. This recipe isn’t just about baking; it’s about making something awesome with your own two hands and then shamelessly enjoying every single bite.
So, now go impress someone—or yourself—with your new culinary skills. You’ve earned it! Seriously, pour yourself a glass of milk and pat yourself on the back. You’re a rockstar.

