Picture this: You’re scrolling through Instagram, being tortured by those perfect little dessert towers, and thinking, “Who has time for that?” Plot twist – you do! These Carrot Cake Mini Stacks are the perfect balance between “I’m a fancy pastry chef” and “I have a life outside my kitchen.” Plus, cream cheese frosting. Need I say more?
Why This Recipe is Awesome
Let’s be real – regular carrot cake is delicious but lacks that certain “I’m adulting successfully” vibe. These mini stacks, though? They’re like the cooler, more photogenic cousin who somehow makes everything look effortless. They’re perfect for portion control (or, you know, for eating four and calling it “sampling”).
The best part? These little towers of joy are basically fool-proof. Even if they lean like the Tower of Pisa, they’ll still taste amazing. And unlike traditional layer cakes that require engineering degrees to assemble, these minis are surprisingly forgiving. Messed one up? Just eat the evidence. No one will know.
Ingredients You’ll Need
For the cake layers:
- 1½ cups all-purpose flour (the regular stuff, nothing fancy)
- 1 cup granulated sugar (because adulting is hard enough without measuring multiple sugars)
- 1 teaspoon baking soda (the unsung hero of height)
- 1 teaspoon ground cinnamon (more if you’re a spice fiend)
- ½ teaspoon salt (to make the sweet things sweeter, science!)
- 2 large eggs (room temperature, because cold eggs are the party poopers of baking)
- ¾ cup vegetable oil (makes it moist – sorry if you hate that word)
- 1½ cups finely grated carrots (approximately 3 medium carrots or 2 large ones having a good day)
- ½ cup crushed pineapple, drained (the secret weapon your grandmother probably used)
- ½ cup chopped walnuts or pecans (optional for the texture-lovers)
For the cream cheese frosting:
- 8 oz cream cheese, softened (the real deal, not that “whipped” nonsense)
- 4 tablespoons unsalted butter, softened (patience is key here, folks)
- 2 cups powdered sugar (aka the white dust that will somehow end up on every surface)
- 1 teaspoon vanilla extract (the good stuff, if possible)
- Pinch of salt (trust me on this one)
Step-by-Step Instructions
Prep Work (or “Setting Yourself Up for Success”):
- Preheat your oven to 350°F (175°C). This isn’t optional – don’t be that person.
- Line a 9×13 inch baking pan with parchment paper, leaving some overhang for easy removal. Your future self will thank you.
- Grate your carrots using the fine side of your grater. Yes, your arm will get tired. Consider it your workout for the day.
Making the Cake:
- In a large bowl, whisk together flour, sugar, baking soda, cinnamon, and salt. This is your dry dream team.
- In another bowl, beat eggs and oil until they’re looking friendly with each other. Add your grated carrots and drained pineapple, stirring until combined.
- Pour wet ingredients into dry ingredients and mix just until combined. Don’t overmix unless you’re going for a rubber tire texture.
- Fold in nuts if using. If not, proceed with zero guilt.
- Pour batter into your prepared pan and spread it evenly. Give the pan a couple of taps on the counter to release air bubbles (and pent-up frustrations).
- Bake for 20-25 minutes or until a toothpick comes out clean. If it comes out with batter, keep baking. If it comes out with moist crumbs, you’re golden.
Frosting Time:
- While the cake cools (completely!), beat cream cheese and butter together until smooth and fluffy.
- Add powdered sugar gradually unless you want to recreate a winter wonderland in your kitchen.
- Mix in vanilla and salt. Taste test (it’s mandatory, I don’t make the rules).
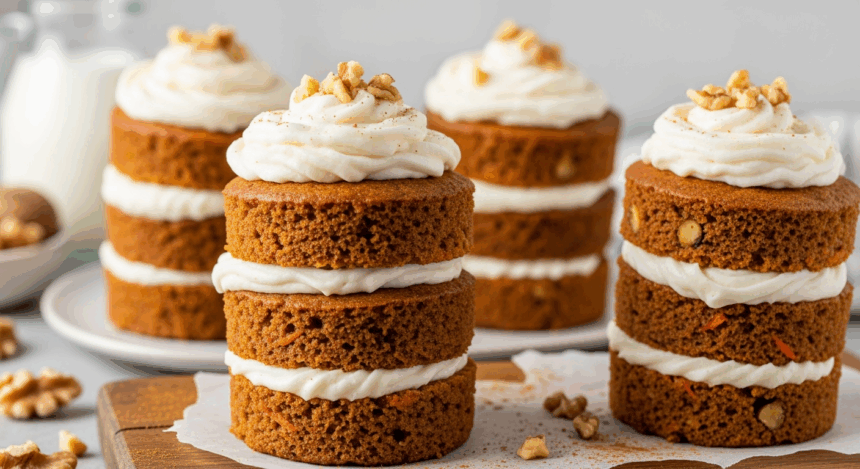
Assembly (where the magic happens):
- Once cooled, lift the cake out using the parchment paper. Feel accomplished.
- Using a 2-inch round cookie cutter (or a drinking glass), cut out circles from the cake. You should get about 12-15 depending on how precisely you cut.
- Slice each circle horizontally into 2-3 thin layers. Steady hands, friend.
- Place your first layer on a plate, add a dollop of frosting, top with another cake layer, repeat until you have adorable 3-layer mini stacks.
- Top each stack with a final swirl of frosting. Get fancy if you’re feeling it – pipe it through a plastic bag with the corner snipped off if you don’t own piping bags because who does?
Common Mistakes to Avoid
The “I’m Too Impatient” Errors:
- Frosting warm cake layers. Unless you’re going for the “melted snowman” aesthetic, wait until they’re completely cool.
- Cutting layers before the cake has cooled. This is how you get carrot crumbs, not carrot cake.
- Using cold cream cheese. Unless you enjoy arm-breaking workouts or lumpy frosting, let that cream cheese soften properly.
The “This Seems Fine” Mistakes:
- Not draining the pineapple. Soggy cake is nobody’s friend.
- Eyeballing measurements. Baking is basically edible science – respect the process.
- Trying to stack more than 3 layers unless you have architectural training. The Leaning Tower of Carrot Cake is not what we’re going for.
Alternatives & Substitutions
Not everyone’s pantry is ready for carrot cake greatness at all times. Here are some swaps that won’t result in disaster:
Make it healthier (sort of): Swap half the all-purpose flour for whole wheat. It’ll be slightly denser but you can pretend it’s “rustic” and feel better about having seconds.
No pineapple? Use applesauce instead. Different flavor profile but still moist (sorry again). About ½ cup will do the trick.
Nut allergies? Skip them entirely or substitute with toasted sunflower seeds for that crunch factor.
Hate measuring? Just kidding, you still have to measure. This isn’t soup.
IMO, the one thing you absolutely cannot substitute is the cream cheese in the frosting. That’s literally the point of carrot cake – to be a vehicle for cream cheese frosting. Everything else is negotiable.
FAQ (Frequently Asked Questions)
Can I make these ahead of time?
Absolutely! The cake layers can be made a day ahead, and the assembled stacks will hold up in the fridge for about 2 days. Just let them come to room temperature before serving or the frosting will be too firm.
What if I don’t have a round cookie cutter?
Any glass with a thin rim works great. Wine glasses, mason jars, or even a clean empty can with both ends removed. MacGyver would be proud.
Can I freeze these?
You can freeze the unfrosted cake layers for up to 3 months, but I wouldn’t recommend freezing the assembled stacks. The frosting gets weird and nobody needs that disappointment in their life.
Why does my cream cheese frosting seem runny?
Did you use cream cheese from a tub instead of a block? That’s culprit #1. Tub cream cheese has more water. Also, if your ingredients were too warm or you overbeat the mixture, it’ll get soupy. Pop it in the fridge for 30 minutes to firm up.
Can I add raisins?
Technically yes, but should you? That’s between you and your conscience. If you proceed with raisins, please warn your guests. Some people have strong feelings about surprise raisins.
Final Thoughts
Look at you with your fancy little carrot cake towers! Whether they’re perfectly stacked or charmingly rustic (code for slightly messy), you’ve created something both impressive and delicious. The beauty of these mini stacks is that they’re impressive enough for company but perfectly acceptable to make just because it’s Tuesday and you deserve nice things.
So go ahead, take that Instagram-worthy photo – you’ve earned those likes. And remember, if anyone asks for your secret technique, just smile mysteriously and say it’s an old family recipe. Bakers have been getting away with that line for centuries.

