Okay, fellow snack enthusiast, let’s get real. Your sweet tooth is probably screaming, and the idea of a complicated baking project makes you want to crawl under a blanket, right? Same. But what if I told you there’s a cookie recipe so ridiculously good, so deceptively simple, it’ll make you feel like a culinary wizard without, you know, doing any actual magic? Enter Kiley’s legendary Brown Butter Chocolate Chip Cookies. Trust me, your taste buds are about to throw a party.
Why This Recipe is Awesome
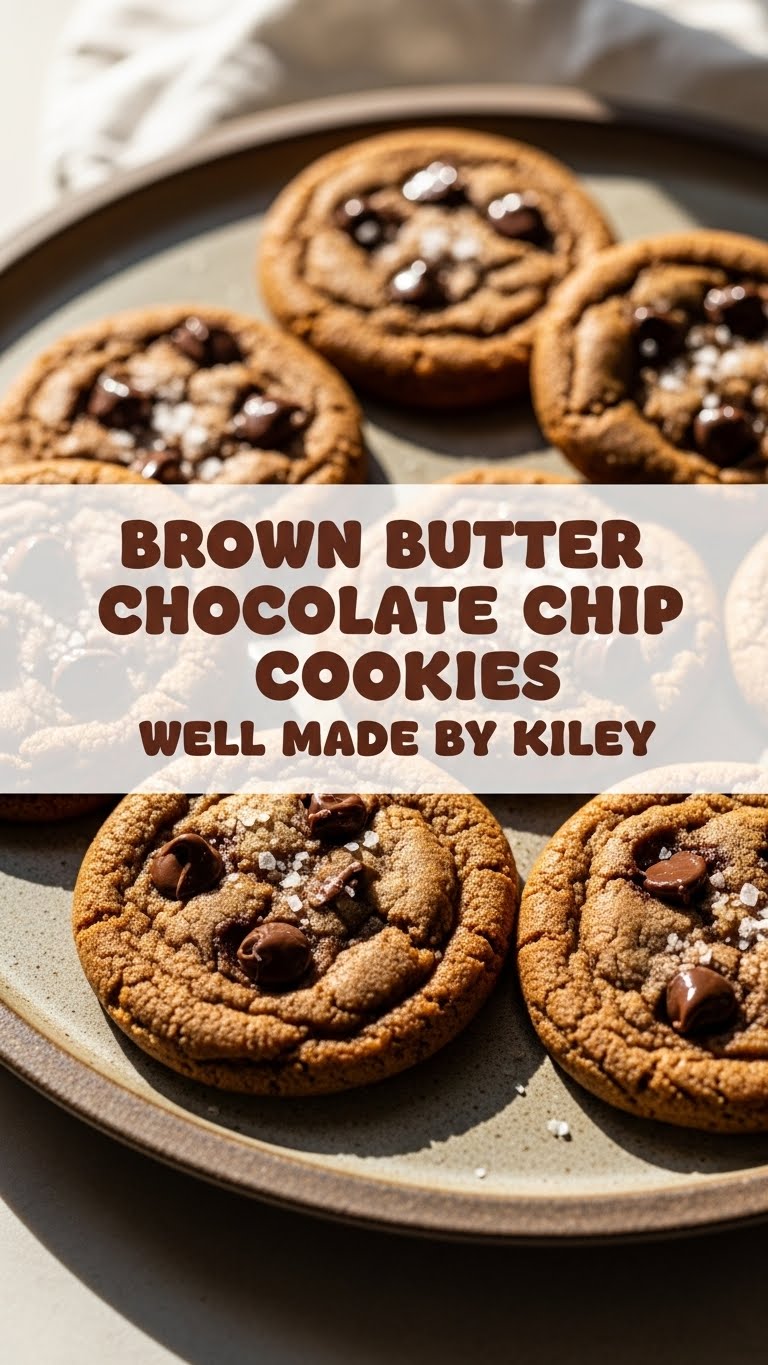
First off, it’s brown butter. If you haven’t experienced the nutty, toasty, caramel-like embrace of brown butter, prepare for a life-altering moment. It takes your average chocolate chip cookie from “meh” to “OMG, I need another one!” This isn’t just a cookie; it’s an experience. Plus, this particular recipe, perfected by the brilliant Kiley, is so **idiot-proof**, even *I* didn’t mess it up. And that’s saying something, folks. It’s got that perfect chew, crispy edges, and gooey center that dreams are made of. You’ll be high-fiving yourself, I promise.
Ingredients You’ll Need
Gather ’round your kitchen kingdom, noble bakers! Here’s your arsenal for cookie domination:
- **Unsalted Butter** (1 cup / 2 sticks): Our star player. Don’t cheap out here.
- **Granulated Sugar** (1/2 cup): The classic sweet stuff.
- **Light Brown Sugar, packed** (1 and 1/4 cups): For that deep, molasses-y goodness and chewiness.
- **Large Eggs** (2, plus 1 yolk): The binders, the glue, the reason it all holds together.
- **Vanilla Extract** (2 teaspoons): Don’t skip this! It’s like a warm hug for your senses.
- **All-Purpose Flour** (2 and 1/4 cups): The backbone of our cookie empire.
- **Baking Soda** (1 teaspoon): Our little leavening friend.
- **Salt** (1 teaspoon): Crucial for balancing the sweetness and making everything pop!
- **Chocolate Chips or Chunks** (1 and 1/2 cups): Use a good quality mix of your favorites—milk, semi-sweet, dark. Or all three, you rebel.
Step-by-Step Instructions
Alright, apron on, game face ready! Let’s make some magic happen.
- **Brown that Butter, Baby!** Take your 1 cup of unsalted butter and melt it in a light-colored saucepan over medium heat. Keep stirring! It’ll foam, then the milk solids at the bottom will turn golden brown and smell nutty. This takes about 5-8 minutes. Once it’s golden brown and fragrant, remove it from the heat immediately and pour it into a heatproof bowl to stop it from burning. Let it cool for about 10-15 minutes. **Don’t skip cooling it!**
- **Cream the Sugars.** In a large bowl, combine the cooled brown butter with your granulated sugar and brown sugar. Beat them together with an electric mixer (or a really strong arm) until they’re light and fluffy, about 2-3 minutes.
- **Add the Eggs and Vanilla.** Beat in the two whole eggs, then the extra egg yolk, one at a time, mixing well after each addition. Stir in the vanilla extract. Scrape down the sides of the bowl to make sure everything is incorporated.
- **Whisk the Dry Stuff.** In a separate medium bowl, whisk together your flour, baking soda, and salt. Make sure it’s all nicely combined.
- **Combine Wet and Dry.** Gradually add the dry ingredients to the wet ingredients, mixing on low speed until *just* combined. **Do not overmix!** Overmixing develops gluten, making tough cookies. And nobody wants a tough cookie.
- **Stir in the Chips.** Fold in your chocolate chips or chunks with a spatula. Don’t be shy; load ’em up!
- **Chill Out.** Cover the dough and refrigerate it for at least 30 minutes, or up to 24 hours. **FYI: Chilling is crucial** for flavor development and preventing your cookies from spreading into flat puddles. Trust the process!
- **Preheat and Prep.** When you’re ready to bake, preheat your oven to 375°F (190°C). Line a baking sheet with parchment paper or a silicone mat.
- **Scoop and Bake.** Scoop tablespoon-sized balls of dough onto your prepared baking sheet, leaving about 2 inches between them. Bake for 9-12 minutes, or until the edges are golden brown and the centers are still slightly soft.
- **Cool (If You Can Wait).** Let the cookies cool on the baking sheet for a few minutes before transferring them to a wire rack to cool completely. Or, you know, eat them warm because life is short.
Common Mistakes to Avoid
We’ve all been there, making rookie errors. Here’s how not to:
- **Burning the Brown Butter:** This is the most common pitfall! Keep an eye on it, stir constantly, and pour it out of the hot pan immediately once it’s fragrant and golden. Black specks mean it’s burnt, and you’ll need to start over. It’s sad, but true.
- **Not Chilling the Dough:** Thinking you’re too busy or important for this step? Bad move! Chilling is essential for flavor and texture. Skip it, and you’ll have flat, greasy cookies. Don’t say I didn’t warn you.
- **Overmixing the Dough:** Once the flour goes in, mix only until just combined. Overmixing makes for dry, tough cookies. Let’s keep ’em tender!
- **Overbaking:** Pull those cookies out when the edges are set and golden, but the centers still look a *little* undone. They’ll continue to bake on the hot sheet. This is the secret to soft, chewy centers!
- **Using Cold Eggs/Butter (for creaming):** While brown butter cools, make sure your eggs are at room temperature. It helps them emulsify better with the sugars, leading to a smoother, more uniform dough.
Alternatives & Substitutions
Feeling adventurous? Or just out of something? No worries, we can tweak this masterpiece!
- **Chocolate Choices:** Mix it up! Try dark chocolate chunks for a more intense flavor, milk chocolate for extra sweetness, or even white chocolate chips for a different vibe. My personal preference? A mix of semi-sweet and a good quality dark chocolate. **IMO**, it’s perfection.
- **Add-ins:** Want more texture? Throw in a handful of chopped walnuts, pecans, or even a sprinkle of toffee bits with your chocolate chips. Just don’t go too crazy, we want cookies, not a trail mix bar.
- **Salted Butter:** If you only have salted butter, reduce the added salt in the recipe to 1/2 teaspoon. Easy peasy!
- **Flour Power:** While I recommend all-purpose flour for this, you *can* experiment with a 1:1 gluten-free baking flour if you’re feeling brave. Just be aware that texture might vary a bit.
FAQ (Frequently Asked Questions)
Got questions? I’ve got (casual and witty) answers!
- **Do I *really* need to chill the dough?** Yes. A thousand times, yes! It’s not a suggestion; it’s a commandment. It helps the flavors meld, the flour hydrate, and prevents your cookies from spreading into sad, flat discs.
- **Can I use regular melted butter instead of browning it?** Well, technically yes, but why would you want to miss out on all that nutty, toasty, caramel goodness? It’s the “brown butter” cookie for a reason!
- **How long do these cookies stay fresh?** Freshly baked, they’re best within 2-3 days. But honestly, they rarely last more than an hour in my house. Just sayin’. Store them in an airtight container at room temp.
- **What if my brown butter burnt? Do I have to start over?** Unfortunately, yes. Burnt butter has a bitter, acrid taste that will ruin your cookies. It’s a bummer, but better to restart than have sad cookies.
- **Can I freeze the cookie dough?** Absolutely! Scoop the dough balls, freeze them on a baking sheet until solid, then transfer to a freezer-safe bag. Bake from frozen, adding a minute or two to the baking time. Future you will thank past you!
- **What’s the best way to get perfectly round cookies?** After baking, if they’re a little lopsided, you can gently reshape them using a large round cookie cutter or the rim of a glass. Just swirl it around the cookie while it’s still warm on the baking sheet. Chef’s secret!
Final Thoughts
So there you have it, folks. Kiley’s Brown Butter Chocolate Chip Cookies. They’re not just a recipe; they’re a declaration of deliciousness. Go forth, conquer that sweet craving, and bask in the glory of your perfectly baked masterpieces. You’ve earned it! Now go impress someone—or yourself—with your new culinary skills. Happy baking!


