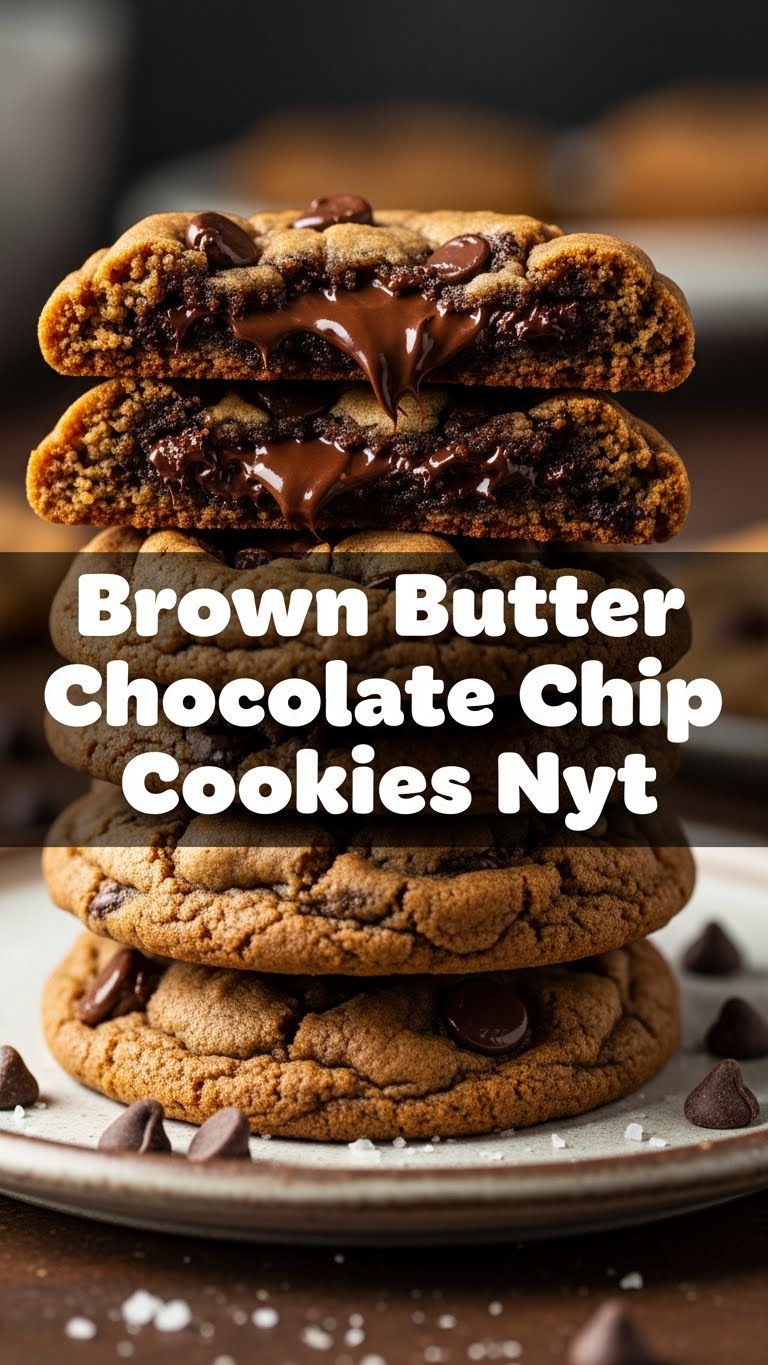
So, You’re Ready to Make Magic (aka Cookies), Huh?
Okay, real talk. We all have those days where the universe just *demands* something warm, gooey, and chocolate-laden. And if that demand comes with a side of “but make it *fancy* without making me work too hard,” then you, my friend, are in the right place. We’re diving headfirst into the legendary Brown Butter Chocolate Chip Cookies, the kind that got rave reviews from the New York Times, but we’re doing it our way: with zero stress and maximum deliciousness. Think of me as your hype person for the next glorious hour. Let’s get baking!
Why This Recipe is Awesome
Alright, so why *these* cookies? Because they’re basically a culinary mic drop. First off, brown butter. It’s like butter went on vacation, came back tan, and with a whole new personality—nutty, rich, and utterly irresistible. This isn’t just a chocolate chip cookie; it’s a chocolate chip cookie that went to finishing school.
Secondly, it’s surprisingly idiot-proof. Seriously, if I can nail it without setting off the smoke alarm (mostly), you totally got this. It’s got that perfect chew, crispy edges, and gooey center combo that makes you close your eyes and do a little happy dance. Plus, bragging rights. “Oh, these? Just some brown butter NYT-style cookies I whipped up.” Casual.
Ingredients You’ll Need
Get ready to assemble your dream team. No obscure ingredients, just good stuff!
- Unsalted Butter: A whole stick (or two, depending on your commitment). This is our superstar; it’s about to get a glow-up.
- Granulated Sugar: For that classic sweetness.
- Light Brown Sugar: Packed, baby! This is key for chewiness and that deep caramel flavor.
- Eggs: Two large ones, ideally at room temp. Don’t be a stranger, let them warm up a bit.
- Vanilla Extract: The good stuff, please. A teaspoon or two makes all the difference.
- All-Purpose Flour: The sturdy backbone of our cookie. Some recipes call for a mix of bread and cake flour, but we’re keeping it simple and awesome with just good old AP.
- Baking Soda: Just a little lift.
- Salt: A good pinch, to balance all that sweetness. Don’t skip it! It really makes the chocolate sing.
- Chocolate Chips: Or chopped chocolate bars (my personal fave!). A mix of semi-sweet and dark is pure heaven.
- Flaky Sea Salt (Optional, but highly recommended): For sprinkling on top. It’s a game-changer, trust me.
Step-by-Step Instructions
Time to get down to business! Follow these easy steps, and you’ll be swimming in cookies soon.
- Brown that Butter: Grab a light-colored saucepan so you can actually *see* the magic happen. Melt your butter over medium heat. Swirl it often! It’ll foam, then get bubbly, then those little milk solids at the bottom will start turning golden brown and smell nutty. Once it’s the color of a hazelnut, immediately pour it into a heatproof bowl. Let it cool for about 10-15 minutes. This is crucial; don’t rush it!
- Sugar & Butter Time: Once the brown butter has cooled slightly (it should still be warm but not scorching), add both your granulated and brown sugars to the bowl. Whisk them together really well until smooth and creamy.
- Egg-cellent Addition: Beat in the eggs, one at a time, until fully incorporated. Then add the vanilla extract and mix until everything is light and fluffy. This usually takes a couple of minutes.
- Dry Mix: In a separate bowl, whisk together your flour, baking soda, and salt.
- Combine Forces: Gradually add the dry ingredients to the wet ingredients, mixing on low speed (or by hand) until *just* combined. Do not overmix! Overmixing leads to tough cookies, and nobody wants that.
- Chocolate Shower: Fold in those glorious chocolate chips until evenly distributed.
- The Chill Zone: Cover the dough and chill it in the fridge for at least 30 minutes. If you can wait an hour or even overnight, you’ll be rewarded with deeper flavors and better texture. Seriously, don’t skip this. It’s where the magic truly develops.
- Preheat & Scoop: When you’re ready to bake, preheat your oven to 375°F (190°C). Line a baking sheet with parchment paper. Scoop about 2-tablespoon sized balls of dough onto the prepared sheet, leaving some space between them. If you’re feeling fancy, sprinkle with flaky sea salt now.
- Bake Away: Bake for 10-12 minutes, or until the edges are golden brown and the centers still look slightly soft. Remember, they continue to cook a bit on the hot sheet.
- Cool Down: Let the cookies cool on the baking sheet for about 5 minutes before transferring them to a wire rack to cool completely (if you can wait that long, you’re a stronger person than I am). Enjoy!
Common Mistakes to Avoid
We’ve all been there. Here are a few pitfalls to dodge for cookie perfection:
- Burning the Brown Butter: It’s a fine line between nutty and charred. Keep an eye on it! If it smells acrid, like burnt popcorn, start over. Your taste buds will thank you.
- Skipping the Chill Time: Rookie mistake! Chilling lets the flavors meld and prevents your cookies from spreading into flat puddles of disappointment.
- Overmixing the Dough: Once the flour is incorporated, stop. Seriously. Overmixing develops gluten, making your cookies tough instead of tender.
- Ignoring Oven Temperature: Thinking you don’t need to preheat? Nuh-uh. A properly preheated oven ensures even baking and perfect texture.
- Using Cold Eggs: Room temperature eggs emulsify better with the butter and sugar, leading to a smoother, more uniform dough. Plan ahead!
Alternatives & Substitutions
Feeling adventurous? Here are some ways to shake things up:
- Chocolate Choices: Can’t decide? Use a mix! Milk chocolate for sweetness, dark for intensity, or even white chocolate for a creamy twist. Chopped chocolate bars melt better and create those gorgeous puddles.
- Nutty Add-ins: Toast some chopped pecans or walnuts and fold them into the dough for extra crunch and flavor.
- Spiced Up: A pinch of cinnamon or a tiny dash of nutmeg can add a cozy warmth, especially in colder months.
- Flour Power: While I suggested all-purpose for simplicity, the original NYT recipe famously uses a mix of bread flour (for chewiness) and cake flour (for tenderness). If you’re feeling fancy, try 1 ¼ cups bread flour and 1 ¼ cups cake flour instead of 2 ½ cups AP.
FAQ (Frequently Asked Questions)
Got questions? I’ve got (casual) answers!
- Can I skip chilling the dough? Well, technically yes, but why hurt your soul (and your cookies’ potential)? Chilling is key for flavor development and preventing spread. Give it at least 30 minutes, you won’t regret it.
- What if I don’t have unsalted butter? You can use salted butter, but then reduce the added salt in the recipe by about half a teaspoon. Just be aware the flavor might be slightly different.
- Can I use margarine instead of butter? Oh honey, no. Just no. This recipe is all about the glorious, nutty brown butter. Margarine won’t give you that. Treat yourself!
- My brown butter looks too dark, is it burnt? If it smells acrid or like burnt popcorn, it probably is. It should smell nutty and toasty, not like a campfire gone wrong. When in doubt, start fresh.
- How do I store these amazing cookies? In an airtight container at room temperature for up to 3-4 days. But let’s be real, they rarely last that long.
- Can I freeze the cookie dough? Absolutely! Scoop balls of dough onto a baking sheet, freeze until solid, then transfer to a freezer-safe bag. Bake from frozen, adding a couple of minutes to the baking time. Meal prep for your sweet tooth!
- Why are my cookies spreading too much? Could be several reasons: dough wasn’t chilled enough, butter was too warm when mixed, or your oven temperature is off. Make sure you measure everything accurately!
Final Thoughts
Phew! You made it. You’ve now officially leveled up your baking game and are moments away from devouring some seriously epic brown butter chocolate chip cookies. Whether you’re sharing them (if you’re feeling generous) or hoarding them all to yourself (no judgment here), know that you’ve created something truly special.
Now go impress someone—or yourself—with your new culinary skills. You’ve earned it! And maybe make an extra batch, just in case. You know, for science. Happy baking!
