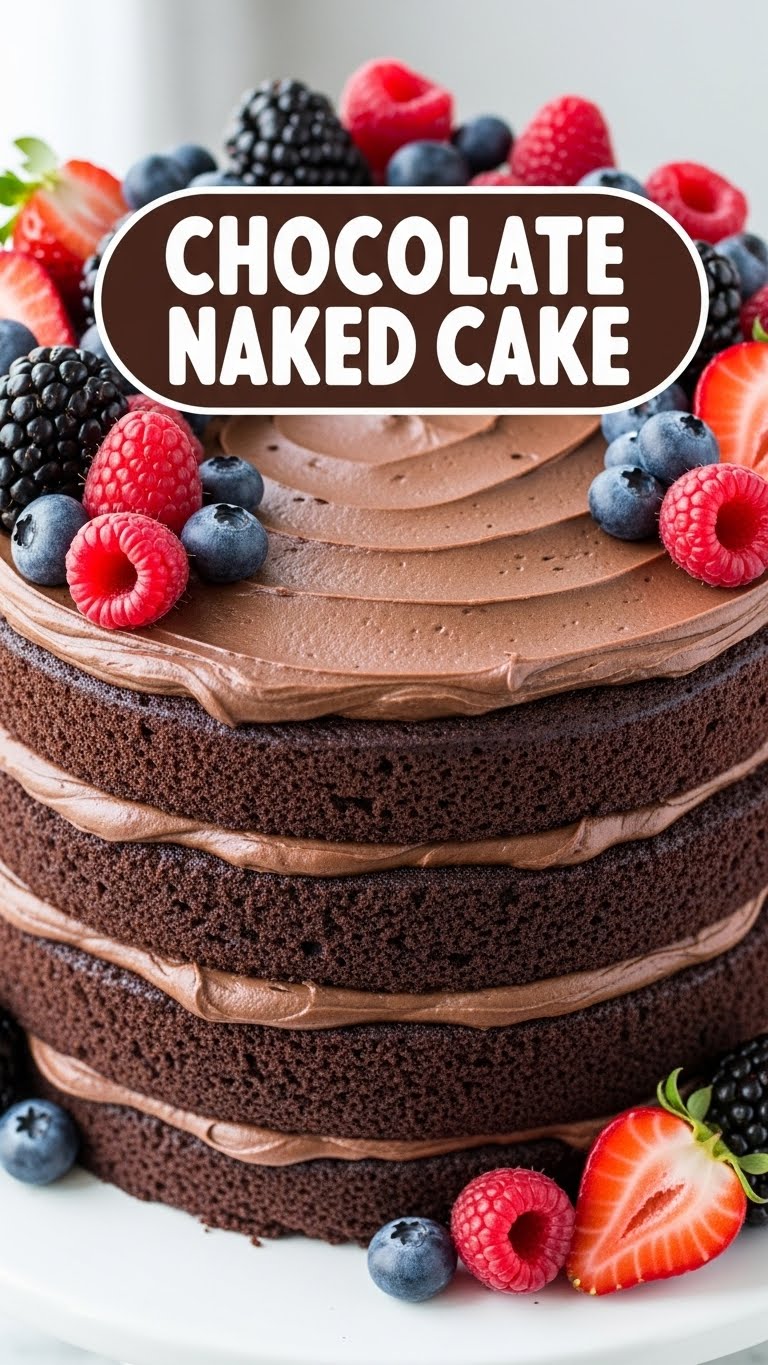
So, you’re craving something utterly divine, ridiculously chocolatey, but also too lazy to spend a weekend perfecting your frosting game, huh? Same, friend, same. That’s why we’re diving headfirst into the glorious world of the Chocolate Naked Cake. It’s chic, it’s understated, and it whispers “I put effort into this!” even when you absolutely didn’t. Prepare for chocolate bliss without the buttercream battle!
Why This Recipe is Awesome
Let’s be real, most of us want to bake something impressive without actually *being* impressive bakers. And this, my friend, is your secret weapon. This Chocolate Naked Cake recipe is so forgiving, it practically apologizes to *you* if something goes slightly awry. It’s **idiot-proof** – and trust me, if I, a person who once set off the smoke alarm by toasting bread, can nail it, you absolutely can too. It skips the whole “smooth frosting perfection” stress entirely, celebrating the rustic, exposed layers. Plus, it’s a chocolate explosion in every bite, which is, IMO, the only acceptable kind of explosion.
Ingredients You’ll Need
Gather your troops! Here’s what you’ll need for this chocolatey adventure:
- All-Purpose Flour: 2 cups. The backbone of our cakey dreams.
- Granulated Sugar: 2 cups. Because adulting is hard, and sugar helps.
- Unsweetened Cocoa Powder: ¾ cup. Go dark, go rich. The darker your cocoa, the deeper your chocolate soul will be.
- Baking Soda: 2 teaspoons. Our magic puff-up fairy dust.
- Baking Powder: 1 teaspoon. More lift, more fun!
- Salt: 1 teaspoon. Don’t skip this; it wakes up all the flavors.
- Large Eggs: 2. The binders of our delicious destiny.
- Milk: 1 cup (whole milk, please – don’t go skimpy on flavor now).
- Vegetable Oil (or melted coconut oil/butter): ½ cup. For that incredible moistness.
- Vanilla Extract: 2 teaspoons. Don’t skimp here; it makes a huge difference.
- Hot Water (or hot coffee for extra depth): 1 cup. Your secret weapon for intense chocolate flavor. Seriously, try the coffee.
- For the Simple Chocolate Ganache/Frosting (because naked doesn’t mean *fully* bare):
- Heavy Cream: 1 cup. For that silky smooth pour.
- Chocolate Chips (dark or semi-sweet): 1 ½ cups. The star, obviously.
Step-by-Step Instructions
Alright, apron on, good vibes only! Let’s get baking.
- Prep Your Stage: Preheat your oven to 350°F (175°C). Seriously, **don’t skip preheating!** Grease and flour two 8-inch round cake pans. Or, even better, line the bottoms with parchment paper and then grease/flour the sides. Future you will thank you when those cakes slide out beautifully.
- Dry Mix Magic: In a large bowl, whisk together your flour, sugar, cocoa powder, baking soda, baking powder, and salt. Make sure there are no lumpy bits. We want smooth sailing, not a lumpy sea.
- Wet Mix Wonder: In another bowl, gently whisk your eggs, milk, vegetable oil, and vanilla extract. Don’t overdo it, just get them combined.
- Combine Forces: Pour the wet ingredients into the dry ingredients. Mix on low speed with an electric mixer (or by hand with a spatula) until *just* combined. **Do not overmix!** Overmixing leads to tough cakes, and nobody wants a tough cake.
- The Secret Weapon (Hot Liquid): Carefully pour the hot water (or coffee!) into the batter. It’ll look really liquidy and you might panic. Don’t. Whisk gently until just combined. This liquid gold makes the cake super moist and intensifies the chocolate.
- Bake It Up: Divide the batter evenly between your two prepared cake pans. Pop them into the preheated oven and bake for 30-35 minutes, or until a wooden skewer inserted into the center comes out clean.
- Cool Down: Let the cakes cool in their pans for about 10-15 minutes on a wire rack. Then, carefully invert them onto the wire rack to cool completely. **This is crucial!** Frosting a warm cake is a recipe for disaster (and melty chocolate puddles).
- Ganache Glam Up: While the cakes are cooling, let’s make that super simple ganache. Heat the heavy cream in a small saucepan over medium heat until it just begins to simmer. Remove from heat and pour it over your chocolate chips in a heatproof bowl. Let it sit for 5 minutes, then whisk until smooth and glossy. If it’s too thick, add a tiny splash more hot cream.
- Naked Assembly: Once your cakes are completely cool, place one layer on your serving plate or stand. Spoon some ganache on top and spread it gently, letting it drip artfully down the sides. Place the second cake layer on top, and repeat with more ganache. You’re aiming for that beautiful, messy, “I woke up like this” look. Garnish with a few chocolate shavings or fresh berries if you’re feeling fancy.
Common Mistakes to Avoid
Listen up, buttercup, we’ve all been there. Here are a few pitfalls to dodge:
- Not Preheating the Oven: Rookie mistake! Your cake needs that immediate, consistent heat to rise properly. Don’t put it in a cold oven. Ever.
- Overmixing the Batter: We already talked about this, but it bears repeating. Overmixing develops the gluten too much, leading to a dense, chewy cake instead of a light, fluffy one. Mix until *just* combined.
- Greasing Failures: Skimping on the grease and flour (or parchment paper) means your beautiful cakes will stick and break. A sad, sad sight.
- Opening the Oven Door Too Soon: Patience, young padawan! Opening the door before the cake is set can make it sink. Resist the urge to peek until at least 25 minutes have passed.
- Frosting a Warm Cake: This isn’t a “mistake,” it’s a cardinal sin. Your ganache will melt, slide off, and you’ll end up with a chocolate soup situation. Chill. Literally.
Alternatives & Substitutions
Feeling creative? Or maybe you’re missing an ingredient? No stress, we can totally adapt!
- Milk Swap: Out of regular milk? Buttermilk adds a lovely tang and extra moisture. Or, for a dairy-free option, almond milk or oat milk works great.
- Oil vs. Butter: Vegetable oil gives a super moist cake. If you prefer the richer flavor of butter, melt ½ cup unsalted butter and use that instead. It might change the texture slightly, but it’ll still be delicious.
- Coffee Haters: If you’re not into the idea of coffee in your chocolate cake (even though you can’t taste it, just get richer chocolate!), simply use hot water. No biggie.
- Frosting Frenzy: Don’t want ganache? You could do a simple chocolate buttercream, a cream cheese frosting, or even just dust with powdered sugar for an even “naked-er” look. Got some fresh berries? Pile ’em on top for color and freshness.
- Add-ins: Fold in a cup of chocolate chips, a handful of chopped nuts, or even some shredded coconut into the batter for extra texture and flavor.
FAQ (Frequently Asked Questions)
- Can I use margarine instead of butter/oil? Well, technically yes, but why hurt your soul like that? Stick to butter or a good quality oil for the best flavor and texture. Margarine just doesn’t hit the same.
- How long does this cake last? In *your* house? Probably not long, if you’re anything like me! But genuinely, it’ll stay fresh at room temperature for 2-3 days, or in the fridge for up to a week. Just cover it loosely.
- Can I make the cake layers ahead of time? Absolutely! Bake the cakes, let them cool completely, wrap them tightly in plastic wrap (and then foil for extra protection), and freeze them for up to a month. Thaw at room temp before frosting. Future you will thank you!
- Why is it called ‘naked’? Is it, like, offensive to other cakes? Haha, nope! It’s called ‘naked’ because it shows off its beautiful layers with minimal frosting, unlike its fully-dressed counterparts. It’s proud of its curves!
- My cake came out dry, help! What did I do wrong? Most likely, you overbaked it. Ovens can vary, so keep a close eye on it after the 25-minute mark. Next time, pull it out as soon as that skewer comes clean. Also, double-check your liquid measurements; too little, and you’ll get a crumbly cake.
- Can I use a different size pan? Sure, but you’ll need to adjust the baking time. For example, three 6-inch pans will bake faster, while a 9×13 inch rectangular pan will take longer. Just keep an eye on that skewer test!
Final Thoughts
There you have it! Your new go-to chocolate cake recipe that makes you look like a baking guru without all the fuss. This Chocolate Naked Cake is perfect for birthdays, casual get-togethers, or, let’s be real, a Tuesday night when you just need some chocolate therapy. Now go impress someone—or yourself—with your new culinary skills. You’ve earned it!

