So you’re craving something tasty but too lazy to spend forever in the kitchen, huh? Same. We’ve all been there, staring into the abyss of our fridge, wishing a magical dessert would just *appear*. Well, guess what? Today, we’re making that magic happen, but like, the fun, low-stress, super cute kind of magic. Say hello to your new best friend: the Chocolate Bento Cake!
Why This Recipe is Awesome
Okay, let’s be real. Bento cakes are basically the cuter, less intimidating younger sibling of those massive, show-stopping layer cakes. They’re tiny, adorable, and perfect for when you want something special without committing to a full-on bakery marathon. This particular chocolate bento cake design recipe? It’s **idiot-proof**, I swear. Even I, a self-proclaimed culinary chaos agent, managed not to mess it up. Plus, it’s chocolate – need I say more? It’s a guaranteed mood booster, perfect for a cozy night in, a mini celebration, or just because you deserve something small, sweet, and perfectly designed. Think instant gratification, but make it gourmet-ish.
Ingredients You’ll Need
Don’t worry, we’re not asking you to source rare spices from the Amazon. This list is pretty basic, because we’re all about making life easier, not harder.
- For the Mini Chocolate Cake: (or just grab a store-bought cupcake and level it, no judgment!)
- 1/2 cup all-purpose flour (the basic stuff)
- 1/4 cup unsweetened cocoa powder (the darker, the better for that rich chocolate vibe)
- 1/2 cup granulated sugar (sweetness is key, my friend)
- 1/2 tsp baking soda (our little leavening hero)
- 1/4 tsp salt (just a pinch to make everything pop)
- 1/4 cup milk (any kind works, seriously)
- 2 tbsp vegetable oil (or any neutral oil you have lying around)
- 1/2 tsp vanilla extract (liquid gold for bakers)
- 1/4 cup hot water or freshly brewed hot coffee (coffee makes chocolate sing!)
- For the Silky Chocolate Buttercream:
- 1/2 cup unsalted butter, softened (**room temp, not melted! Super important for smooth frosting**)
- 1.5 cups powdered sugar (sifted, if you’re feeling fancy and hate lumps)
- 1/4 cup unsweetened cocoa powder (more chocolate, hooray!)
- 1-2 tbsp milk or heavy cream (to get that perfect consistency)
- 1/2 tsp vanilla extract (because vanilla and chocolate are soulmates)
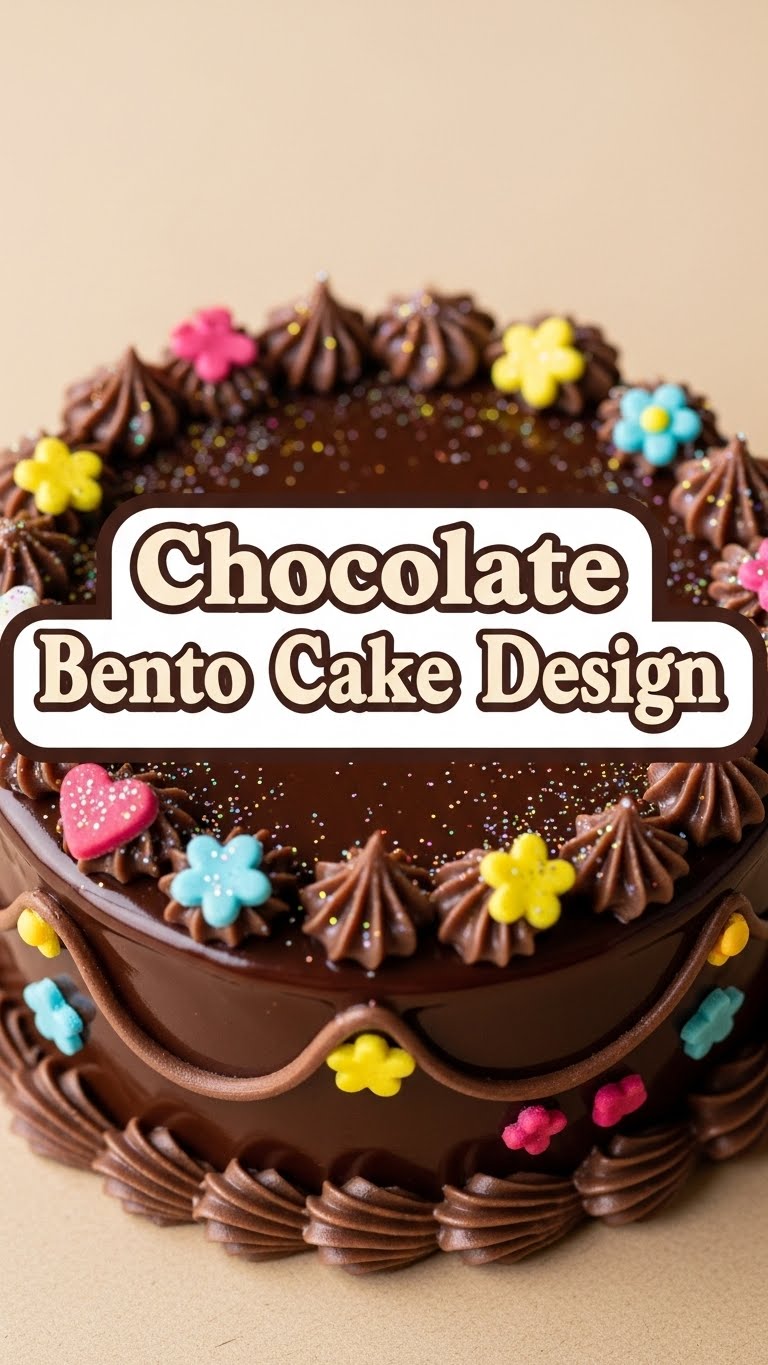
- For the Fun Design Elements:
- Chocolate melts or candy melts (various colors if you’re feeling extra)
- Sprinkles (your favorite kind, go wild!)
- Edible glitter (for that extra sparkle)
- Writing gel or melted chocolate in a piping bag with a tiny tip (for cute messages or details)
Step-by-Step Instructions
Alright, apron on, game face ready! Let’s get this tiny cake party started.
- Cake Time (if baking): Preheat your oven to 350°F (175°C). Grease and flour a 4-inch round cake pan or line a few cupcake liners. In a bowl, whisk together the flour, cocoa powder, sugar, baking soda, and salt. Add the milk, oil, and vanilla, mixing until just combined. Stir in the hot water or coffee until the batter is smooth. Pour into your prepared pan/liners.
- Bake It Off: Bake for 20-25 minutes, or until a toothpick inserted into the center comes out clean. Let it cool in the pan for 10 minutes, then transfer to a wire rack to cool completely. **Patience, young grasshopper! A warm cake + frosting = sad, melty mess.**
- Buttercream Bliss: While your cake cools, make the buttercream. In a medium bowl, beat the softened butter with an electric mixer until light and fluffy (about 2-3 minutes). Gradually add the sifted powdered sugar and cocoa powder, beating on low speed until combined, then increase to medium-high and beat until smooth. Add milk/cream one tablespoon at a time until you reach your desired creamy, spreadable consistency. Stir in vanilla.
- Level Up: Once your cake is completely cool, use a serrated knife to level the top if it domed. If you baked cupcakes, just level the top flat. If you’re using two small cake layers, stack them now with a thin layer of frosting in between.
- Crumb Coat Magic: Apply a thin, even layer of frosting all over your cake. This is your “crumb coat” and its job is to trap all those pesky crumbs. Pop it in the fridge for about 15-20 minutes to firm up. **Don’t skip this; it’s the secret to a neat finish!**
- Final Frosting & Smooth Moves: Once the crumb coat is chilled, apply a thicker, even layer of buttercream all over your cake. Use an offset spatula or a small palette knife to smooth the sides and top. Aim for a relatively flat surface for your design.
- Let the Design Begin! This is where the “bento design” truly shines. Get creative!
- Simple Swirls: Use a small star tip to pipe cute swirls or rosettes around the edges.
- Chocolate Drip: Melt some chocolate melts according to package directions. Drizzle it artfully around the top edge, letting it drip down the sides.
- Mini Messages: Use writing gel or a tiny piping bag with melted chocolate to write “Happy Day,” “Treat Yourself,” or a funny inside joke on top.
- Sprinkle Party: Scatter your favorite sprinkles on top or around the base.
- Chocolate Shavings/Curls: If you’re feeling fancy, make some chocolate curls with a vegetable peeler from a chocolate bar and place them artfully.
- Chill Out: Once decorated, pop your bento cake back in the fridge for another 15-20 minutes to set the frosting and decorations. This makes it easier to handle and ensures your masterpiece stays put!
Common Mistakes to Avoid
We all make mistakes, but let’s try to avoid the common pitfalls that turn a cute bento cake into… well, a bento *disaster*. Just kidding, mostly.
- Baking While Hot: Thinking you don’t need to preheat the oven. Rookie mistake. Your cake will be sad and dense.
- Overmixing the Batter: Once you add the wet to the dry, mix *just* until combined. Overmixing develops gluten and gives you a tough cake. Nobody wants a tough cake.
- Not Sifting Powdered Sugar/Cocoa: If you skip this for the buttercream, prepare for lumpy frosting. It’s not the end of the world, but it’s a texture thing.
- Frosting a Warm Cake: I’m reiterating this because it’s that important. Warm cake + frosting = landslide. Let it cool, for goodness sake!
- Skipping the Crumb Coat: This isn’t just an extra step to annoy you. It’s crucial for a clean, professional-looking finish. Embrace the crumb coat!
- Rushing the Decoration: Take your time! This is the fun part. A steady hand and a deep breath will go a long way.
Alternatives & Substitutions
No particular ingredient? No problem! This isn’t rocket science, it’s cake, so feel free to improvise a little. (Within reason, don’t swap flour for sawdust, okay?)
- Cake Base: Don’t feel like baking from scratch? **Grab a pre-made mini cake or even a couple of plain cupcakes** from the grocery store. Level ’em, stack ’em, and you’re good to go. Or, if you’re not a chocolate fiend (gasp!), use a vanilla cake base instead.
- Frosting Flavors: Not feeling chocolate buttercream? Try a simple vanilla buttercream, cream cheese frosting (divine!), or even a peanut butter frosting. The world is your oyster!
- Milk Alternatives: Any plant-based milk (almond, soy, oat) works perfectly fine in the cake and frosting.
- Oil Alternatives: Melted coconut oil or even unsalted melted butter can be used instead of vegetable oil in the cake recipe.
- Decoration Swaps: No fancy sprinkles? Use chocolate chips, chopped nuts, mini marshmallows, or even fresh berries for a pop of color. For piping, if you don’t have a piping bag, a Ziploc bag with a tiny corner snipped off works in a pinch!
FAQ (Frequently Asked Questions)
Because you probably have questions, and I probably have slightly sarcastic answers.
- Can I use margarine instead of butter? Well, technically yes, but why hurt your soul like that? Butter just tastes better, IMO. But if that’s all you have, it’ll work, just know your frosting might be a tad softer.
- How long does a bento cake last? In the fridge, tightly covered, usually 3-4 days. But let’s be honest, will it *really* last that long? Probably not, you’ll eat it.
- Can I make it ahead of time? Absolutely! Bake the cake layers up to 2 days in advance and store them wrapped tightly at room temp (or freeze for longer). Make the buttercream a day ahead and store it in the fridge; re-whip before using. Assemble and decorate closer to serving for the freshest look.
- My frosting is too runny/stiff, help! If it’s too runny, add a bit more sifted powdered sugar. If it’s too stiff, add a tiny splash more milk/cream, a teaspoon at a time, until it loosens up. **It’s like Goldilocks and the three bears, but for frosting.**
- What if I don’t have a tiny cake pan? No worries! You can bake the batter in a standard muffin tin (fill 2-3 liners), then just level off the tops and stack them to create your mini cake. Or, you know, just make one big cupcake and decorate *that*.
- Can I use different colors for the frosting? OMG, yes! Divide your buttercream and use gel food coloring to dye it any shade your heart desires. Just remember, a little gel goes a long way.
Final Thoughts
And there you have it, folks! Your very own, incredibly cute, and ridiculously delicious Chocolate Bento Cake. See? That wasn’t so scary, was it? You’ve just leveled up your baking game without even breaking a sweat (or at least, not *much* sweat). Now go impress someone—or yourself—with your new culinary skills. You’ve earned it! Seriously, take a pic, show it off, then devour it. You’re a baking rockstar, and don’t let anyone tell you otherwise. Now, go forth and bake (or just decorate a store-bought cake, whatever, I won’t tell!).


