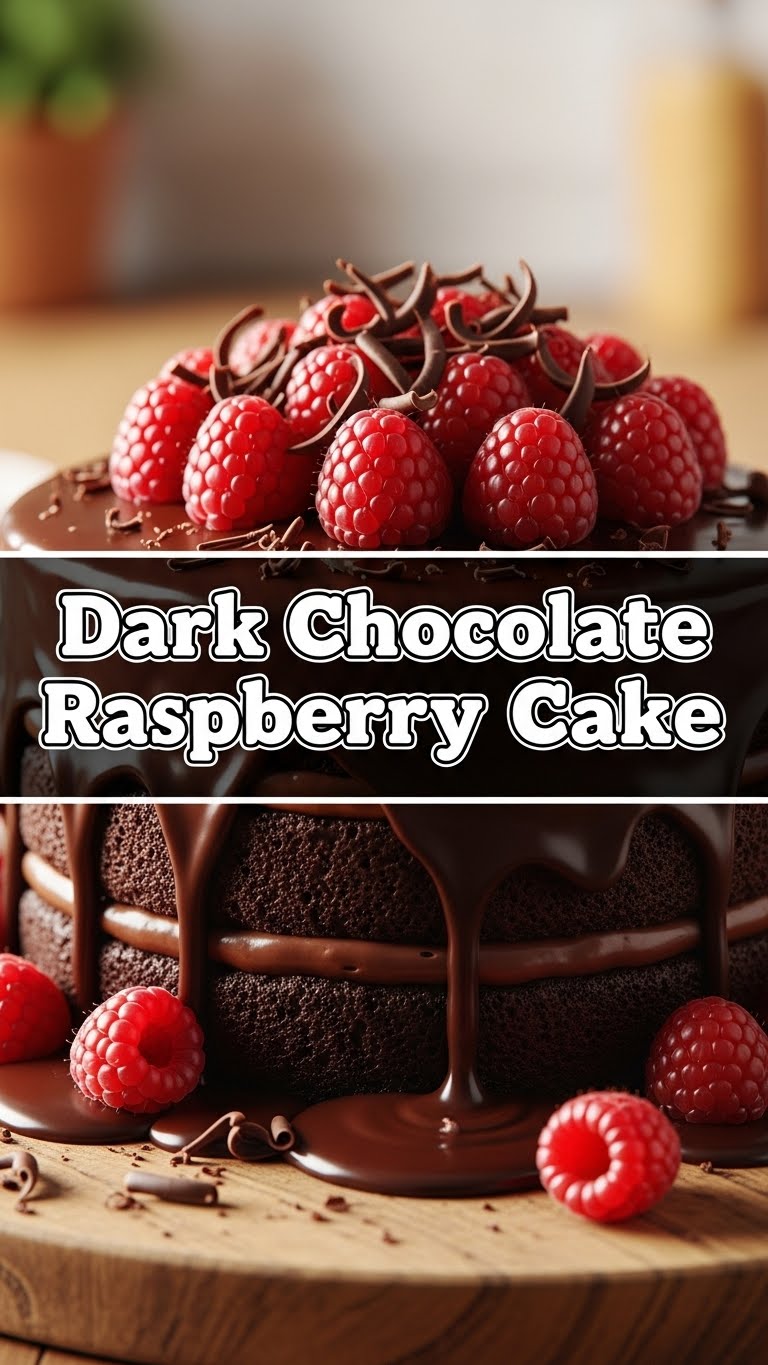
So you’re feeling a little fancy, but your energy levels are currently screaming “Netflix and chill” rather than “Iron Chef,” right? Same, friend, same. We all crave something decadent that tastes like you spent a weekend perfecting it, when in reality, it’s surprisingly chill. Enter: The Dark Chocolate Raspberry Cake. This isn’t just a cake; it’s a mood. A deep, dark, fruity, slightly-too-good-for-words kind of mood.
Why This Recipe is Awesome
Listen, I’m not gonna lie, this cake is practically magic. It tastes like you poured your heart and soul into it (which, let’s be real, you’re about to do for the next hour, but a chill hour, promise!), but it’s actually **surprisingly simple**. We’re talking rich, fudgy dark chocolate cake, perfectly complemented by the bright, tart pop of raspberries. It’s like the sophisticated older sibling of your usual chocolate cake, but without all the drama. Plus, it’s pretty much idiot-proof. Seriously, even I didn’t mess it up, and my track record with anything more complex than toast is… spotty, to say the least.
Ingredients You’ll Need
Gather your troops! Here’s what you’ll need to assemble this masterpiece. No exotic herbs or ancient spices, just good old-fashioned deliciousness.
- For the Cake:
- 2 cups (250g) All-Purpose Flour: The usual suspect.
- 1 ¾ cups (350g) Granulated Sugar: Sweetness personified.
- ¾ cup (75g) Unsweetened Dark Cocoa Powder: Go dark or go home.
- 1 ½ tsp Baking Soda: For the lift-off!
- 1 tsp Salt: Don’t skip this, trust me. It makes everything better.
- 2 large Eggs: Binders extraordinaire.
- 1 cup (240ml) Milk: Buttermilk is awesome for extra tang, but regular works too if you’re not feeling adventurous.
- ½ cup (120ml) Vegetable Oil: Moisture master!
- 2 tsp Vanilla Extract: The soul of all baking, IMHO.
- 1 cup (240ml) Hot Water or Hot Coffee: **Secret weapon alert!** This activates the cocoa and makes the cake super fudgy.
- 1 cup (170g) Dark Chocolate Chips or Chopped Dark Chocolate: The main event, obviously.
- 1 cup (125g) Fresh Raspberries: Our tart hero.
- For the Raspberry Buttercream Frosting:
- 1 cup (226g) Unsalted Butter: Softened, because no one likes rock-hard butter.
- 4 cups (480g) Powdered Sugar: The fluffy white stuff.
- ¼ cup (60ml) Milk or Cream: For creaminess.
- 1 tsp Vanilla Extract: More soul!
- ½ cup (60g) Fresh Raspberries: Mashed or puréed, for that lovely pink hue and flavor.
- Extra Fresh Raspberries for Garnish: Because it’s pretty!
Step-by-Step Instructions
Alright, apron on, good tunes playing, let’s do this! Don’t overthink it, just follow along.
- Get Prepped: Preheat your oven to 350°F (175°C). Grease and flour two 8-inch round cake pans. Or line with parchment. Whatever makes your life easier.
- Dry Goods Unite: In a large bowl, whisk together the flour, sugar, cocoa powder, baking soda, and salt. Give it a good whisk to make sure there are no lumpy surprises.
- Wet Wonders: In a separate medium bowl, whisk together the eggs, milk, vegetable oil, and vanilla extract until well combined.
- Mix it Up: Pour the wet ingredients into the dry ingredients. Mix on low speed with an electric mixer (or by hand with a whisk) until just combined. **Don’t overmix!** A few lumps are totally okay.
- The Hot Stuff: Carefully pour in the hot water or hot coffee. Stir until the batter is smooth. It will be thin – **don’t panic!** This is exactly how it should be.
- Fold in the Goodies: Gently fold in the chocolate chips and about ¾ cup of the fresh raspberries. We’re saving some for the top, remember?
- Bake Time: Divide the batter evenly between your prepared cake pans. Bake for 30-35 minutes, or until a wooden skewer inserted into the center comes out with moist crumbs, not wet batter.
- Cool Down: Let the cakes cool in their pans for about 10-15 minutes. Then, carefully invert them onto a wire rack to cool completely. **Patience is a virtue here!**
- Whip Up the Frosting: While the cakes are chilling (literally!), beat the softened butter in a large bowl with an electric mixer until light and fluffy. Gradually add the powdered sugar, alternating with the milk/cream, until smooth. Stir in the vanilla extract and the mashed/puréed raspberries. Beat until light and fluffy.
- Assemble Your Masterpiece: Once the cakes are completely cool (this is crucial, trust me), place one layer on your serving plate. Spread about a third of the frosting on top. Place the second cake layer on top, and frost the top and sides of the entire cake.
- Garnish & Glorify: Decorate with the remaining fresh raspberries. Snap a pic for the ‘gram, then dig in!
Common Mistakes to Avoid
We’ve all been there, making rookie errors. Let’s learn from past mistakes so your cake can be glorious!
- Overmixing the Batter: Seriously, once the flour disappears, stop. We’re making cake, not bread. Overmixing develops gluten, leading to a tough, dense cake. We want light and fluffy, people!
- Skipping the Hot Liquid: Thinking that hot water/coffee step is optional? Nah, that’s what gives this dark chocolate cake its **super fudgy, moist texture**. Don’t skip it, my friend.
- Opening the Oven Door Too Early: Patience, padawan. Let that cake rise and set. Peeking too soon is a recipe for a sunken center and a sad baker.
- Not Cooling Completely Before Frosting: Trying to frost a warm cake is like trying to ice skate uphill. It’s gonna melt, it’s gonna slide, and it’s gonna make you cry. **Cool completely before frosting!** No exceptions.
Alternatives & Substitutions
Life happens, ingredients run out, or maybe you just feel like being a rebel. Here are some simple swaps:
- No Buttermilk? No Problem! Add 1 tablespoon of lemon juice or white vinegar to regular milk, stir, and let it sit for 5 minutes. Voila! Instant buttermilk.
- Oil vs. Butter: You can absolutely use melted butter instead of vegetable oil for a richer flavor. However, the oil is key to that super moist, tender crumb, so choose wisely!
- Raspberry Variations: Frozen raspberries work in a pinch for the cake (don’t thaw them, just toss them in!), or try blackberries or chopped cherries for a different fruity twist. Just be mindful they might release more moisture. For the frosting, fresh is best for color and flavor, but a good quality raspberry jam (warmed and sieved) can work for flavor if you’re really stuck.
- No Coffee? No Fuss! Decaf coffee or just plain hot water works perfectly fine in the cake batter if you’re caffeine-sensitive or just not a coffee fan.
- Dark Chocolate Level: Want it sweeter? Use semi-sweet chocolate chips. Want it even darker? Go for a higher percentage cacao bar, chopped finely. It’s your cake, friend!
FAQ (Frequently Asked Questions)
Got questions? I’ve got (casual) answers!
- Can I make this as cupcakes? Absolutely! Reduce the baking time to about 18-22 minutes. Keep an eye on them – cupcakes cook faster than a full cake.
- My cake sank in the middle, what happened? Oh, the dreaded crater! This usually points to overmixing, opening the oven door too early, or your baking soda isn’t fresh. **Always check those expiration dates!**
- How long does this cake last? If it lasts more than 2-3 days in your house, you have stronger willpower than me. Store it covered at room temperature for 2-3 days, or in the fridge for up to 5 days.
- Can I freeze this cake? Yep! Wrap unfrosted cake layers tightly in plastic wrap and then foil. They’ll keep in the freezer for up to 2 months. Thaw overnight in the fridge before frosting.
- Do I have to use fresh raspberries for garnish? Nah, get creative! A dusting of cocoa powder, some elegant chocolate shavings, or even a few extra chocolate chips work just as well. It’s your cake, friend!
Final Thoughts
So there you have it, folks! Your new go-to recipe for when you want to feel like a fancy baker but keep things chill. This Dark Chocolate Raspberry Cake isn’t just a dessert; it’s a statement. A statement that says, “I can bake, and I’m awesome, and also, I’m gonna eat this entire slice myself, don’t even think about it.” Now go forth and conquer that kitchen! **You’ve got this.** And seriously, send me a picture when you’re done!


