So, you’ve scrolled past one too many gorgeous chocolate cakes on Instagram, huh? And now you’re thinking, “I could totally make that… if I wasn’t so intimidated by anything beyond instant ramen.” Girl, I *feel* you. We’ve all been there, drooling over a photo-perfect cake, then retreating to the safety of our Netflix binge. But what if I told you that achieving that drool-worthy chocolate cake aesthetic isn’t some mythical quest reserved for professional bakers? What if I told you we could make it happen, without pulling an all-nighter or having a meltdown in the kitchen? Get ready, buttercup, because your chocolate cake glow-up starts now!
Why This Recipe is Awesome
This isn’t just any chocolate cake. This is *the* chocolate cake. The one that looks like it came from a fancy bakery but tastes like pure, unadulterated comfort. And guess what? **It’s so ridiculously easy**, even your cat could probably supervise the process without causing a major disaster. We’re talking maximum impact, minimal effort, and zero tears (unless they’re tears of joy, of course).
You’ll look like a culinary genius, effortlessly whipping up something stunning, and no one needs to know you didn’t even break a sweat. It’s our little secret. Plus, it’s ridiculously moist, incredibly chocolatey, and seriously hard to mess up. What more could you ask for?
Ingredients You’ll Need
Grab your apron, because it’s time to gather your chocolate-y arsenal:
- All-Purpose Flour: 2 cups. Because we’re not baking scientists here.
- Granulated Sugar: 2 cups. For that sweet, sweet bliss.
- Unsweetened Cocoa Powder: ¾ cup. Dark stuff – no sissy cocoa here. This is for a *chocolate* cake, after all.
- Baking Soda: 2 teaspoons.
- Baking Powder: 1 teaspoon. The dynamic duo that makes things rise. Don’t skimp, unless you want a flat sad pancake.
- Salt: 1 teaspoon. Just a pinch, because balance, darling.
- Large Eggs: 2. Ideally at room temp. They just mix better, trust me.
- Whole Milk: 1 cup. Any kind you like, though whole milk makes it extra lush.
- Vegetable Oil: ½ cup. Or canola. For ultimate moistness. Butter is great, but oil makes it *super* moist. Plus, less creaming involved, amirite?
- Vanilla Extract: 2 teaspoons. The secret handshake of good baking. Don’t skip!
- Hot Coffee (or Hot Water): 1 cup. Hot coffee makes the chocolate flavor sing. If you’re not a coffee person, hot water works too, but consider the coffee, seriously.
For the Frosting/Ganache (to achieve that aesthetic!):
- Your favorite chocolate buttercream ingredients OR good quality dark chocolate (8 oz) and heavy cream (1 cup) for a simple ganache.
- Sprinkles, chocolate shavings, fresh berries – whatever makes your heart sing for decoration.
Step-by-Step Instructions
- Prep the battlefield: Preheat your oven to 350°F (175°C). Grease and flour two 8-inch round cake pans. Or line with parchment paper. Whatever makes you feel most professional.
- Dry stuff first: In a large bowl, whisk together the flour, sugar, cocoa powder, baking soda, baking powder, and salt. Make sure there are no lumpy bits, unless you’re into that texture.
- Wet stuff next: In a separate bowl, whisk together the eggs, milk, vegetable oil, and vanilla extract. Get it nice and combined.
- Combine the armies: Gradually add the wet ingredients to the dry ingredients, mixing on low speed until *just* combined. **Don’t overmix!** Lumps are okay. Overmixing means tough cake, and nobody wants that.
- The secret weapon: Carefully stir in the hot water (or coffee). The batter will be thin, and that’s exactly what we want. It’s magic, trust the process.
- Bake it up! Divide the batter evenly between your prepared cake pans. Bake for 30-35 minutes, or until a toothpick inserted into the center comes out clean. **Seriously, check it.**
- Cool down: Let the cakes cool in the pans for about 10-15 minutes before flipping them onto a wire rack to cool completely. Patience is a virtue here, my friend.
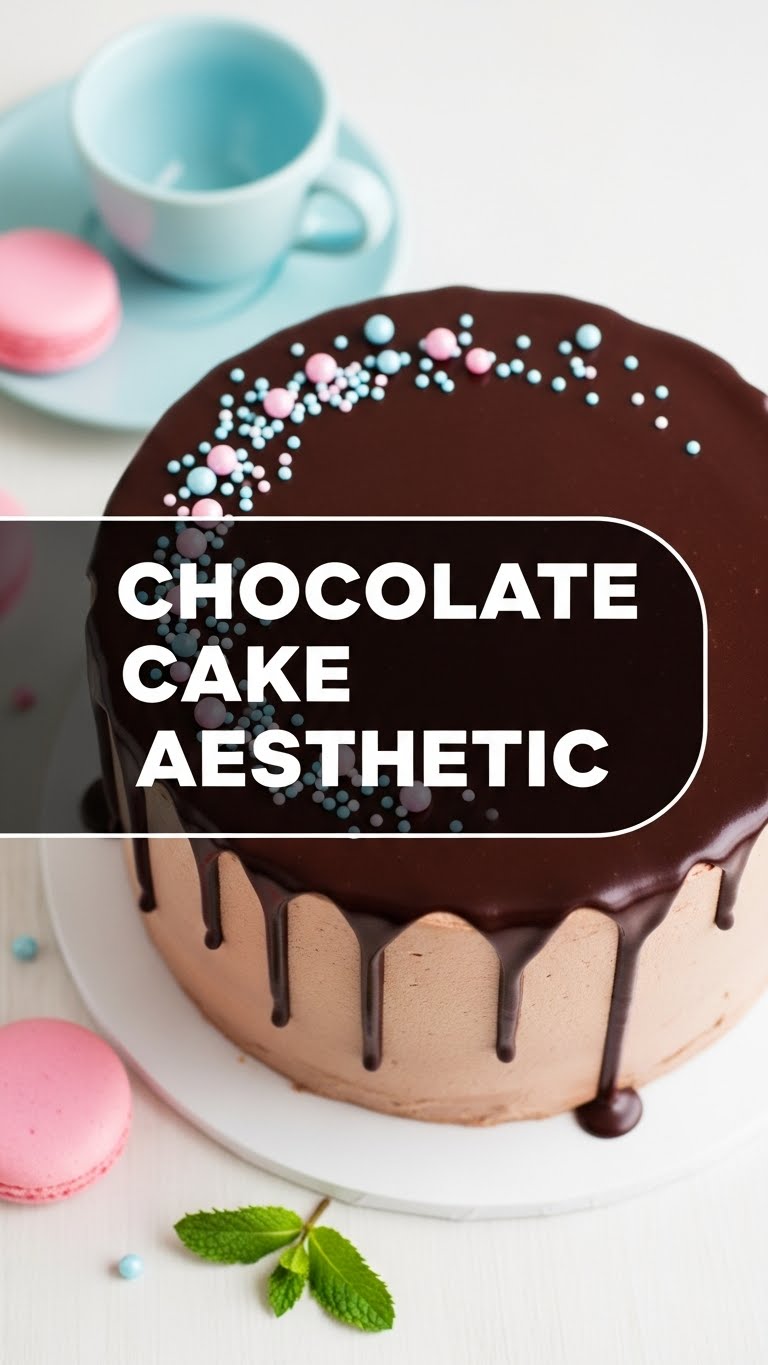
- Frosting fun (for the aesthetic!): While the cakes cool, whip up your favorite chocolate frosting or a simple ganache. For a trendy drip cake, make a slightly thinner ganache. For a rustic look, use a spatula to spread a thicker buttercream.
- Assemble & admire: Once cooled, level your cakes if needed (don’t worry, you’ll get good at this!). Spread frosting between layers, then all over the cake. Decorate as desired. Sprinkles? Chocolate shavings? A single elegant cherry? You do you, boo.
Common Mistakes to Avoid
We’ve all been there, staring at a baking fail. Learn from my oopsies:
- Overmixing the batter: Thinking you need to beat the life out of your batter until it’s super smooth. Nope! Overmixing develops gluten, leading to a tough, dry cake. Lumps are totally fine, even desirable. Embrace the lump!
- Not preheating the oven: Just slapping your cake in a cold oven and hoping for the best. Big no-no! A preheated oven ensures even baking and proper rise. **Always preheat!**
- Opening the oven door constantly: Poking your head in every five minutes “just to check.” Every time you open that door, the temperature drops, messing with your cake’s rise and texture. Be strong. Resist the urge until close to the end.
- Not cooling the cake completely: Trying to frost a warm cake. It’s like trying to put lipstick on a melting chocolate bar. It will slide, it will crumble, it will be a mess. **Let it cool. Completely.**
- Skipping the coffee: Thinking hot water is *just* as good as hot coffee. While it works, hot coffee truly elevates the chocolate flavor, making it deeper and richer. You won’t taste coffee, just *more chocolate*. Trust me on this one, it’s a game-changer.
Alternatives & Substitutions
Because sometimes you gotta work with what you got, right?
- Milk: No dairy? Almond, oat, or soy milk work perfectly here. Just make sure it’s unsweetened if you’re going plant-based.
- Oil: You *can* use melted butter, but oil really does make it ridiculously moist. Plus, less effort. Win-win IMO.
- Coffee: If you absolutely despise coffee or don’t have it, hot water is fine. But if you want that next-level chocolate depth, strongly brewed coffee is your best friend. Even decaf works!
- Frosting: Not feeling ganache? A simple chocolate buttercream is always a winner. Or even just a dusting of powdered sugar if you’re going for minimalist chic. Your cake, your rules!
- Gluten-Free: Swap the all-purpose flour for a good 1:1 gluten-free baking blend. Make sure it contains xanthan gum, or add a quarter teaspoon per cup of flour.
FAQ (Frequently Asked Questions)
- Can I make this as a bundt cake? Absolutely! Just make sure your bundt pan is *super* well greased and floured. You might need to adjust baking time – probably longer, around 45-60 minutes. Keep an eye on it!
- What if I don’t have two cake pans? No problem! Bake one layer at a time, or use a 9×13-inch pan for a sheet cake (adjust baking time down to 25-30 mins). It won’t be a layer cake, but it’ll still be delicious and aesthetic, in its own way.
- How do I get those perfect, flat cake layers? A little trick: use cake strips (you can buy them or DIY with wet foil/paper towels). They help the cakes bake more evenly. Or just embrace the dome and level it with a serrated knife once cooled. No shame in slicing off a bit for a chef’s treat!
- Can I freeze this cake? Heck yes! Baked unfrosted layers can be wrapped tightly in plastic wrap and foil and frozen for up to a month. Frosted cake can also be frozen, then thawed in the fridge. Perfect for planning ahead or just hoarding deliciousness.
- My cake looks dry. What went wrong? Hmm, usually this recipe is super moist. Did you overbake it? Or maybe overmix the batter? Remember, **a dry cake is often an overbaked cake.** Get to know your oven!
- What’s the secret to a shiny ganache? Using good quality chocolate and making sure your cream is hot enough to melt it thoroughly. Also, letting it cool a bit before pouring can help achieve that glossy drip effect without it being too runny.
Final Thoughts
See? I told you this wasn’t rocket science! You’ve just unlocked the cheat code to a stunning, delicious chocolate cake that’ll make everyone think you spent hours slaving away. Now go forth and conquer your kitchen, you magnificent baker, you! Seriously, share a pic and make me proud. You’ve earned those bragging rights (and that second slice!).


