So you’re craving something tasty but too lazy to spend forever in the kitchen, huh? Same. We’ve all been there: the sudden, undeniable urge for something sweet, something decadent, something that screams “I tried!” but actually took less effort than deciding what to binge-watch next. Well, my friend, have I got a treat for you that’s about to become your new favorite secret weapon: the No-Bake Chocolate Eclair Cake!
Why This Recipe is Awesome
Let’s be real, anything that involves “no-bake” and “chocolate eclair” in the same sentence is already winning. This isn’t just a dessert; it’s a declaration of independence from your oven. It’s so easy, it’s practically assembly required, like a delicious flat-pack furniture item, but without the existential dread of deciphering instructions. It’s **idiot-proof**, I swear, even *I* didn’t mess it up! Plus, it tastes like you slaved away for hours, which means maximum impressiveness for minimal effort. Win-win, baby!
Ingredients You’ll Need
Gather ’round, my fellow kitchen minimalists. Here’s your shopping list – nothing fancy, just pure deliciousness waiting to happen:
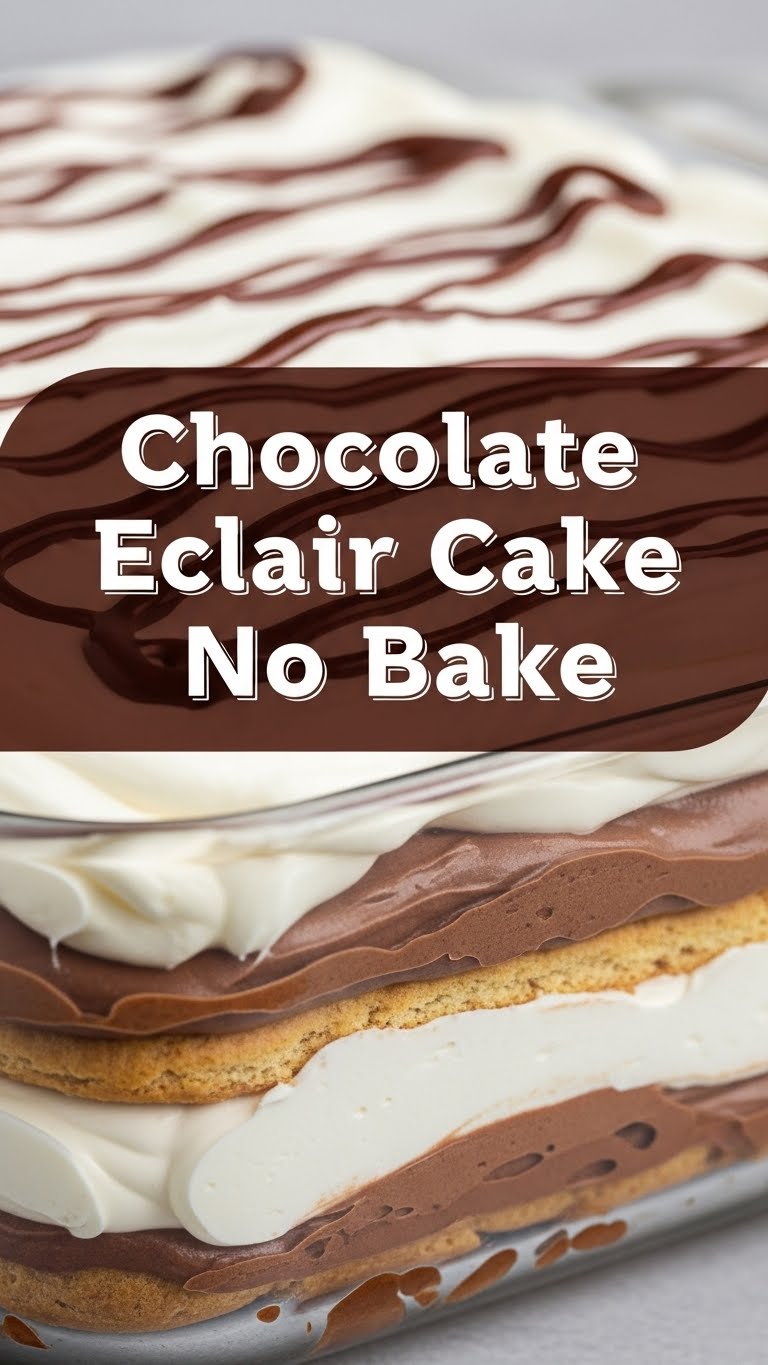
- **1 box (14.4 oz) Graham Crackers:** The unsung heroes, stepping in for actual pastry. Bless their hearts.
- **2 boxes (3.4 oz each) Instant Vanilla Pudding Mix:** The magic powder that makes all your creamy dreams come true. Don’t grab the cook-and-serve; we’re in a hurry here!
- **4 cups Cold Milk:** The pudding’s best friend. Make sure it’s cold, it helps with the setting.
- **1 block (8 oz) Cream Cheese, softened:** For that extra bit of luxurious tang and richness. Don’t skip this, your taste buds will thank you.
- **1 large tub (12 oz) Frozen Whipped Topping (like Cool Whip), thawed:** Because who has time to whip actual cream? Not us.
- **1 can (16 oz) Chocolate Frosting (the canned kind):** Our glorious shortcut to chocolatey perfection.
- **2 tablespoons Butter, softened:** To make that canned frosting spread like a dream (and taste even better).
Step-by-Step Instructions
Alright, apron on (or not, we’re casual here), let’s get this show on the road!
- First things first: Grab a 9×13-inch baking dish. Line the bottom with a single layer of graham crackers. Don’t worry if you have to break a few to fit; it’s all part of the charm (and no one will know once it’s covered).
- In a large bowl, whisk together the two boxes of instant vanilla pudding mix with the 4 cups of cold milk for about 2 minutes. You want it nice and thick, so let it sit for another minute or two to really set up.
- Next, add the softened cream cheese to the pudding mixture. Beat it with an electric mixer (or a strong arm and whisk) until it’s super smooth and there are no lumps. **No one likes lumpy pudding**, trust me.
- Gently fold in the thawed whipped topping. Do this carefully so you keep that light, airy texture. This mixture is your creamy filling – prepare to fall in love.
- Now, spoon half of that glorious pudding mixture evenly over your first layer of graham crackers in the dish. Spread it out with a spatula.
- Lay another layer of graham crackers on top of the pudding. Again, break ’em if you need to.
- Spread the remaining pudding mixture over this second layer of crackers. You’re almost there!
- Top with a final layer of graham crackers. This is the last cracker layer, folks.
- For the frosting: In a microwave-safe bowl, combine the canned chocolate frosting and the softened butter. Microwave for about 30-45 seconds, stirring halfway through, until it’s smooth and pourable. **Don’t overheat it**, or it’ll separate.
- Pour the warm chocolate frosting evenly over the top layer of graham crackers. Spread it gently with a spatula to cover everything.
- Cover the dish with plastic wrap and pop it in the fridge. **Chill for at least 4 hours**, but ideally overnight. This is crucial; it allows the graham crackers to soften and become cake-like.
- Slice, serve, and bask in the glory of your effortless culinary genius!
Common Mistakes to Avoid
Look, we all make mistakes. But with a little heads-up, you won’t make *these* ones:
- **Not Chilling Long Enough:** This is the #1 rookie mistake. You’re excited, I get it. But pulling it out too soon will result in a messy, soupy, crumbly disaster. **Patience, young padawan!** Those graham crackers need their beauty sleep to soften properly.
- **Using Cook-and-Serve Pudding:** A definite no-go. It won’t set up correctly with this method, and you’ll end up with a very sad, liquidy situation. Double-check that box, folks!
- **Overheating the Frosting:** While you want it pourable, you don’t want it boiling. Too hot, and the fats in the frosting and butter will separate, leaving you with a greasy, unappetizing mess. Warm it gently!
- **Not Softening the Cream Cheese:** Trying to mix cold, hard cream cheese into your pudding will give you a lumpy, unappealing texture. Take it out of the fridge a bit before you start, or zap it for 10-15 seconds in the microwave if you’re in a pinch.
Alternatives & Substitutions
Feeling a little adventurous, or just missing an ingredient? No stress, we can totally tweak this bad boy:
- **Pudding Power:** Not a vanilla fan? Try instant chocolate pudding for an extra cocoa kick, or even banana pudding if you’re feeling tropical.
- **Cracker Swaps:** Graham crackers are classic, but Nilla Wafers, shortbread cookies, or even digestive biscuits work wonderfully too. Just make sure they’re fairly thin and absorb liquid well.
- **Homemade Frosting:** If you’re feeling ambitious (and have more time than me), you can totally whip up a batch of homemade chocolate ganache or buttercream. Just remember it adds to the “bake-time” (aka effort-time).
- **Whipped Cream:** Prefer the real deal? Go for it! Just whip heavy cream with a little sugar and vanilla until stiff peaks form. It won’t be quite as stable as Cool Whip, but it’ll taste divine.
- **Add-ins:** Sprinkle some mini chocolate chips, toasted coconut, or even chopped nuts between layers for extra texture and flavor. YOLO!
FAQ (Frequently Asked Questions)
- **Can I use skim milk for the pudding?** Well, technically yes, but why hurt your soul like that? Whole milk will give you a much richer, creamier result. Go for the good stuff!
- **Does it *really* need to chill for 4 hours?** Yes! I cannot stress this enough. That chilling time is what transforms the humble graham cracker into a tender, cake-like layer. **IMO, overnight is best.**
- **Can I make this ahead of time?** Absolutely! In fact, it’s often even better the next day once all those flavors have had a chance to meld. Perfect for parties!
- **What if I don’t have a 9×13-inch dish?** You can use a slightly smaller or larger dish, but be aware that the layers might be thicker or thinner. Just adjust your cracker breaking accordingly!
- **Is it possible to make a smaller batch?** Sure! Halve all the ingredients and use an 8×8 or 9×9-inch pan. But really, why would you want less of this deliciousness?
- **My frosting is too thick after microwaving, help!** Try adding just a teaspoon of hot water or milk at a time, stirring well, until it reaches the right consistency.
Final Thoughts
See? That wasn’t so hard, was it? You just whipped up a dessert that looks fancy, tastes incredible, and required zero actual baking. You’re practically a culinary wizard! This No-Bake Chocolate Eclair Cake is perfect for potlucks, impressing guests, or simply satisfying that late-night sweet tooth with minimal fuss. Now go impress someone—or yourself—with your new culinary skills. You’ve earned it!


