So, you’re looking for something that screams “I tried really hard” but actually just whispers “I found an awesome recipe that’s surprisingly easy,” huh? And maybe, just maybe, you want chocolate? Like, *a lot* of chocolate? My friend, you’ve stumbled upon the Holy Grail of dessert-dom: the Chocolate Tuxedo Cake. It’s elegant, it’s decadent, and it’s basically a fancy outfit for your taste buds. Let’s get baking!
Why This Recipe is Awesome
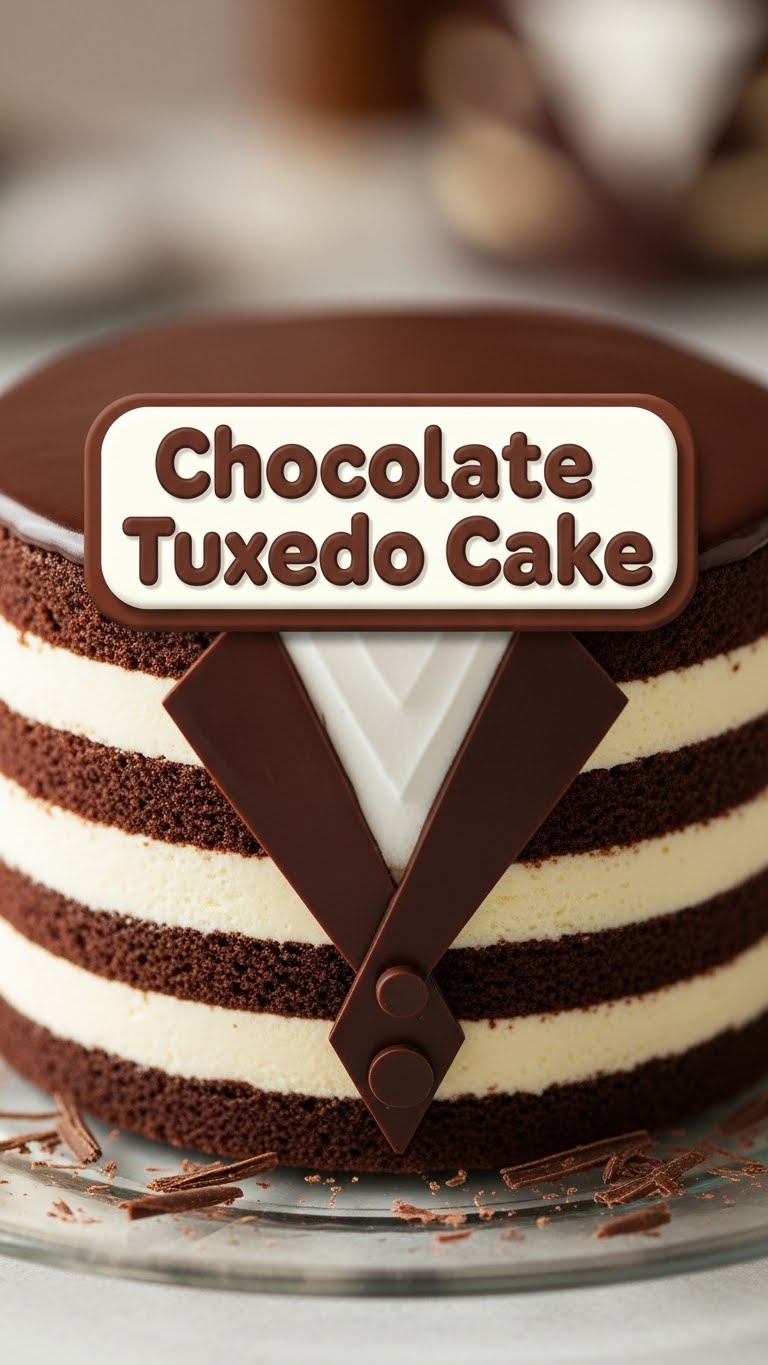
Honestly, this isn’t just another chocolate cake. This is *the* chocolate cake that will make people think you secretly trained at a French patisserie. But here’s the kicker: it’s embarrassingly simple to make. Seriously, if I can do it without setting off the smoke detector, anyone can. It’s got moist chocolate layers, a creamy white chocolate filling that’s practically a cloud, and a silky chocolate ganache on top. It’s a texture party, a flavor explosion, and basically, your new favorite way to show off without actually doing much heavy lifting. Plus, it just *looks* fancy. Instant culinary cred, **no actual chef skills required.**
Ingredients You’ll Need
Gather ’round, my sweet-toothed conspirators! Here’s what you’ll need to transform into a dessert hero:
- For the Chocolate Cake Layers:
- 2 cups all-purpose flour (the plain stuff, don’t get fancy yet)
- 2 cups granulated sugar (sweetness personified)
- ¾ cup unsweetened cocoa powder (the darker, the better for that deep chocolatey goodness)
- 2 teaspoons baking soda (our leavening MVP)
- 1 teaspoon baking powder (its trusty sidekick)
- 1 teaspoon salt (enhances all those sweet flavors, trust me)
- 1 cup buttermilk (for moisture and a tender crumb, it’s essential!)
- ½ cup vegetable oil (or any neutral oil, for extreme moistness)
- 2 large eggs (room temp is best, for better emulsion)
- 1 teaspoon vanilla extract (because vanilla and chocolate are soulmates)
- 1 cup boiling water (or hot coffee for an even deeper chocolate flavor—your call, rebel!)
- For the White Chocolate Cream Cheese Filling:
- 8 oz cream cheese, softened (full-fat, please! We’re not counting calories today)
- ½ cup unsalted butter, softened (the good stuff)
- 1 teaspoon vanilla extract (more vanilla, never hurts)
- 3-4 cups powdered sugar (confectioners’ sugar, for that silky smooth texture)
- 4 oz white chocolate, melted and slightly cooled (good quality makes a difference, FYI)
- For the Chocolate Ganache:
- 1 cup heavy cream (the thicker, the richer)
- 8 oz semi-sweet chocolate, finely chopped (chocolate chips work too, but chopped melts smoother)
- 1 tablespoon unsalted butter (for shine and extra richness)
Step-by-Step Instructions
Alright, apron up! Let’s make some magic happen.
- **Prep Your Pan-tastic Cake:** Preheat your oven to 350°F (175°C). Grease and flour two 8 or 9-inch round cake pans. Or, even better, line the bottoms with parchment paper. This prevents sticking, which is a total mood killer.
- **Mix the Dry Stuff:** In a large bowl, whisk together the flour, sugar, cocoa powder, baking soda, baking powder, and salt. Make sure there are no lumpy bits.
- **Wet Ingredients Go In:** Add the buttermilk, oil, eggs, and vanilla extract to the dry ingredients. Beat with an electric mixer on medium speed for about 2 minutes until everything is well combined and smooth. Don’t overmix; we want tender cake, not tough cake.
- **Add the Hot Stuff:** Carefully pour in the boiling water (or coffee). The batter will be thin, and that’s totally okay! It’s what makes the cake super moist. Gently mix until just combined.
- **Bake ‘Em Up:** Divide the batter evenly between your prepared cake pans. Bake for 30-35 minutes, or until a wooden skewer inserted into the center comes out clean. **Don’t open the oven door too early!** Let those cakes rise.
- **Cool Down, Buttercup:** Let the cakes cool in the pans for about 10-15 minutes before inverting them onto a wire rack to cool completely. Patience is a virtue here; trying to frost warm cake is a one-way ticket to a crumbly mess.
- **Whip Up the Filling:** While the cakes are cooling, get started on that dreamy white chocolate filling. In a large bowl, beat the softened cream cheese and butter together until light and fluffy. Add the vanilla extract and mix. Gradually add the powdered sugar, a cup at a time, beating until smooth and creamy.
- **Fold in White Chocolate:** Pour in the melted and slightly cooled white chocolate. Mix until just combined. If it seems too thick, add a tablespoon of milk or cream. If it’s too thin, a bit more powdered sugar.
- **Ganache Time!:** For the ganache, heat the heavy cream in a small saucepan over medium heat until it just begins to simmer (don’t boil!). Remove from heat and pour it over the finely chopped semi-sweet chocolate in a heatproof bowl. Let it sit for 5 minutes, then stir gently until smooth and glossy. Stir in the butter for extra shine. Let it cool slightly and thicken for about 15-20 minutes.
- **Assemble Your Masterpiece:** Once the cake layers are completely cool, place one layer on your serving plate. Spread about half of the white chocolate filling evenly over the top. Place the second cake layer on top and spread the remaining filling. Now, pour the slightly cooled ganache over the top of the cake, letting it drip artfully down the sides. You can use an offset spatula to gently spread it if you like.
- **Chill Out:** Pop the cake in the fridge for at least 30 minutes to allow the ganache to set and the flavors to meld. Then, slice, serve, and bask in the glory!
Common Mistakes to Avoid
Nobody’s perfect, but we can learn from past culinary mishaps, right?
- **Overmixing the Batter:** This is a big no-no! Overmixing develops gluten, which leads to a tough, dry cake. Mix until *just* combined, then stop.
- **Not Cooling Cakes Completely:** Trying to frost warm cakes is a nightmare. The frosting will melt, slide off, and you’ll end up with a sad, sloppy mess. **Seriously, cool them down.**
- **Skimping on Quality Ingredients:** Especially with chocolate and butter. This cake is simple, so good ingredients really shine. Don’t cheap out, your taste buds will thank you.
- **Opening the Oven Door Too Soon:** Resist the urge to peek! Especially during the first 20 minutes of baking. It can cause your cakes to fall flat, and nobody wants a deflated dessert.
- **Rushing the Ganache:** If your ganache is too hot, it’ll just melt off the cake. Too cold, and it won’t pour smoothly. It needs to be the right consistency—thick but still pourable.
Alternatives & Substitutions
Feeling adventurous or missing an ingredient? No worries, we’ve got options!
- **Buttermilk:** No buttermilk? No problem! Just add 1 tablespoon of white vinegar or lemon juice to a measuring cup, then fill the rest with regular milk until it reaches 1 cup. Let it sit for 5 minutes before using. It’s not *exactly* the same, but it gets the job done.
- **Coffee for Water:** If you want an even more intense chocolate flavor (and let’s be real, who doesn’t?), swap the boiling water for hot brewed coffee. It really deepens the chocolate notes without making the cake taste like coffee.
- **Different Extracts:** Feel free to swap out vanilla extract for a bit of almond extract in the filling for a slightly different nuance, or even a touch of peppermint extract for a festive twist!
- **Dairy-Free:** For a dairy-free version, use dairy-free milk, dairy-free cream cheese, and dairy-free butter. Make sure your chocolate is also dairy-free. The cake will still be delicious, IMO!
- **Dark vs. Semi-Sweet Ganache:** If you’re a dark chocolate fanatic, go ahead and use darker chocolate for the ganache. Just be prepared for a more intense, less sweet topping.
FAQ (Frequently Asked Questions)
- **”Can I make this cake ahead of time?”** Absolutely! The cake layers can be baked a day in advance, cooled completely, wrapped tightly in plastic wrap, and stored at room temperature. The filling and ganache can also be made a day ahead and stored in the fridge. Assemble on the day you plan to serve.
- **”How should I store the leftover cake?”** If there *are* leftovers (a big if!), store the cake loosely covered in the refrigerator for up to 3-4 days. Bring it to room temperature for about 30 minutes before serving for the best flavor and texture.
- **”My ganache is too thick/thin! Help!”** If it’s too thick, gently warm it over a double boiler or in the microwave in short bursts (10-15 seconds), stirring until it loosens. If it’s too thin, let it cool at room temperature for a while longer, or pop it in the fridge for 10-15 minutes, stirring occasionally until it reaches the desired consistency.
- **”Can I freeze this cake?”** Yes! You can freeze individual slices or the whole cake (unfrosted layers are best, wrapped well). Thaw overnight in the fridge before frosting or serving.
- **”What if I only have one cake pan?”** No sweat! Bake one layer at a time. The remaining batter can sit at room temperature while the first layer bakes. Just make sure to re-grease and flour the pan for the second batch.
- **”Is the boiling water really necessary?”** Yes! The hot water or coffee “blooms” the cocoa powder, enhancing its flavor and making the cake incredibly moist. Don’t skip it!
Final Thoughts
So there you have it, your new go-to recipe for when you want to look like a baking superstar without actually breaking a sweat. This Chocolate Tuxedo Cake is rich, elegant, and surprisingly easy to pull off. It’s perfect for celebrations, a fancy dinner, or just because it’s Tuesday and you deserve something amazing. Now go forth, bake this beauty, and prepare for the compliments to roll in. You’ve earned ’em!


