So you’re craving something tasty but too lazy to spend forever in the kitchen, huh? Same. We’ve all been there – staring into the fridge, wishing a magical dessert would just *poof* into existence. Well, my friend, today’s your lucky day because I’m about to drop the recipe for a **Chocolate Peanut Butter Poke Cake** that’s so easy, so ridiculously delicious, you’ll wonder where it’s been all your life. Think of it as your secret weapon for looking like a baking genius with minimal effort. Ready to dive into some chocolatey, peanut buttery bliss? Let’s do this!
Why This Recipe is Awesome
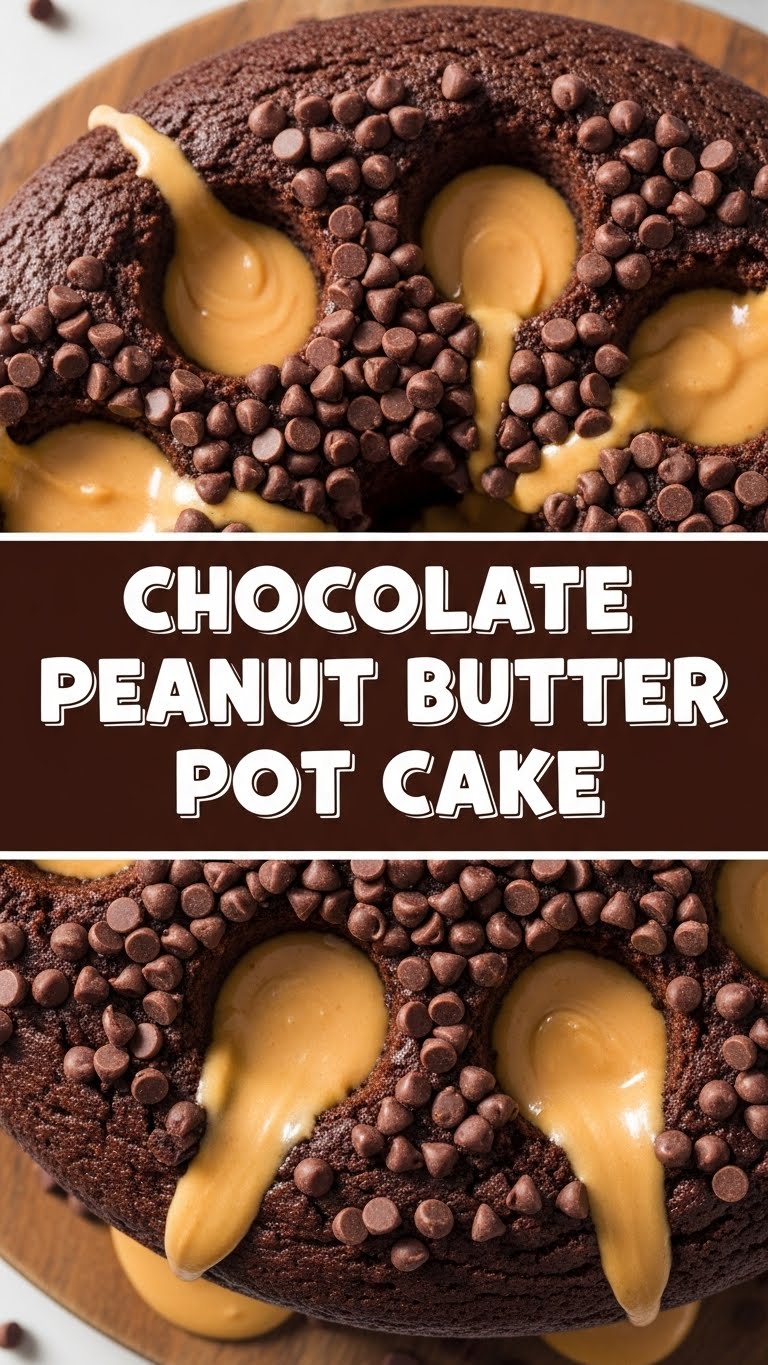
Okay, let’s be real. This isn’t just *any* cake. This is a Chocolate Peanut Butter Poke Cake. It’s basically the culinary equivalent of a warm hug from your favorite person, if that person also happened to be a genius at combining two of the best flavors on Earth. Why is it so awesome, you ask?
- First, it’s **idiot-proof**. Seriously, even I, a person whose kitchen sometimes looks like a culinary crime scene, managed to nail this.
- Second, it uses a boxed cake mix. Don’t judge! It’s a shortcut to happiness, and we’re all about efficiency here.
- Third, the “poke” part? That’s where the magic happens. We’re talking about a moist, rich cake infused with a sweet peanut butter sauce. It’s like a flavor bomb in every single bite.
- And finally, it combines chocolate and peanut butter. Do I really need to elaborate? It’s a match made in dessert heaven, and your taste buds will send you thank-you notes.
Ingredients You’ll Need
Alright, gather your troops! Most of these you probably already have lurking in your pantry, waiting for their moment to shine. No fancy-schmancy, hard-to-find stuff here, just good old deliciousness.
- 1 box (approx. 15.25 oz) chocolate cake mix: Your trusty starting block. Any brand works!
- Ingredients required by cake mix: Usually eggs, oil, and water. Follow the box directions, my friend.
- 1 (14 oz) can sweetened condensed milk: This is the secret weapon for moisture and sweetness. Do NOT substitute this.
- 1 cup creamy peanut butter: We’re talking regular, smooth peanut butter here. Jif, Skippy, whatever your heart desires.
- 1/2 cup (1 stick) unsalted butter, softened: Real butter, because flavor.
- 2 cups powdered sugar (confectioners’ sugar): For that dreamy frosting.
- 1/4 cup milk (or heavy cream for extra richness): Just a splash to get the right frosting consistency.
- Optional: Chocolate chips, chopped Reese’s peanut butter cups, or a chocolate drizzle for garnish. Go wild!
Step-by-Step Instructions
Get ready to create some magic. These steps are super straightforward, so no need to panic. You’ve got this!
- Bake the Cake: First things first, prepare your chocolate cake mix according to the package directions. Pour the batter into a greased 9×13-inch baking pan and bake as instructed. Once done, let it cool on a wire rack for about 10-15 minutes. Don’t rush this part; we need it slightly cooled but still warm.
- Poke ‘Em Up: Now for the fun part! While the cake is still warm (but not scorching hot), grab the handle of a wooden spoon or a similar round object. **Gently poke holes all over the top of the cake, about 1 inch apart.** Make sure the holes go deep but don’t tear the cake to shreds. We’re making little tunnels for the goodness to seep into.
- Whip Up the Peanut Butter Magic: In a microwave-safe bowl, combine the sweetened condensed milk and 1/2 cup of your creamy peanut butter. Microwave it on high for about 60-90 seconds, stirring halfway through, until the mixture is smooth and runny. Alternatively, you can do this over low heat on the stovetop.
- Drown That Cake: Pour the warm peanut butter mixture evenly over the poked cake. Make sure it drips into all those lovely holes you created. Use a spatula to gently spread it if needed. This is where the “poke” cake truly gets its amazing moisture and flavor!
- Chill Out: Cover the cake loosely with plastic wrap and pop it in the fridge for at least 2 hours. Even better, let it chill overnight. This gives the sauce time to really soak in and transform the cake into something truly epic. Patience, my friend, it’s worth it.
- Frosting Time! Once the cake is chilled, it’s time for the crowning glory. In a medium bowl, beat the softened butter and the remaining 1/2 cup of creamy peanut butter together until light and fluffy. Gradually add the powdered sugar, one cup at a time, mixing well after each addition.
- Smooth It Out: Add the milk (or cream), one tablespoon at a time, until you reach your desired frosting consistency – smooth, creamy, and spreadable. Don’t be afraid to taste test and adjust!
- Frost and Decorate: Spread that glorious peanut butter frosting all over your chilled poke cake. If you’re feeling fancy, sprinkle with chocolate chips, crushed Reese’s cups, or a drizzle of melted chocolate. Cut into squares and prepare for compliments!
Common Mistakes to Avoid
Even though this recipe is pretty foolproof, there are a few rookie errors that can happen. Learn from my past kitchen mishaps!
- **Not cooling the cake enough before poking:** If the cake is too hot, it’ll just tear apart when you poke it. Aim for warm, not scalding.
- **Being too gentle with the poking:** Don’t be shy! Those holes need to be deep enough for the sauce to really penetrate. We’re not tickling the cake, we’re making portals.
- **Using crunchy peanut butter for the poke sauce:** This might sound like a fun textural adventure, but those peanut chunks will clog your precious poke holes. Stick to creamy for the sauce part, please.
- **Skipping the chilling time:** I know, I know, it’s hard to wait. But the chilling time is CRUCIAL for the sauce to fully absorb and create that signature moist, infused texture. **Don’t skip the fridge!**
- Thinking you can just “taste test” half the frosting and still have enough for the cake. (Not that I’ve ever done that… ahem.)
Alternatives & Substitutions
Feeling a little creative? Here are a few ways to tweak this masterpiece without messing it up:
- Cake Mix: Any chocolate cake mix works wonders. Want to go darker? Use a dark chocolate fudge mix. Feeling adventurous? A yellow cake mix with the chocolate-peanut butter combo is actually pretty amazing too!
- Peanut Butter: While creamy is king for the poke sauce, if you absolutely must use natural peanut butter, make sure it’s well-stirred and smooth. For the frosting, natural can work, but you might need to adjust the amount of powdered sugar or milk to get the right consistency. **IMO, stick to the classic for best results.**
- Toppings Galore: Beyond chocolate chips or Reese’s, consider chopped salted peanuts for a sweet and salty crunch, mini chocolate candies, a drizzle of caramel, or even a dusting of cocoa powder.
- Frosting Flavors: Not a fan of peanut butter frosting? You can totally swap it out for a simple chocolate ganache, a cream cheese frosting, or even a store-bought chocolate frosting if you’re really pressed for time. (But the PB frosting really seals the deal, FYI!)
FAQ (Frequently Asked Questions)
Got questions? I’ve got answers, delivered with a side of sass.
- Can I make this ahead of time? Absolutely! This cake actually gets better overnight, like a fine wine (but, you know, cake). The flavors meld, and the moisture level reaches peak perfection.
- What if I don’t have a wooden spoon handle for poking? No worries! A fork works in a pinch (just make lots of holes), or even the back of a chopstick or a skewer. Just make sure whatever you use is clean and creates decent-sized holes.
- My peanut butter poke sauce is too thick/thin, help! If it’s too thick, pop it back in the microwave for another 15-30 seconds, or add a tiny splash of milk and stir. If it’s too thin, it’ll still work, but you can try chilling it briefly to firm it up a bit before pouring.
- Is this cake kid-friendly? Is water wet? It’s chocolate and peanut butter! Kids (and adults who are basically big kids) will absolutely devour this. Prepare for sticky faces and happy grins.
- How long does this cake last? Stored in an airtight container in the fridge, it’ll last 3-4 days. But let’s be honest, it rarely makes it past day two in my house, LOL.
- Can I use light or reduced-fat peanut butter? You can, but expect a slight difference in texture and richness. The full-fat stuff definitely gives the best flavor and creamy mouthfeel. Why go halfway on happiness?
- Can I freeze this cake? Yes! Unfrosted cake (after the poke sauce has soaked in) freezes well for up to a month. Thaw in the fridge, then frost and serve.
Final Thoughts
See? Told you it was easy! Now you have a secret weapon in your baking arsenal – a show-stopping, crowd-pleasing Chocolate Peanut Butter Poke Cake that requires minimal effort but delivers maximum deliciousness. Go ahead, bask in the glory, accept the compliments, and maybe even share a slice (or five). You’ve earned it! Now go impress someone—or yourself—with your new culinary skills. Don’t forget to savor every single, glorious bite.


