So, you’ve got that irresistible chocolate craving hitting you hard, but the thought of spending hours in the kitchen sounds like a nightmare? Trust me, I get it. We all want that warm, gooey, chocolatey hug without the commitment. Good news, my friend! This isn’t one of those “only on special occasions” kind of cakes. This is your “I-need-chocolate-and-I-need-it-now” kind of cake, and it comes with frosting that’ll make you question all your life choices (in a good way, obviously). Let’s get this party started, shall we?
Why This Recipe is Awesome
Because, unlike my last attempt at sourdough, this recipe is practically **idiot-proof**. Seriously, even if your baking experience extends only to microwaving popcorn, you’ve got this. It’s quick enough for a weeknight craving, impressive enough for unexpected guests (who knew you were such a domestic god/goddess?!), and it uses ingredients you probably already have lurking in your pantry. No fancy-schmancy techniques, no hours of chilling, just pure, unadulterated chocolate bliss. Plus, the frosting is so good, you might just eat it with a spoon. No judgment here, I’ve done it.
Ingredients You’ll Need
Gather ’round, my sweet-toothed conspirators! Here’s your toolkit for deliciousness:
- All-Purpose Flour: The backbone of any good cake. Don’t worry, it won’t judge your baking skills.
- Granulated Sugar: Sweetness personified. Because life’s too short for unsweetened cake.
- Unsweetened Cocoa Powder: The star of the show! Make sure it’s good quality; your taste buds will thank you.
- Baking Soda & Baking Powder: Our leavening dream team. They work harder than I do on a Monday morning to make your cake rise.
- Salt: Just a pinch! It makes all the other flavors sing. Don’t skip it, even if you think it’s weird.
- Milk: Any kind will do – whole, 2%, almond, oat… pick your poison!
- Vegetable Oil: Keeps the cake super moist. Don’t try to substitute with olive oil unless you want an… interesting flavor profile.
- Eggs: Two large ones, please. They’re the glue that holds this whole delicious operation together.
- Vanilla Extract: A dash of magic. Don’t buy the “imitation” stuff unless you truly hate joy.
- Boiling Water (or hot coffee!): This is the secret weapon for an extra rich, moist cake. Trust me on this one.
For the Chocolate Frosting:
- Unsalted Butter: Room temperature is key! Cold butter is the enemy of smooth frosting.
- Powdered Sugar (Confectioners’ Sugar): For that silky, melt-in-your-mouth texture. Sifting it is a good idea unless you like lumps.
- Unsweetened Cocoa Powder: More chocolate! Because why not?
- Milk or Cream: Just a splash to get that perfect consistency.
- Vanilla Extract: Again, pure vanilla, please!
- Pinch of Salt: Balances the sweetness, elevates the chocolate. It’s a miracle worker.
Step-by-Step Instructions
Preheat & Prep: First things first, get your oven ready. Crank it up to 350°F (175°C). Grab a 9×13 inch baking pan, grease it, and dust it with a little cocoa powder or flour. This prevents sticking and ensures a beautiful release. Nobody wants a stuck cake.
Dry Mix It Up: In a large bowl, whisk together your flour, sugar, cocoa powder, baking soda, baking powder, and salt. Make sure there are no lumpy bits. You want everything well combined and airy. Think of it as a warm-up for your whisking arm.
Wet Ingredients Join the Party: Add the milk, vegetable oil, eggs, and vanilla extract to your dry mixture. Beat with an electric mixer (or a strong arm!) on medium speed for about 2 minutes. Scrape down the sides of the bowl to make sure everything gets incorporated. We’re aiming for smooth here, people.
The Secret Weapon: Carefully, pour in the boiling water (or hot coffee!) and mix on low speed until just combined. The batter will be thin—don’t panic! This is totally normal and actually a good sign. It’s what gives the cake its incredible moisture. Do NOT overmix at this stage; just combine.
Bake It Off: Pour your lovely thin batter into your prepared pan. Pop it into the preheated oven and bake for 30-35 minutes. You’ll know it’s done when a toothpick inserted into the center comes out clean. If it’s still gooey, give it a few more minutes. Patience, young Padawan!
Cool Down: Once baked, let the cake cool in the pan on a wire rack for at least 30 minutes, or until completely cool. Trying to frost a warm cake is a recipe for a melted, messy disaster. Learn from my past mistakes.
Frosting Time! While the cake chills out, make your frosting. In a large bowl, beat the softened butter until light and fluffy. Gradually add the powdered sugar, cocoa powder, and salt, alternating with splashes of milk/cream, until you reach a smooth, spreadable consistency. Beat in the vanilla extract last. If it’s too thick, add a tiny bit more milk; too thin, add more powdered sugar. It’s an art, not a science!
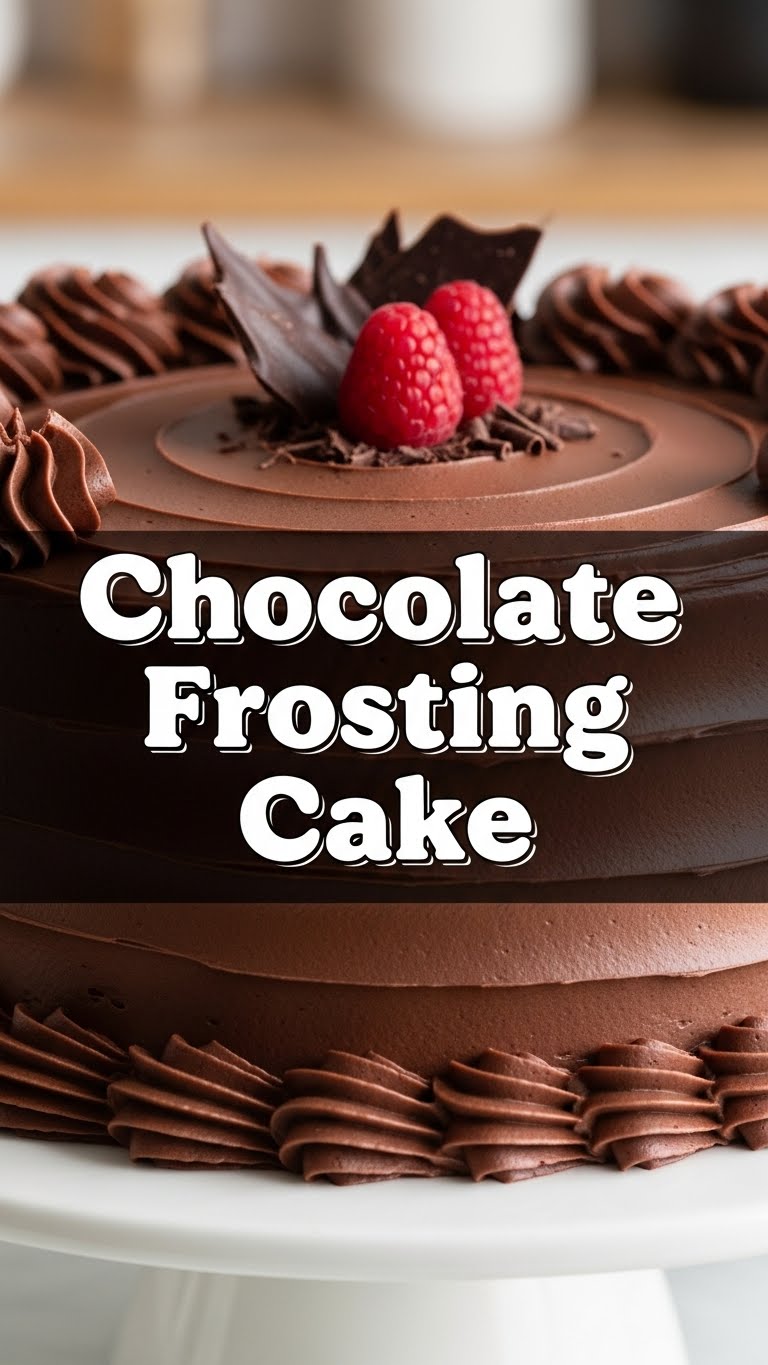
Glorious Finale: Once the cake is completely cool, slather on that glorious chocolate frosting. Spread it evenly, or go wild with swirls—it’s your masterpiece! Cut, serve, and bask in the adoration.
Common Mistakes to Avoid
- Not Preheating the Oven: This isn’t a suggestion, it’s a command! A cold oven will mess with your cake’s rise and texture. Rookie mistake!
- Overmixing the Batter: Once the flour goes in, mix only until just combined. Overmixing develops the gluten too much, leading to a tough, dense cake. Nobody wants a hockey puck.
- Frosting a Warm Cake: I already warned you, but it bears repeating. Unless you’re going for a lava cake aesthetic (which, fine, but that’s not what we’re doing here), let that cake cool completely.
- Skipping the Salt: Seriously, it makes a difference. It’s not just for savory dishes!
- Eyeballing Ingredients: Baking is a science, not like cooking a stir-fry where “a little of this, a little of that” works. Measure accurately, especially for the dry ingredients.
Alternatives & Substitutions
- Dairy-Free Delight: Swap regular milk for almond, soy, or oat milk, and use a dairy-free butter alternative for the frosting. Easy peasy!
- Coffee Kick: Instead of boiling water, use hot brewed coffee for an even deeper, richer chocolate flavor. It really intensifies the cocoa without making the cake taste like coffee. Highly recommended, IMO!
- Spice It Up: Add a pinch of cinnamon or a tiny dash of cayenne pepper to the dry ingredients for a subtle, unexpected warmth. Trust me, it works!
- Flavor Boost: For the frosting, try adding a tablespoon of espresso powder for extra depth, or a splash of peppermint extract for a festive twist.
- Sugar Swap? While technically possible to reduce sugar slightly, I wouldn’t go wild. It affects not just sweetness but also moisture and texture. For your first go, stick to the recipe.
FAQ (Frequently Asked Questions)
- “Can I use margarine instead of butter?” Well, technically yes, but why hurt your soul like that? Butter just tastes better and gives a superior texture to the frosting. If you must, use a high-quality stick margarine.
- “My frosting is too thin/thick! Help!” Don’t panic! Too thin? Add more powdered sugar, a tablespoon at a time. Too thick? Add more milk or cream, a teaspoon at a time. It’s all about finding that perfect, spreadable consistency.
- “How long does this cake last?” Covered tightly at room temperature, it’s usually good for 3-4 days. If you manage to make it last that long, you have more willpower than I do.
- “Can I bake this in different sized pans?” Sure! For cupcakes, reduce baking time to 18-22 minutes. For two 8-inch round cakes, reduce baking time to about 25-30 minutes. Just keep an eye on it!
- “What if I don’t have an electric mixer?” You’ll get a killer arm workout! You can totally make this cake by hand, but be prepared for a bit more effort, especially for the frosting to get it super fluffy.
- “Is this suitable for a fancy dinner party?” Absolutely! Dress it up with some fresh berries, chocolate shavings, or a dusting of cocoa powder. **FYI**, it looks way more effortful than it actually is.
Final Thoughts
And there you have it, folks! Your new go-to chocolate cake recipe. It’s delicious, it’s easy, and it’s guaranteed to make you feel like a culinary rockstar without breaking a sweat. So go ahead, whip up a batch, impress your friends, or just hoard it all to yourself (no judgment, I told you!). You deserve a little chocolatey heaven in your life. Now go forth and bake with confidence! You’ve earned it!

